Did you know it’s National Pancake month? My kids think it should be pancake day, everyday. During this cold, snowy winter I felt the need for something sweet and summery. Strawberry shortcake is one of my favorite desserts so I decided to create some strawberry shortcake pancakes!

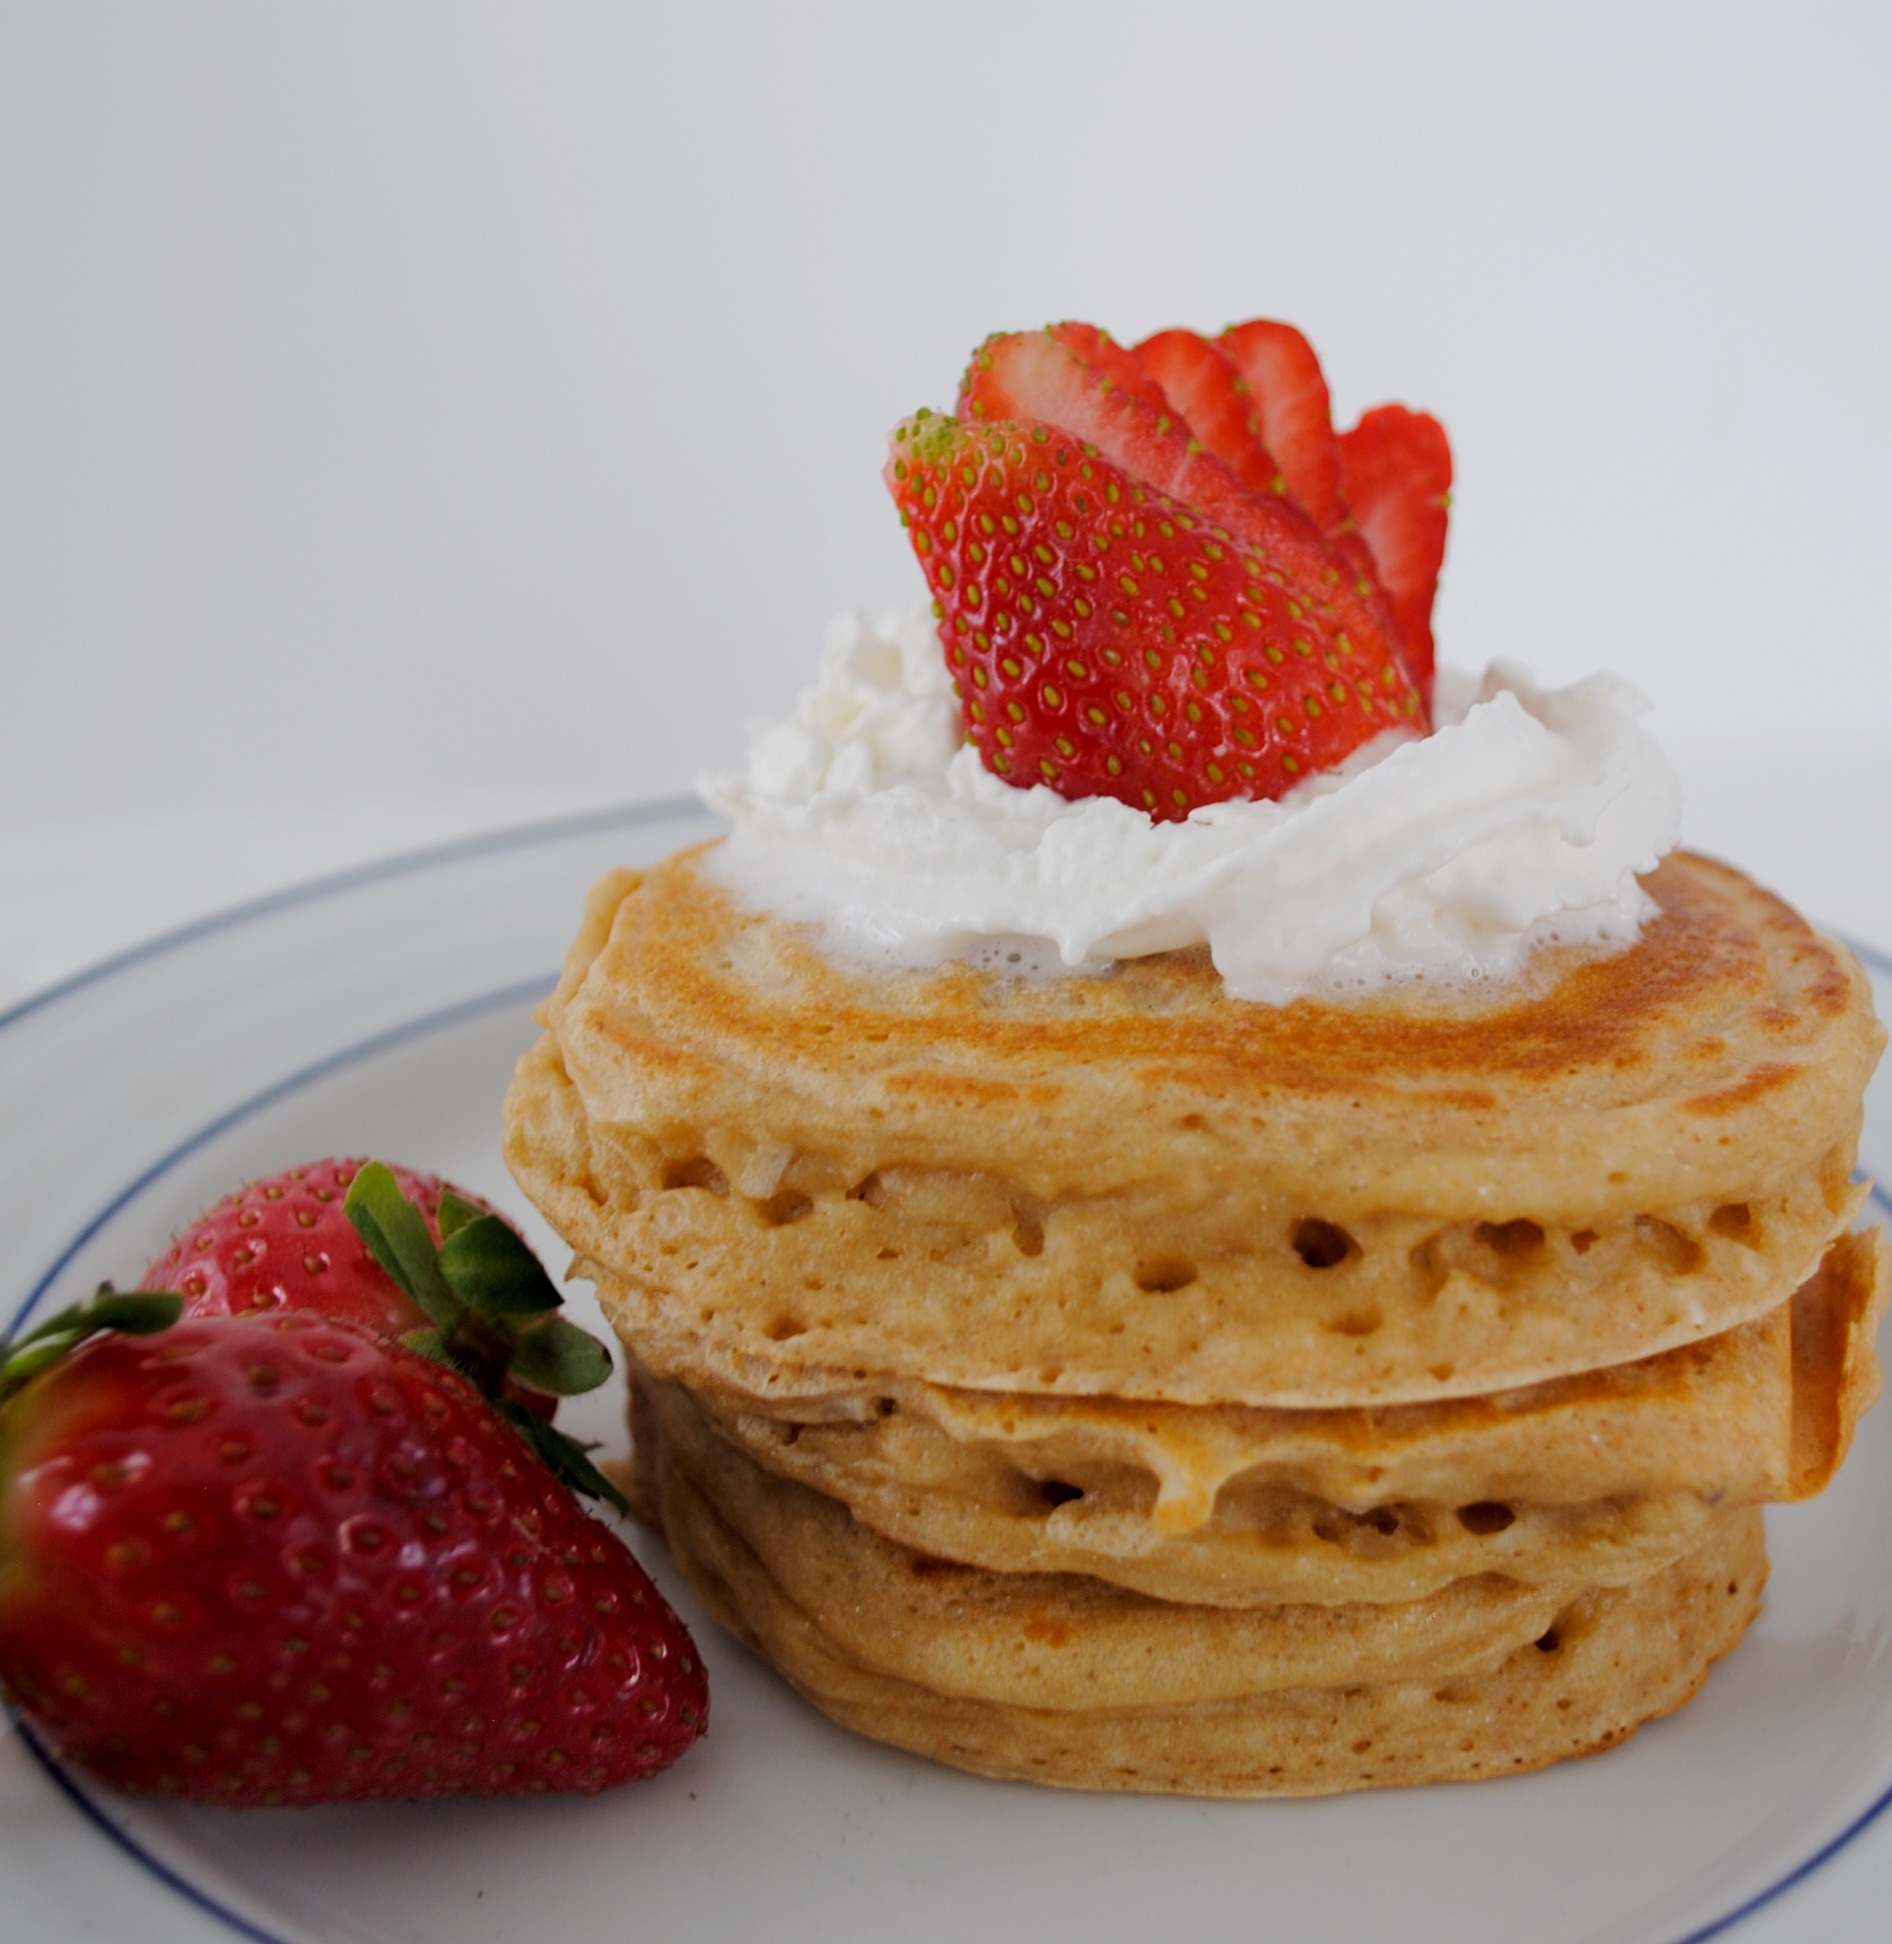
This is a pretty easy pancake from scratch recipe. {I usually keep a batch of dry pancake mix on hand for when my little ones request pancakes. It’s a lot faster to just add one egg, one cup of yogurt and one cup of milk on a busy weekday morning.} The pancakes are a little on the thick side, kind of what you would expect from a strawberry shortcake dessert. Whipped cream is a must…my kitchen helpers love to do it themselves. Which means they put on way too much! I can’t help but laugh because I love whipped cream nearly as much as they do.

chopped strawberries for pancakes

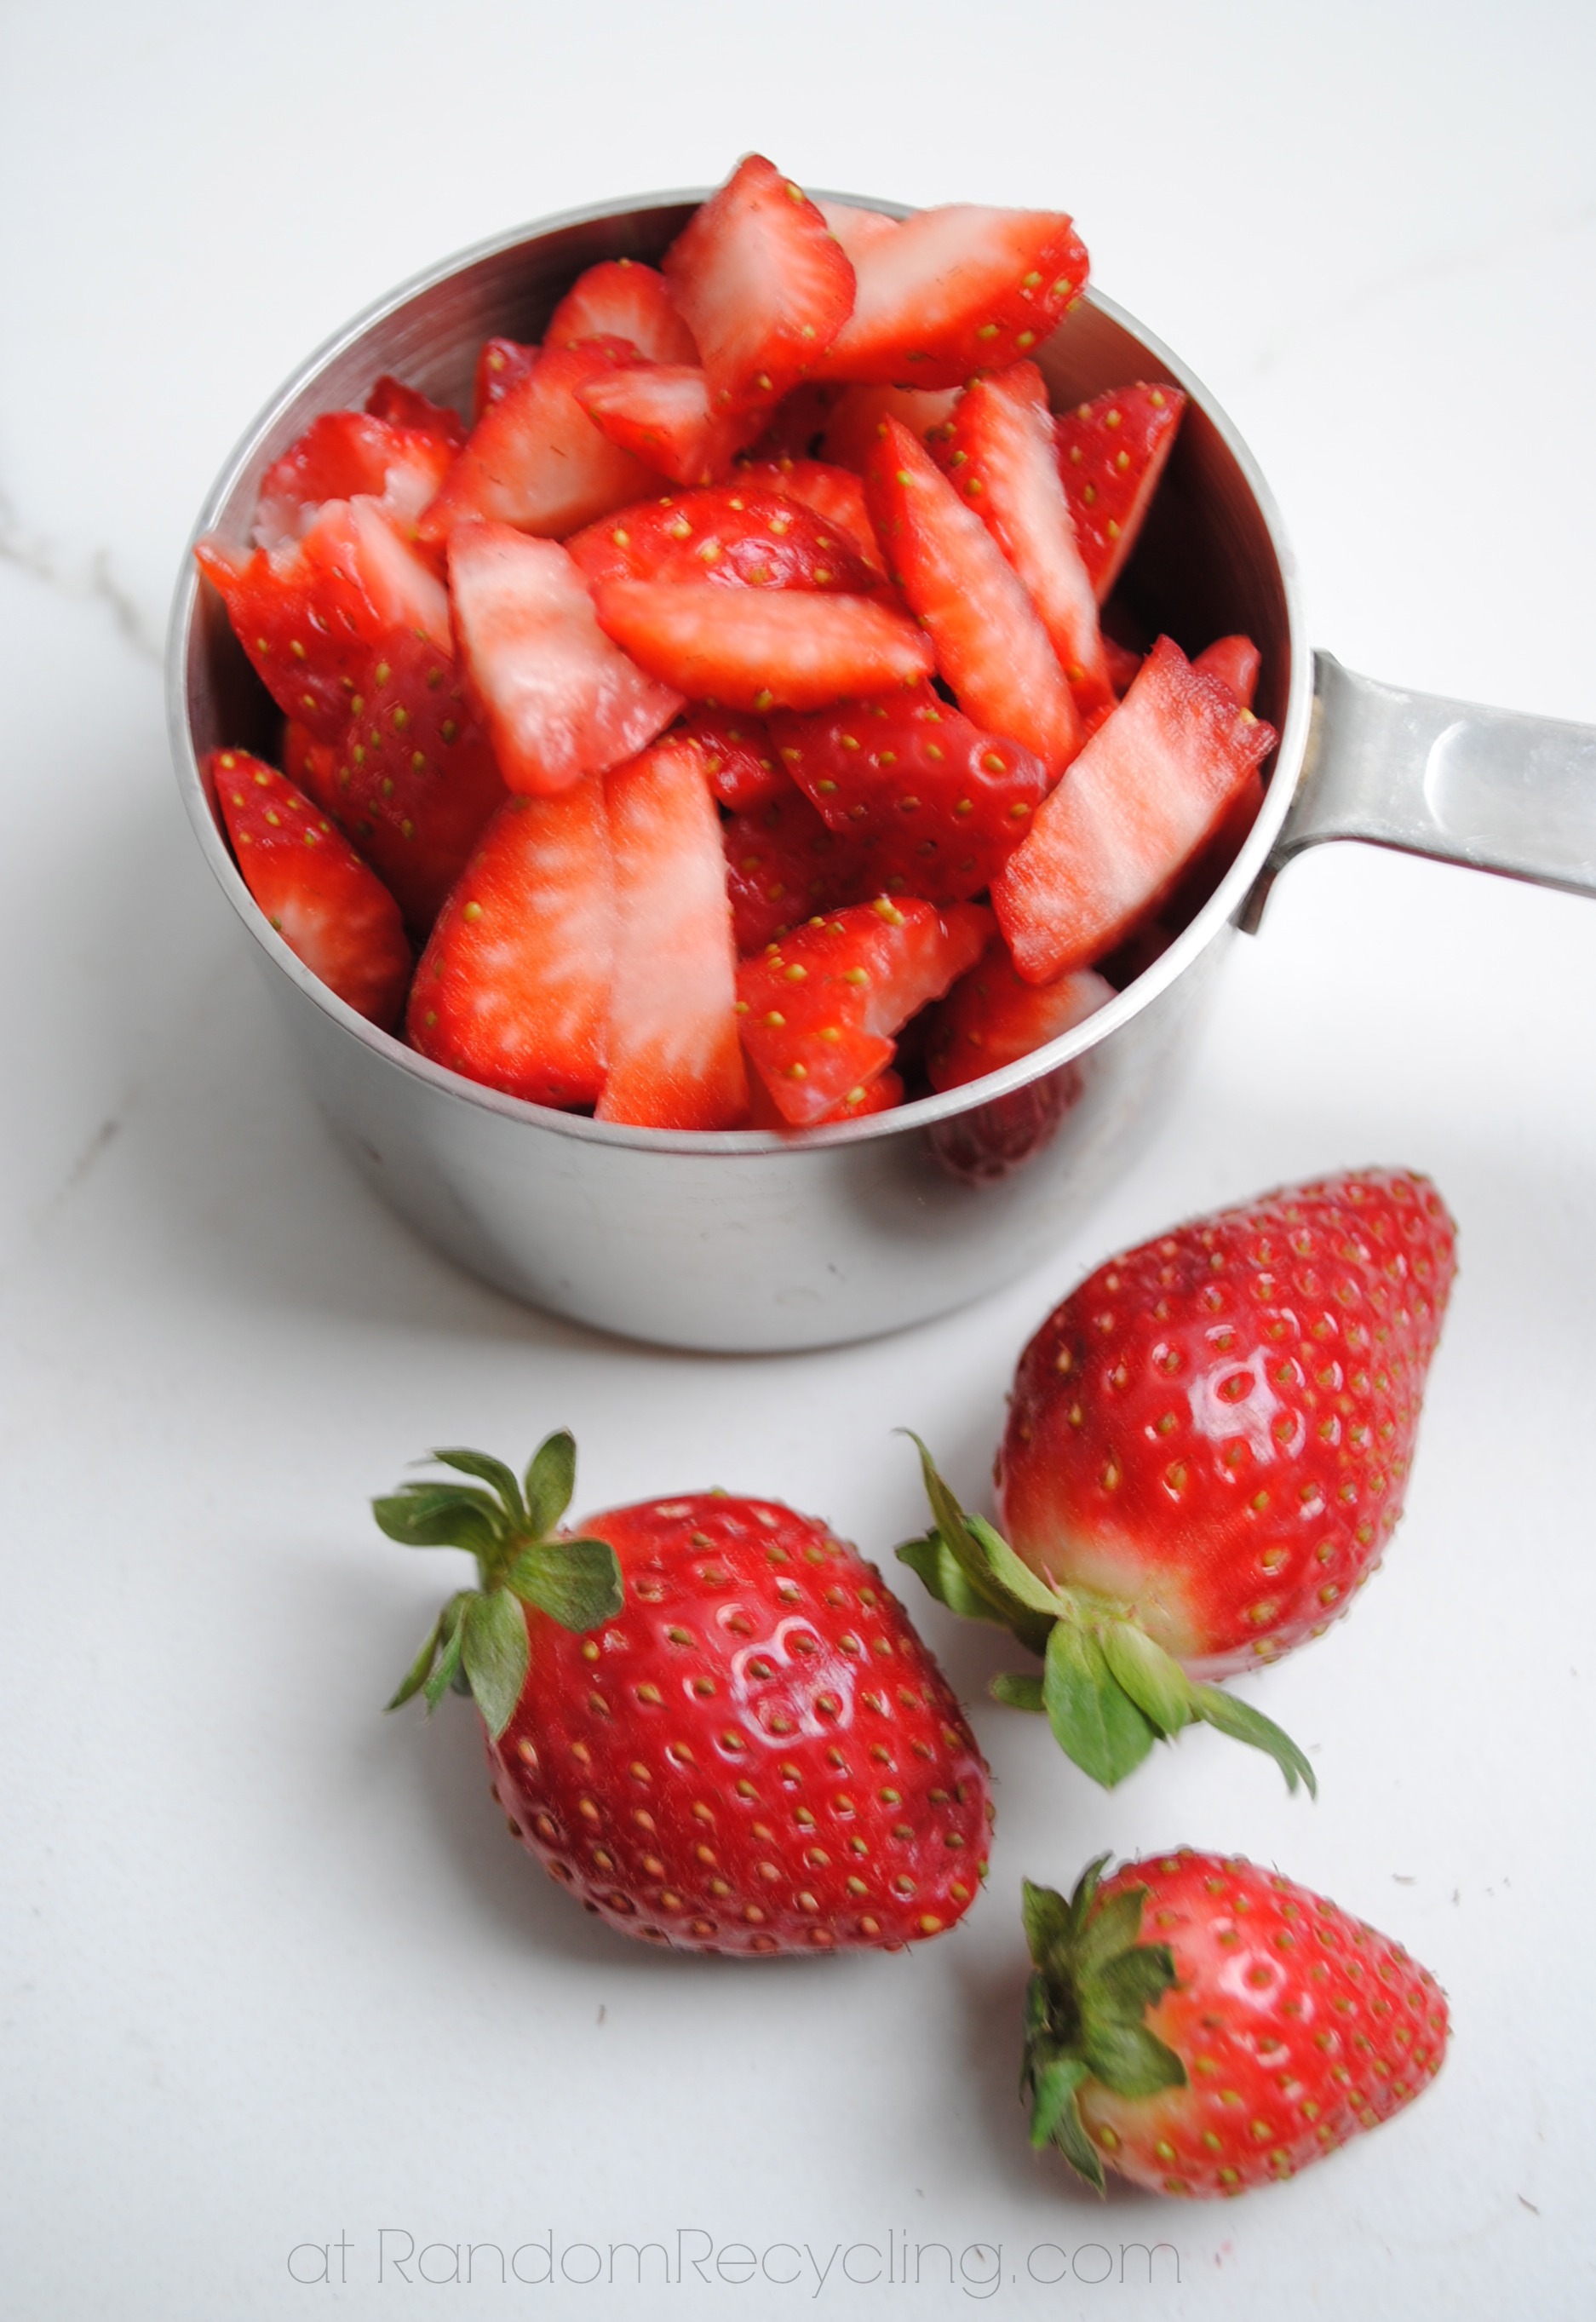
I use a strawberry huller to save as much of the strawberry as possible. The kids like to help out with this task while I prep the ingredients. Then they take turns stirring- one stirs the dry ingredients and the other one stirs the wet ingredients.

kids in the kitchen

My kitchen helpers.

One new trick for cooking pancakes- brush the griddle with coconut oil to make it non-stick. It gives it a nice crisp finish and is healthier than a lot of the cooking sprays on the market.

whipped cream and strawberry shortcake pancake

The pancakes turned out delicious and everyone enjoyed overindulging in whipped cream. The strawberries went fast too…I can’t believe how fast the kids will polish off a box of strawberries.

Strawberry Shortcake Pancakes

Course: Breakfast
Cuisine: American
Keyword: Pancakes

Ingredients

  • 2 cups white whole wheat flour
  • 1/4 cup old fashioned oats
  • 2 tsp baking powder
  • 1 tsp baking soda
  • 1/2 tsp salt
  • 1/4 cup unsweetened coconut
  • 2 eggs lightly beaten
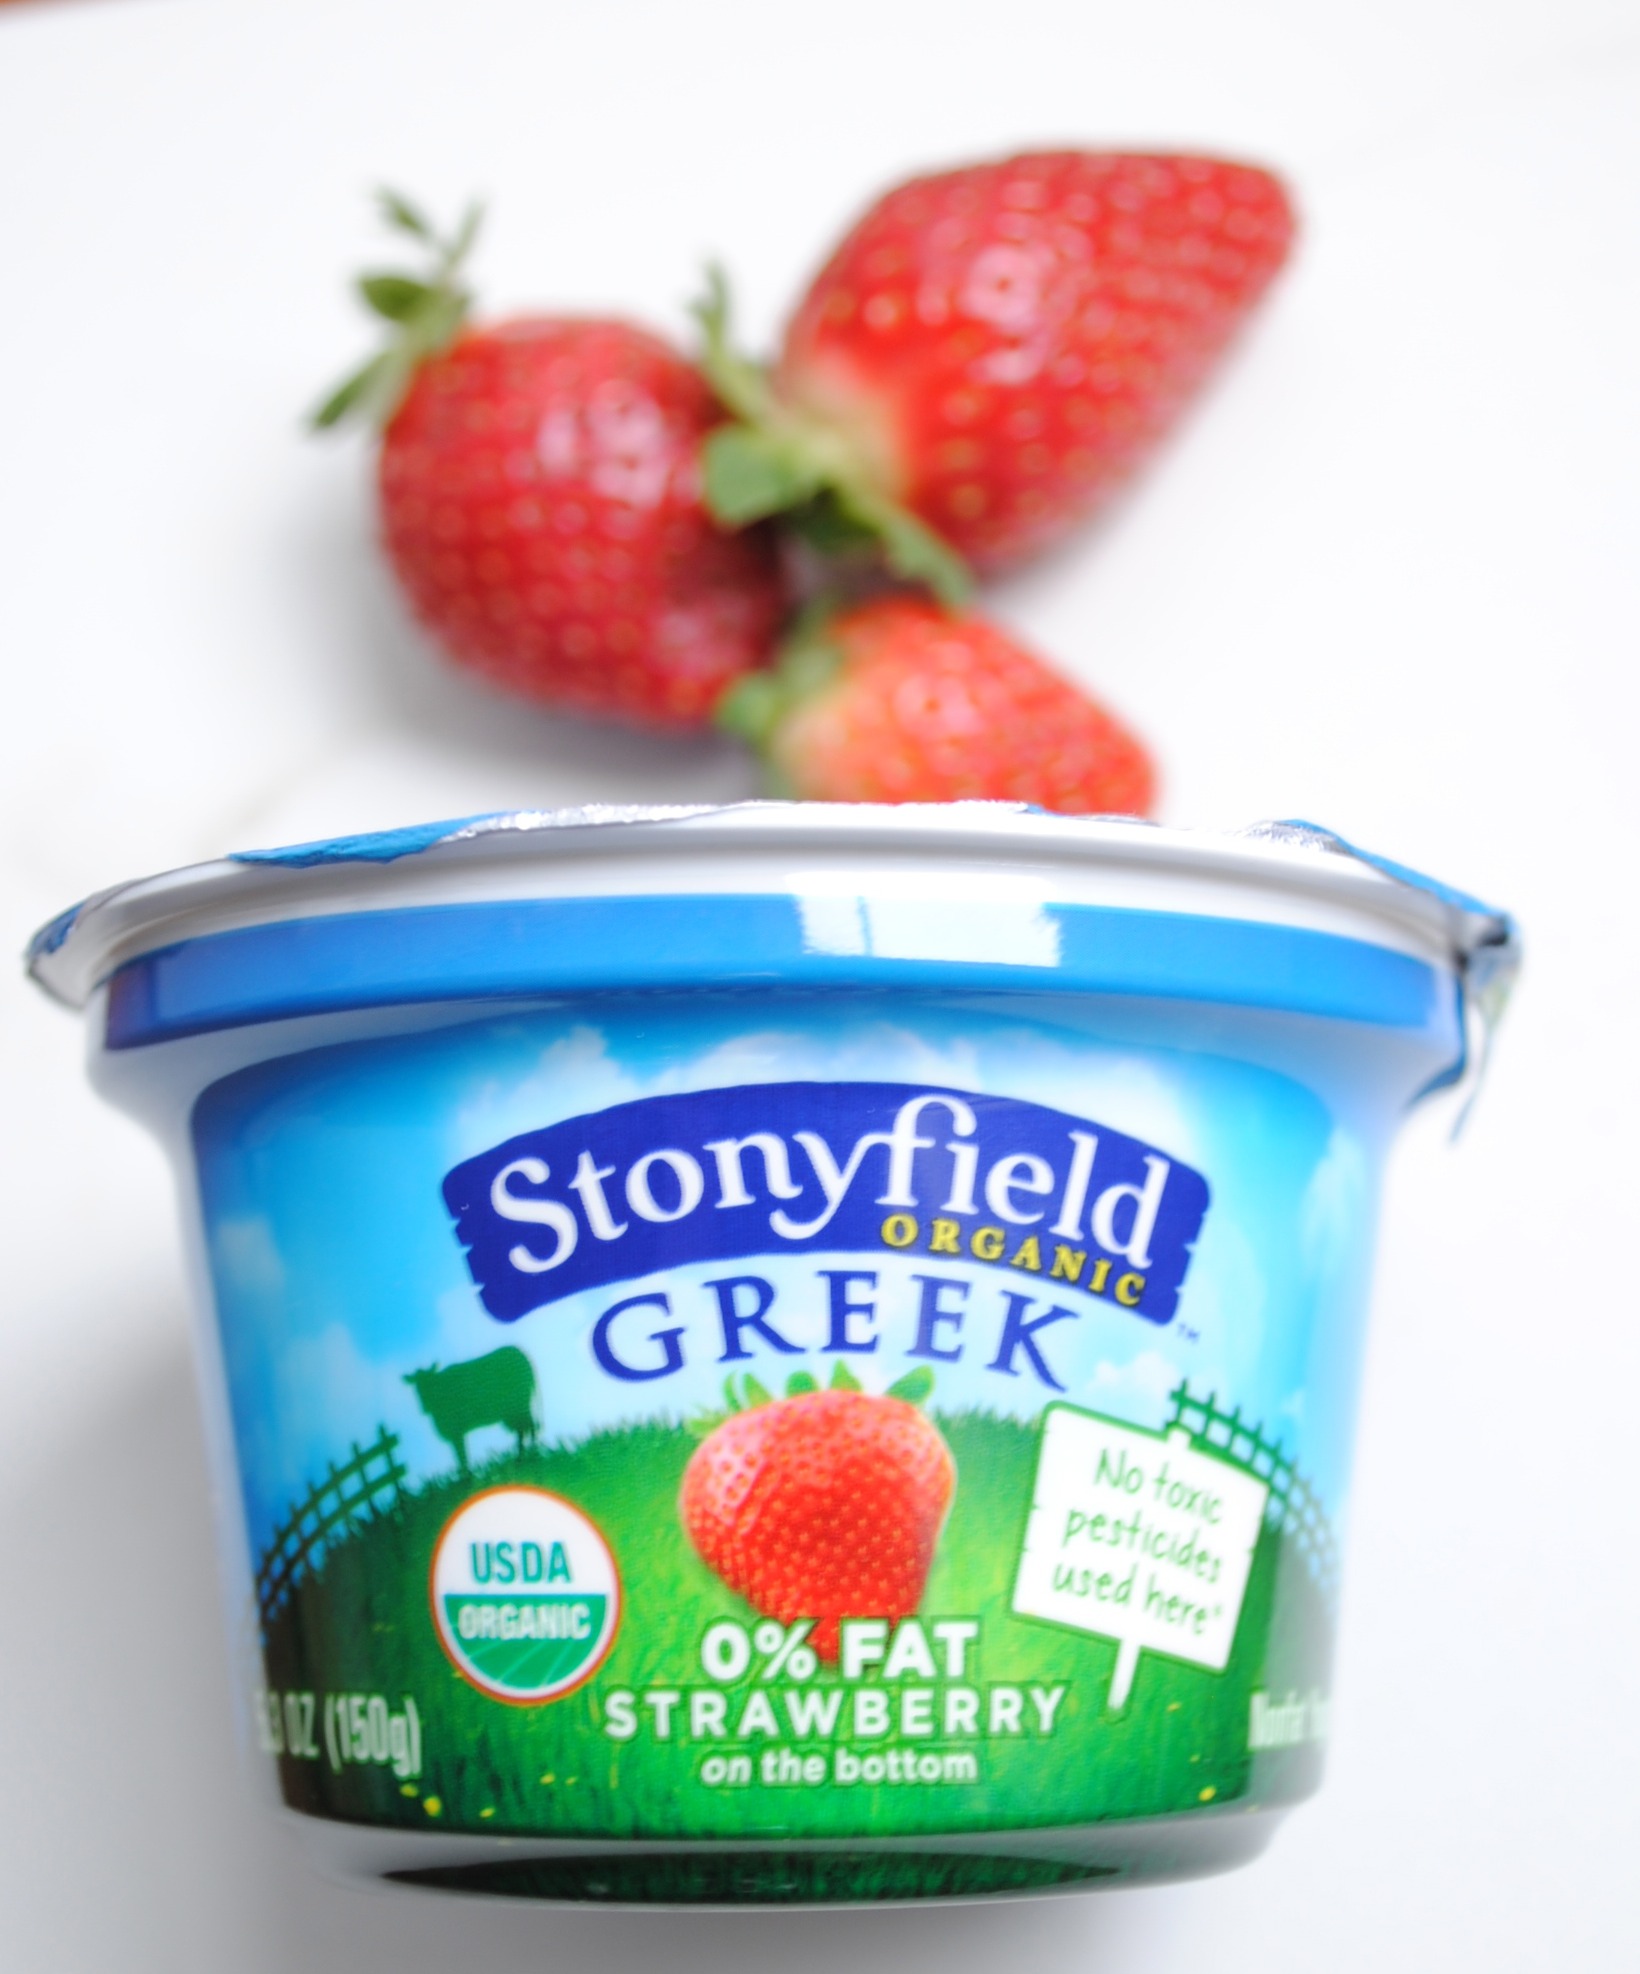
  • 5.3 oz Stonyfield Strawberry Greek yogurt
  • 1 1/4 cup milk
  • 1 cup chopped strawberries
  • whipped cream

Instructions

  • Combine all dry ingredients in a large bowl.
  • Add wet ingredients to dry ingredients and combine well.
  • Fold in strawberries.
  • On a hot griddle or skillet, brush with coconut oil.
  • Over medium-hot heat, drop rounds of batter and let cook until bubbles begin to pop in center of pancake, about 2 minutes.
  • Flip pancake and cook for an additional minute.
  • Serve immediately or cool on a rack completely before storing (or freezing.)
  • Serve with whipped cream in layers. {or syrup, or both!}

Notes

Yield: Makes 16 small pancakes
Tried this recipe?Mention @emilyroachwellness or tag #erwellness!

I am a Stonyfield Clean Plate Club Ambassador and created this recipe for them using their Organic Greek Yogurt. 

stonyfield greek strawberry yogurt

As a Stonyfield Clean Plate Club Ambassador, I get to try new products sometimes, like Late July Organic chips. My kids are so lucky…delicious chips and a healthy yogurt dip?! All opinions shared here are my own, or my kids.

As Superbowl week arrives, some of you may be planning a little party. Some of you may be committed to healthy eating after the sins of holiday overindulgences. Today I’m sharing a healthy recipe for Cucumber Dill Yogurt Dip that is perfect to serve your guests. It has a lot of flavor, yet is healthy with a big dose of Greek Yogurt. It was a big hit with everyone in the family and we quickly polished off the dip and chips after lunch. Those lucky taste testers!

cucumber dill greek yogurt dip. Party dip appetizer.

While I wish our Patriots were going to be in the Superbowl, at least we will enjoy the game in sunny Florida with family. I plan to make the dip again down there as it will be light and refreshing, and pair it with the Dude Ranch flavor of Late July chips. Or maybe the Sea Salt to the Seashore because I just love the name. Fun fact~ Late July was started by the daughter of the guy who started Cape Cod Potato Chips. Clearly good taste runs in the family.

late july chip case giveaway

After the recipe, enter to win a case of Late July Chips (7 bags!) and also Stonyfield Yogurt. Leave a comment on this post and share whether or not you will be watching the Superbowl this year. Contest will be open until Feb 3rd.  US residents only please. 

cucumber dill greek yogurt dip. Party dip appetizer.

Cucumber Dill Yogurt Dip

Course: Appetizer
Keyword: Dip

Ingredients

  • 2 small cups of Stonyfield Plain Greek Yogurt
  • 1/2 of an English cucumber
  • 1 tablespoon chopped dill
  • 1 clove of garlic minced
  • 1/2 teaspoon kosher salt

Instructions

  • Peel English cucumber and use half. Cut lengthwise and scrape out the seeds.
  • Chop the cucumber and add to the yogurt in a bowl.
  • Add dill, garlic and salt.
  • Mix well and serve chilled.
  • This amount pairs well with one bag of chips. Increase the recipe as needed for a crowd.
Tried this recipe?Mention @emilyroachwellness or tag #erwellness!


late july organic dude ranch chips

On a cold snowy day, this easy banana bread recipe for the bread maker will make your house smell delicious. I love being able to dump all the ingredients into the bread maker because it means less dishes for me to clean! Next time you have some overripe bananas that need to be used up, break out the bread maker and enjoy.

Why do those bananas turn brown so fast sometimes? One reason is you may be storing them too close to your apples. Apples “off-gas” and it can spoil other fruits and vegetables. I suggest keeping apples in a separate spot, or transfer them to the fridge and keep in a container with some paper towels to absorb any moisture.

You can play around with this easy banana bread recipe in your bread maker. Add nuts, or keep it nut free and safe for school lunches. Try a gluten-free flour mix, like the one from Bob’s Red Mill’s, and see what you think.

We use the Breville Bread Maker and have been very happy with it. The shape of the bread always comes out great and there are no clumps of flour, even if I don’t scrape down the sides. Making your own banana bread in the bread maker is quick and a healthier alternative to packaged banana breads that are full of questionable preservatives.

banana nut bread recipe for bread machine

One tip I got from my mother-in-law was to take the overripe bananas, peel them, then freeze in batches of three. That will generally give you the 1 1/2 cups of mashed bananas you need for most recipes. I keep loads of bananas peeled and ready to go for our green smoothies kids will love.

Bread maker banana bread recipe

BANANA BREAD RECIPE IN THE BREAD MAKER

Course: Breakfast
Keyword: bread

Ingredients

  • 1/4 cup of yogurt
  • 1/4 cup of milk
  • 1/3 cup room temperature butter cut into 1/2'' pieces
  • 1/3 cup applesauce
  • 2 eggs at room temperature
  • 1 1/2 teaspoons vanilla extract
  • 1 1/2 cups mashed bananas. typically 3 bananas
  • 2 2/3 cups all purpose or white whole wheat flour
  • 1 teaspoon salt
  • 3/4 cup sugar
  • 1/4 cup brown sugar
  • 1 teaspoon baking powder
  • 1 1/2 teaspoon baking soda
  • 3/4 cup chopped walnuts

Instructions

  • Add ingredients to the bread machine in the order listed. Add walnuts to fruit/nut dispenser (on Breville model, or add to bread pan directly.)
  • Place pan in bread machine and set to Quick loaf, or appropriate setting for non-yeast bread.
  • Press start. Scrape sides (if you remember, otherwise don't worry) after first few minutes of the mixing cycle.
  • Remove bread pan when timer finishes. Let cool for 5 minutes, then remove bread carefully and let cool for another 15 minutes. This cuts down on the crumble factor, but it will be really hard to wait!

Notes

Note~ you could also replace the yogurt and milk with 1/4 cup of buttermilk. I generally don’t buy buttermilk but always have my homemade yogurt on hand to use in recipes. We also use our homemade applesauce in this recipe. I replaced some of the butter called for in the original recipe with the applesauce to make it healthier.
Tried this recipe?Mention @emilyroachwellness or tag #erwellness!

Bread maker banana bread recipe

READY TO GO MAKE AN EASY BANANA BREAD IN YOUR BREAD MAKER? ENJOY!

As 2013 comes to a close, I like to review what blog posts were most popular among my readers. I write here to share our healthy living experiences in the hopes that others may find an idea, or two, to incorporate into their lifestyle. Below is a recap of the Top 10 Most Popular Posts on Random Recycling. What this doesn’t cover is what people say to me offline when they mention the blog. They often speak of our Meal Plans, making granola, wanting to try to make their own yogurt, and our craft projects. Hearing what friends and neighbors are being inspired by makes writing this blog worth it.

top 10 posts at RandomRecycling 2013

In the coming year, I see some changes ahead for this blog. As I try to simplify things, the time I spend here needs to be more meaningful. I am thankful for you, my readers, for gracing me with your time reading these posts. Your time is valuable and I understand there is a lot of digital distractions out there to keep us entertained. Going forward, there will be a bit less giveaways and more focus on healthy recipes, kids activities and just some fun, inspiring product reviews. The name Random Recycling really doesn’t reflect the current focus so maybe a blog name change is in order….any ideas?

Without further ado…here are the Top 10 posts of 2013.

  1. A Book to Get You Out of the Lunch Packing Rut
  2. How to Host a Canning Party
  3. Crock Pot Tomato Soup
  4. Green Smoothies Your Kids Will Love to Drink
  5. Summer Meal Planning Ideas
  6. Shhh…We Make Our Own Hand Soap
  7. Spiced Pumpkin Smoothie Recipe
  8. Kid Approved Granola Bars
  9. Healthy Chocolate Chip Pumpkin Cookies
  10. 25 Non-Toy Holiday Gift Ideas

Any of your favorites I missed? Cheers to a very Happy New Year’s to all of you!

Welcome to baking season everyone! Get your kitchens ready and check to see if your spice rack is fresh and ready for Christmas cookie afternoons and gingerbread house making. I recently was given a fresh set of seasonal spices from Simply Organic in connection to my partnership with Stonyfield Clean Plate Club and you can win your own set too!

Did you know the shelf life of spices is around six months? Buying your spices in bulk is not a great investment as they will lose their pungency if they are sitting on a shelf. Did you also know you should keep your spices away from the stove? While convenient, the heat will make your spices break down even faster.

We keep our spices in a drawer, organized in small plastic trays. One is specifically for baking spices (nutmeg, ginger, ground cloves) and others are specific to green herbs (parsley, basil, sage, rosemary) and the others end up in two other trays depending on the season. Grilling ones are in back now and the slow cooking spices are in front. If you need some other spice organization ideas you can check out my Pinterest board.

Apple Christmas Tree appetizer

With all the holiday parties we are attending lately, it’s a healthy idea to offer to bring a fruit appetizer. Young kids often will nosh on fruit just as much as the cookies. For a recent party, I shared a apple Christmas tree platter along with a sweet yogurt dip. I used the Simply Organic Ground Cinnamon in the dip. Mix it in and then sprinkle another dash on top. {Our “dash” was a little heavy handed as Madison did the honors.}

RECIPE

1 cup Stonyfield Greek Yogurt (vanilla or plain)

1 tablespoon honey

1/4 teaspoon cinnamon

Mix all ingredients together and serve with fruit. The star is made from cheddar cheese and this star cookie cutter. I also have some lemon juice in a mister bottle and give the fruit a light spray to avoid browning.


Simply Organic Giveaway

Ready to update your spice assortment?! Here’s a giveaway from Simply Organic and you can win this entire set of seasonal organic spices. There is a great mix of both savory and sweet spices for dessert or dinner. One other favorite detail I like in their product is the spices are stored in glass. (I read awhile back that their is BPA in some plastic spice jars and it leaches into your spices. yuck!) Contest is open to US residents only and ends 12/13 at midnight. Enter through the Rafflecopter below.

a Rafflecopter giveaway

Disclosure: I am a Stonyfield Clean Plate club member and receive samples of yogurt and the spices to help facilitate writing this post. Otherwise it’s not a compensated post. All opinions shared here are my own. 

Looking for an easy stovetop popcorn recipe? This is fast and you can use your own organic, GMO-free popping corn. It’s a lot less expensive than buying bags of organic popcorn from the store. We use this recipe and make it weekly for snacks, lunch boxes or family movie night.

How to make stovetop popcorn

Course: Snack
Keyword: Popcorn

Ingredients

  • 3 Tablespoons Coconut Oil
  • 1/2 cup popping corn
  • 1/2 teaspoon salt {optional}
  • Instructions

Instructions

  • In a large sauce pot, heat oil and 3 kernels on medium heat.
  • When the kernels pop, the oil is hot enough.
  • Add the balance of popping corn and give them a quick stir.
  • Cover with the lid slightly askew to let the steam release.
  • When the corn popping slows, move the pot off the heat and let it pop for another 30 seconds.
  • Give it all a stir and then transfer to a large bowl.
  • Store in an airtight container.
Tried this recipe?Mention @emilyroachwellness or tag #erwellness!


*Some affiliate links are included in this post. If you make a purchase through the link, it helps support development of this site at no cost to you. Thanks!

Butternut Squash Soup with WonderBag

Some women get excited about new shoes. I get excited about new kitchen gadgets. The WonderBag is new to the U.S. and I was curious when asked to test it out. Our favorite pumpkin carving party was coming up and it gave me an opportunity to test out this latest gadget.

This post is part of a social shopper marketing insight campaign with Pollinate Media Group™ and WonderBag, but all my opinions are my own. #pmedia #WonderBag http://cmp.ly/3/8vNxcO

WonderBag slow cooker

The WonderBag acts like a slow-cooker, but without using electricity. This fits two important needs in anyone’s kitchen.

  • Save times and money
  • Safe around young children

The WonderBag allows me to use less energy in my kitchen, and I don’t have to worry about a hot slow-cooker on the counter and little hands accidentally touching it. For my experiment, I used it to make Butternut Squash Soup for a party. I was crunched for time so I was able to make most of the soup at home, pack it in the WonderBag, bring it to the party to let it finish cooking and finish it up with an immersion blender.

The WonderBag fits short handle pots best so be mindful of that. My large dutch oven wouldn’t fit, but my tall stockpot fit fine as it can hold up to a 9 quart pot. After I unpacked the soup, the temperature was 130 degrees after about three hours. (Yes, I am a kitchen gadget geek and packed a thermometer.) I wanted to make sure the food would stay a safe temperature and be ready to serve guests.

Baby playtime

I would rather spend less time in the kitchen and more time with this guy.

Turns out, this new gadget is one with a cause. For every bag sold, one is donated to a family in need in Africa. Where water and energy resources are so scarce, this product can be life changing for families there. They can’t plug-in a crock-pot, so the WonderBag functions as a portable slow cooker without the use of additional fuel. An average African family can reduce their fuel usage by up to 30% using the WonderBag. The women creating the meal get more time with their families instead of standing by the fire to finish cooking their meals. Learn more about how eco-friendly the bag is by visiting the WonderBag Facebook page, plus get new recipe ideas.

The WonderBag is available now on Amazon, after quickly selling out. This would be a great holiday gift for someone who entertains often, needs a second slow cooker, and those who often tailgate or picnic. You can make chili in it, then easily bring it to the game piping hot. Plus, which each purchase a family in need also gets one.

Pumpkin Carving Party

The only negative thing for me is the size of the bag. It’s rather large, as it can hold up to a 9 quart pot. It’s not something I can easily keep in my kitchen, but I do plan to use it next time I’m bringing a stew to a potluck dinner.

butternut squash soup ingredients

Butternut Squash Soup with WonderBag

Butternut Squash Soup Recipe

Course: Soup
Keyword: Butternut Squash

Ingredients

  • 1 butternut squash peeled deseeded and cut into 1" cubes
  • 1/2 red onion finely diced
  • 1 medium apple peeled and cut into eighths
  • 1 tablespoon grapeseed oil or olive oil
  • 1 teaspoon fresh thyme
  • Salt and pepper to taste
  • 4 cups vegetable or chicken stock

Instructions

  • Heat oil over in a large pot on medium-high heat. Add onions and sauté for about 5 minutes.
  • Add squash, apple, thyme and stock.
  • Increase heat to high and bring to a boil. Reduce heat to medium-low and simmer, covered for 5 minutes.
  • Remove from heat and transfer to WonderBag for a minimum of 2 hours. (If you don't have a WonderBag, continue to cook for another 15 minutes or until squash is fork tender.)
  • Puree with an immersion blender or food processor.
Tried this recipe?Mention @emilyroachwellness or tag #erwellness!

I received the WonderBag to test out and share a recipe with you. All opinions shared here are my own. Amazon links are affiliate links. Learn more about how the WonderBag helps women and families worldwide by connecting with them via Twitter or Instagram

It’s pumpkin season! Did you know it’s really easy to make your own pumpkin puree? No worrying about BPA in cans, it’s super fresh and maybe even local. All you need is some sugar pumpkins, an oven and a blender.

1. Wash your pumpkins off and place on a baking sheet.

2. Using a strong sharp knife, stab the pumpkin about 6-8 times.

3. Bake in a 350 degree oven for 1 1/2 hours or until fork tender.

Roasted Pumpkins

Roasted pumpkin cooling off.

4. Let pumpkins cool until they are easy to handle. Slice in half horizontally.

5. Scoop out just the seeds and connecting membrane.

6. The pumpkin flesh leftover can be scooped out into a food processor or blender. Compost the outer skin.

7. Save your pumpkin puree in the freezer or use to make Spiced Pumpkin SmoothiesPumpkin Gingersnap CookiesPumpkin Muffins (love!) or Pumpkin Chocolate Chip Cookies.

Enjoy!

Based on how many people quickly liked my popover Instagram shot this week, I thought I would share the recipe I have used for years. I remember making these with my Mom when I was little. First with the hand powered beater (remember those!) and then being old enough to use the electric hand mixer myself. There is just 5 ingredients and it’s a great way to put bread on the table in about 45 minutes. Feel free to experiment and add in some herbs like chives or fresh grated Parmesan.

Popovers Recipe

Popovers: Fancy but not Fussy

Course: Snack
Keyword: Baking

Ingredients

  • 1 cup all purpose flour
  • 1/2 teaspoon salt
  • 3 eggs
  • 2 tablespoons butter melted
  • 1 cup milk

Instructions

  • Preheat oven to 400 degrees. Grease a popover pan or muffin tin with butter.
  • Combine flour and salt in a bowl. Make a well in the center and add eggs, butter and milk.
  • Beat until smooth.
  • Fill muffin tins half full.
  • Bake 35-40 minutes.
Tried this recipe?Mention @emilyroachwellness or tag #erwellness!

My popover pan was a Christmas gift from Williams and Sonoma. I checked and it’s close to this version available on Amazon: Non-Stick 12- Cup Mini Popover Pan. For an even better popover, choose premium butter.

DO YOU HAVE A FAVORITE RECIPE YOU MADE WHEN YOU WERE LITTLE? HAVE A LOVE FOR POPOVERS YOURSELF?

Sauce recipes that call for taking the skins off tomatoes before cooking always became such a hassle. In this recipe, the tomatoes are roasted slowly so the skins are much easier to peel off before processing. It’s not a lot of hands on time, you just need to give yourself about an hour and a half for cooking and prepping.

Plum tomatoes for easy roasting sauce

Roasted Plum Tomato Sauce

Course: Sauce

Ingredients

  • Ripe plum tomatoes
  • Fresh basil
  • Garlic cloves
  • Kosher salt
  • Cracked pepper
  • Olive oil or grapeseed oil

Instructions

  • Preheat oven to 400 degrees.
  • Cut plum tomatoes in half. Place tomatoes cut side down on a parchment lined baking sheet.
  • Add 1/4 cup chopped basil, 2-3 garlic cloves, 1/2 teaspoon kosher salt, and 1/4 teaspoon cracked pepper to each tray. (Adjust to the number of trays you can make with your tomatoes.)
  • Drizzle olive oil or grapeseed oil over tomatoes.
  • Roast in oven for 30 minutes, then rotate if more than one tray is in the oven. Return to oven and cook for another 30 minutes.
  • Let cool slightly, then using tongs, peel off the skins.
  • Add tomatoes and herbs to a food processor and pulse a few times to desired consistency.
  • Label and store in refrigerator for up to 5 days, freeze, or can by cooking in a water bath for 40 minutes.
Tried this recipe?Mention @emilyroachwellness or tag #erwellness!

DO YOU HAVE A FAVORITE SAUCE RECIPE?