I am in love with holiday decorating. Easter included.  Time to decorate those eggs!  This year I finally took some time to do some egg dying with natural ingredients.  Everything came from what I already had in the house.

I bought generic white eggs.  I went with hard boiled instead of blowing them out because I was wasn’t sure if my kids could handle something so delicate.  Cook for at least 15 mins on a simmer to avoid cracks.

I did some clean out of the fridge/freezer and cabinet to test out a few options.  The blueberries soaked in water for about an hour.  Others were boiled for about 20 minutes to draw out the colors.

Once the liquid was ready, I divided it up into smaller containers and added about one teaspoon of vinegar per one cup of liquid.

Cover the area with a large cloth or newspaper as this got messy when the eggs were dropped in!

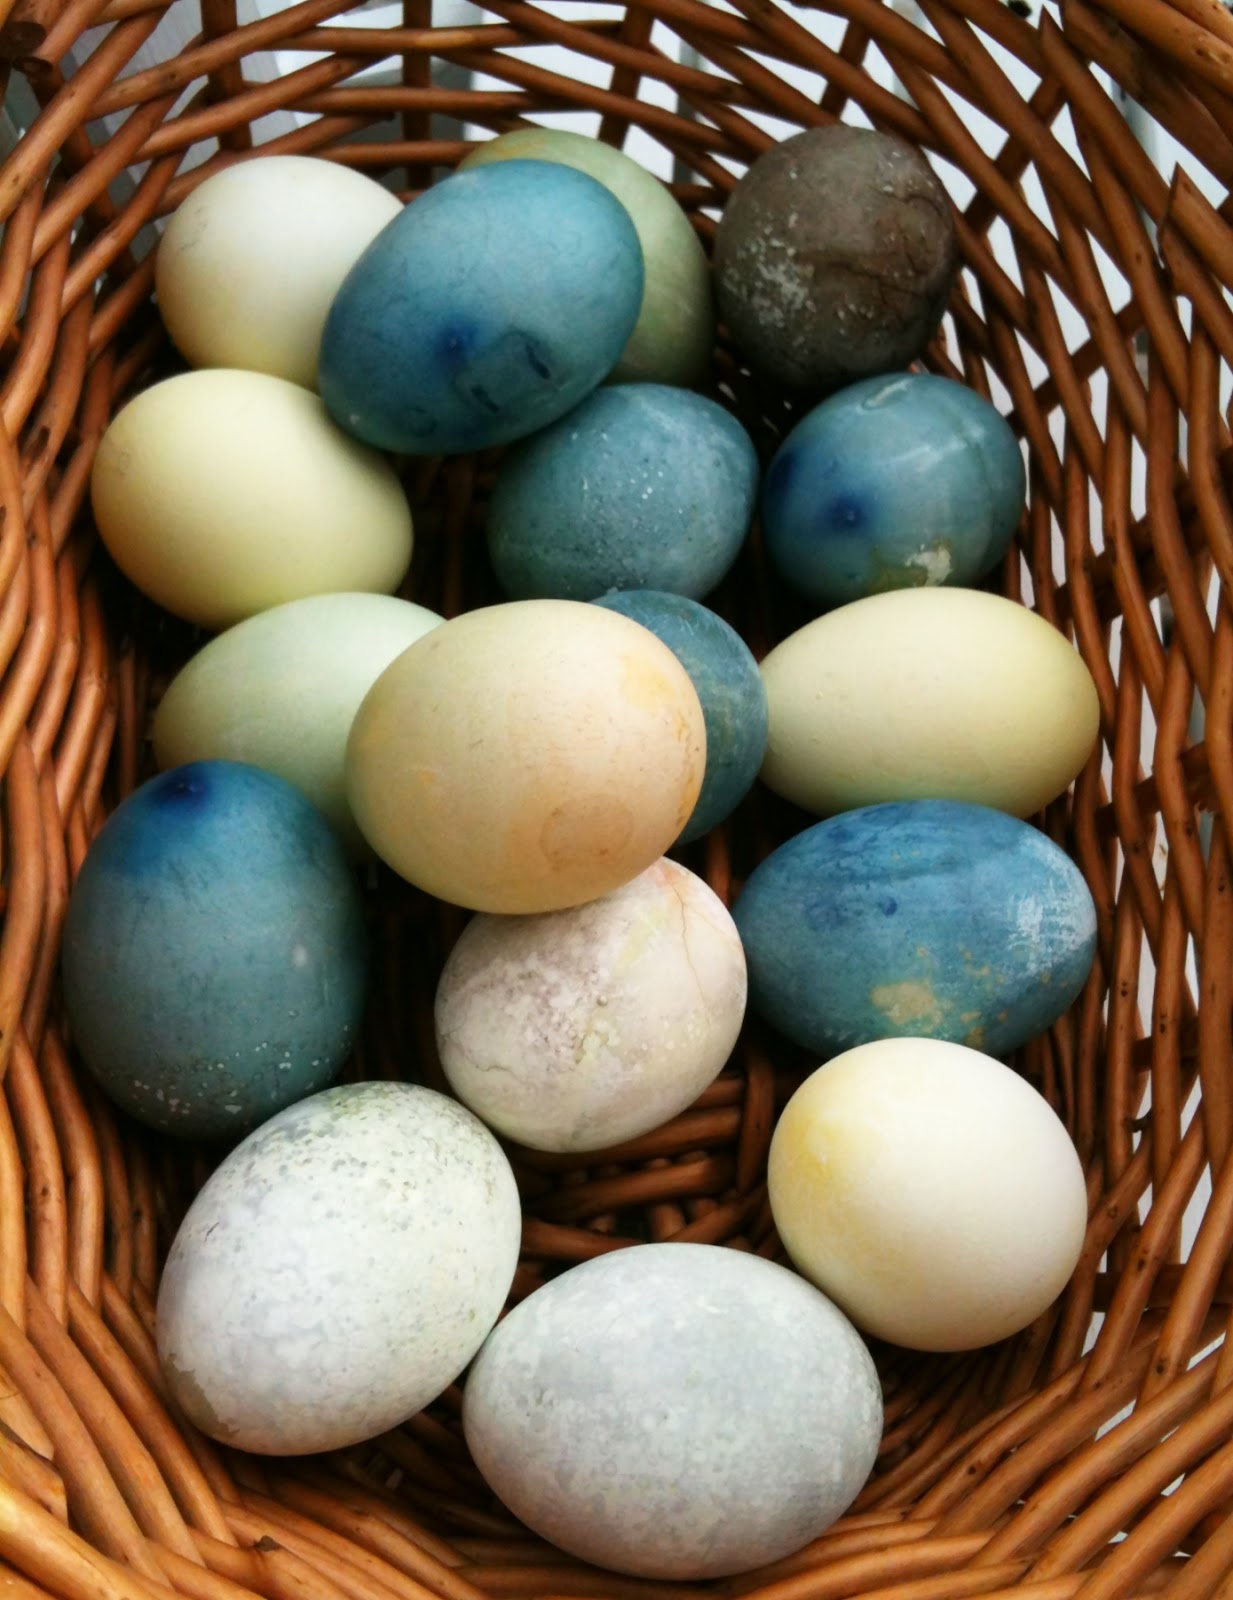
We got used the following and let the eggs sit in the mixture overnight.

Spinach~ light green
Cranberries~ light pink…I would strain in a cheese cloth before doing this again.  I got funny bubbles on the eggs
Pomegranate tea~ turned green over night!  Originally was pink
Carrots~ light yellow
Red wine~ brown, almost prehistoric looking.
Beet juice~ (very) light pink
BLUEBERRIES~ dark blue. Favorite of all the eggs by far.

We drained them on a cookie cooling rack.  I didn’t care about little marks as it just adds to their character. This was an easy kids activity when adult can make the natural dyes at the stove ahead of time.  The eggs are safe to eat as long as they are refrigerated.  Find more egg dying ideas on my Pinterest Board.  Next up for me are some chalkboard eggs!

Happy Easter and Passover to all!

Strawberry Fruit roll-ups, or fruit leather, are probably the kids’ favorite snack right now.  Both get excited when they see the blender come out.  The tricky part is the one year old is so slow eating his, big sister tries to take what he hasn’t eaten yet!

Strawberry Fruit Leather
Ingredients
1 lb Fresh Strawberries  
2 tablespoons honey

Instructions
Wash strawberries and remove the green stems.

Place strawberries and honey in a blender and puree.

Pour strawberry mix on a dehydrator tray with the fruit leather tray. Spread evenly.

Cook at 135 degrees overnight, or about 10 hours.
This is a bit trickier with an oven, as friends have confirmed that getting an evenly cooked roll-up is difficult. However, you can cook it on a very low oven temp on a parchment lined baking sheet.  I would advise using a cookie sheet with no sides to allow for better air flow, or turn on the convection oven blower.

It will be done when there are no sticky spots.  You want it to be pliable, not brittle.
Let cool completely, then peel fruit leather from tray and move to parchment paper.

Little hands got to this before I could get my picture!

Roll the paper and fruit leather together into a long roll.  Cut with scissors into desired length.  Store in an airtight container or zip top bag.

Strawberry Fruit Leather RandomRecycling.com

See the previous post for the Cinnamon Apple Ring recipe.
Enjoy!

Ever hear about using a dehydrator?  I hadn’t until about a year ago when I started reading blogs that talked about making dried apple slices in the fall and homemade fruit roll-ups.  Before then, it never was on my kitchen wish list.

Luckily, a little birdy (thanks Christy!) told my husband I might be interested in one for Christmas. Over the past two months we have devoured not only apple slices, but also bananas, pineapples and strawberries.  I’ve dehydrated potatoes, but haven’t found a great stew recipe yet to try them out.  The number of items to dehydrate is massive, but we have limited it to snacks.  Have you noticed a snack theme to my last few posts 😉

I have the Nesco Food Dehydrator.  It’s round and comes with 5 trays, plus layers for drying herbs or making fruit leathers (yum!).  It’s reasonably priced for anyone looking to test the water of dehydrators, compared to the more fancy Excalibur dehydrators that have square trays and a different air flow.  For non-essential kitchen toys like this, I like being able to decide if I really use it before making a bigger investment.

So far, our two favorite snacks have been cinnamon apple slices and strawberry fruit leather.  Both are easily portable, enjoyed by both the 3 and 1 year old and also offered a great teething food instead of a store-bought biscuit.  We haven’t tried it, but sweet potatoes are also supposed to be great for teething, plus the little ones get a nice dose of beta carotene.

Cinnamon Apple Rings
Wash and core about 4 large apples.  We have done a mix of varieties and they all cook up similarly well.
Peel on or off is your call.  I like to leave it on to increase the fiber in the snack.
Slice the apples about 1/4-inch thick, either with a sharp knife or a mandoline.
Sprinkle apples with cinnamon lightly on one side.
Place apples on the drying racks in a single layer.  Avoid crowding the apples to allow for even drying.
Dry at 135 degrees overnight, or about 9 hours. (I suggest allowing yourself time to check them in the morning so you get a sense of how fast they cook, it depends on the size of the apple slice.)
The rings are done when they are pliable, but no liquid is squeezed out when you break it apart.  You don’t want brittle rings, that means they are a bit overdone.
Store the cooled apple rings in an airtight container or zip top bags.

If you don’t have a dehydrator, you can make these in an oven on the lowest setting, either 150 or 200 degrees.  The apples can be layered on an oven safe cooling rack over a baking sheet.  You will need to watch the time as the difference in degrees can vary the cooking time.  (more details here.)

One of my new year’s goals is to do some emergency preparation planning.  You just never know when you might get a snow storm that shuts everything down.  I would feel better knowing we have some food options in the house that will last for a long time, and don’t necessarily come out of a can.  There will be more to come on this topic as I share the progress we have made on this goal and how the dehydrator fits into our plans.  My husband wants to make beef jerky.  He might be on his own with this next kitchen mission.  Maybe I’ll get him to guest post. (he, he.)

A little red pancakes anyone?  I had some leftover beets and needed to use them up since the kids were not into them plain.  I found the Red Beet Pancake recipe from Weelicious and tested it out this weekend.  Madison ate 3 hearts before we even got to sit down together. This recipe was a winner!

Here is the recipe, with a few of my tweaks.  I altered the flour ratio so there is a higher amount of whole wheat instead of white flour.  I have found that most baked goods have a better end result when I keep some of the white flour in the recipe.  It adds a little more gluten to the mix and helps with the leavening.

Ingredients
1 1/4 cup whole wheat flour
1/2 cup white all-purpose flour
3 Tbl brown sugar
1 Tbl baking powder
1/2 Tsp kosher salt
1 can of beets (original recipe calls for roasted beets…canned was fine.)
1 1/4 cup milk
1/3 cup Greek yogurt
1 egg
3 Tbl melted butter
1 Tsp vanilla

Instructions
-Mix all dry ingredients in a large bowl.
-Drain beets. (I saved the beet juice to use as food coloring for Valentine’s Day cookies this week.)
-Puree the beets and measure out 3/4 of a cup.
-Mix all wet ingredients together. Combine with dry until well blended.

Someone woke up in time to help stir the batter

-Drop a 1/4 cup of batter onto a buttered griddle plan. Cook for about 3 minutes per side.

We used heart cookie cutters to celebrate Valentine’s Day once the pancakes were cool enough to handle.

I served it with some of the leftover Wallababy Greek Yogurt for the little guy. The Greek yogurt is great for spreading as it’s thick enough to adhere to pancakes, rice cakes or bread.

He was awfully happy about his breakfast.

If he eats more than what’s on the floor by the end of the meal, it’s worth repeating.  Plus he like playing with the yogurt.

How are you celebrating Valentine’s Day?
Image and video hosting by TinyPic
Disclosure: I was provided samples of the new Wallababy Organic Greek yogurt.  The opinions shared here are my own.  This post is shared with Seasonal Celebrations, Tasty Tuesday Tidbits and Your Green Resource.  

10 Non-Candy Valentines Day Ideas

Guess what.  Valentine’s Day is coming upPe.  You may not make a big deal about it, but your kids classroom might.  That means getting an updated class list, making sure you have enough Valentine’s Day cards that work for the boys and the girls.  Then you have to decide if you are going to give candy in a cute little gift bag.

As I try to limit my kids exposure to the synthetic food dyes, I’ve tried to come up with a fun list of candy alternatives for the classroom.  This list is geared to the preschool/elementary age.  If you have other suggestions, I would love for you to share them in the comment section.

  • Stickers~ get a couple of packages and give a sheet for each child on your list.  We go through stickers so fast in our house, I’m always happy to get something new to decorate paper (or people.)
  • Craft supplies~ new Crayons, Markers, Chalk.
  • Bubbles~ spring is just around the corner!
  • Temporary Tattoos
  • Bouncy Balls
  • Musical trinkets~ little kazoo?
  • Healthy Snacks~ Annie’s fruit snacks come in fun-size packages, or pretzels. (better than candy!)
  • Homemade Cookies or Granola Bars 
  • Play dough
  • Pencils. (love this cute printable!)

At my daughter’s school, the choice was made easy this year.  There are so many food allergies that there is no candy allowed.  The kids will celebrate with a big party on Tuesday and pass out Valentine’s Day cards. (see my Pin for the card I’m going to make.)  I will be making sugar cookies, and I think I’ll just pass on the Red Dye #40 sprinkles. 😉

If you have a little free time and $2.50 to spend, this owl printable sheet is adorable! Print on sticker paper and cut out using a circle punch.  So cute!!

Source: Etsy via CherryClipArt


Do your kids pass around Valentine’s Day cards?  

Healthy Homemade Chicken Nuggets

Skip the drive thru and the frozen food aisle.  Here is an easy chicken nugget recipe that is both kid, and husband, friendly.  I grew up eating these and I have hardly tweaked the original recipe from the Eater’s Choice cookbook.  Now I make sure to cook enough so there is leftovers for the kids lunches.

A note about breadcrumbs.  I use the heels of my bread and pulse them in the food processor.  I have also used panko breadcrumbs as well and they come out just as crunchy.

Healthy Homemade Chicken Nugget Recipe

Kid-approved healthy chicken nuggets are a winner at the dinner table.
Prep Time: 8 minutes
Cook Time: 15 minutes
Total Time: 23 minutes
Cuisine: American, dinner
Servings: 4 servings
Author: Emily

Ingredients

  • 3-4 Boneless Chicken Breasts
  • 2 Tbl Olive Oil
  • 2 Garlic Cloves
  • 1/4 tsp ground black pepper
  • 1 Cup Breadcrumbs 2-3 pieces of bread
  • 1/4 tsp cayenne pepper
  • Dipping Sauce~ 2 1/2 Tsp Honey and 2 Tbl Dijon Mustard

Instructions

  • Preheat oven to 425 degrees.
  • Cut chicken into bite size pieces, about 8 pieces per breast.
  • Mix oil, garlic, pepper and chicken in a zip top bag and marinate about 30 minutes. (You can do it in the morning and let it sit till evening, or just marinate for a few minutes, it doesn't make a huge difference in taste.)
  • Mix breadcrumbs with cayenne pepper. Roll chicken pieces in bread crumbs and place on a large cookie sheet. I line my cookie sheet with parchment paper to make clean up easy.
  • Bake 15-17 minutes until lightly browned and cooked through.
  • Use honey mustard sauce or ketchup for dipping.

Notes

Updated: Instead of a breadcrumb topping, you can coarsely chop 3/4 cups of nuts. Pecans, walnuts or almonds are all healthy choices. If you choose a nut topping, omit the garlic from the recipe.
Tried this recipe?Mention @emilyroachwellness or tag #erwellness!


Healthy Homemade Chicken Nugget Recipe


Chicken Nuggets Honey Mustard Sauce

Enjoy this healthy homemade chicken nugget recipe. I’ve been eating this version since I was a kid!