I have a daughter who loves to watch me put lip gloss on. And then I hear, “My turn, my turn.” One time she put some lip balm on and it turned her skin all red. Since then, I’m more strict about what I share with her, and it’s motivated me to switch to safer products for myself.

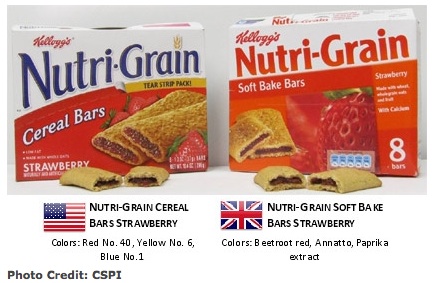
As our kids get older, they start using more bath and beauty products. They might need conditioner and detangler spray, especially if they have curly hair like my Madison. Or maybe they need a stronger shampoo to get rid of greasy hair. Do you want to use the same thing you do? Maybe not. The skin is our largest organ and all those ingredients get absorbed into the bloodstream and if it’s a chemical, it can cause hormonal disruptions, dermatitis and more.

As we buy new products, I have been doing a test wash on myself on my inner arm prior to letting either kid use it. I figure it’s a good first start to make sure there are no skin irritants. Now I know we can’t really test diaper rash creams, but look for one without too many ingredients besides the all important zinc oxide.

Here are the ingredients I make sure are not listed:


Sodium laureth sulfate
Parabens

Fragrance

There is a great online guide that will give you a safety rating, based on the ingredient list. It’s organized by the EWG, or Environmental Working Group. Lots of people use their database to check their sunscreen safety, but they also have one for beauty products. I was excited to see one of our products, Dolphin Organics Body Lotion got a zero rating. That means there is nothing unnatural about what goes into making this lotion. I am totally comfortable using this for Madison for dry patches on her face.

Here is my go-to list for bath and beauty products for the kids

Bath Wash

Conditioner
Whole Foods Conditioner
(Going to check out Aubrey’s next)

Detangler
We were using Healthy Sexy Hair (yes, for my 3 year old), but i’m going to switch after I looked at the ingredient list. However, it works amazing well.  A couple of good ones recommended are the California Baby detangler or Original Sprout 

Lip balm
Mad Gabs. Madison now gets her own she can put on before nap time or bedtime. She is enjoying the new Wildy Natural Juicy Mango Lip Butter.  Doesn’t that just sound delicious! I love her having her own special lip gloss like Mommy, but no sharing germs and it’s safe for her skin. Plus the tube is recyclable. 🙂
(I also am using Mad Gab’s lip gloss and love the texture and shine.  The lip shimmers they offer were a bust…they were too smushy, even in cool temperatures.  I can’t imagine how they would hold up over the summer!  To find a store that carries Mad Gabs, check here.)

Lotion
Dolphin Organics Lotion
Coconut Oil

Toothpaste
Tom’s of Maine for Kids, Strawberry Flavor **Yet just realized there is Sodium Lauryl Sulfate on the ingredient list which I am not excited about.

What are your favorite products for your kids?
Image and video hosting by TinyPic
I love to hear your feedback and comments. Stop by and visit the Facebook page or Twitter for updates!  Or get posts delivered via Email or RSS Feed. Thanks!    


Disclosure: I received samples of Mad Gabs and Dolphin Organics. This did not influence my opinions shared here. 

In my quest to eat more real foods, I’ve become more conscious of the how often I see synthetic food dyes in our world.  Valentine’s Day candy is already set-up in the stores and it’s a billboard for Red Dye#40. (Synthetic food dyes are listed with a #, like Blue #2.) In the past couple of years, I keep reading that food dyes have been linked to hyperactivity in children, eczema, ear infections, headaches, asthma, sleep issues and more. As a parent of young children, I don’t need to increase the likely hood of any of those ailments, so I say no to rainbow colored sprinkles when we are in the grocery store.  However, I’m not going to prevent my kids from enjoying confetti colored birthday cake when they are at friend’s parties.  I figure that if I reduce our use by at least 80%, then the other 20% will have less of an impact.
As an avid label reader, I have started a mental list of where I need to seek an alternative to the conventional options.  You can see that the list extends far beyond the dinner table.
  • Ice Cream
  • Tortilla Chips
  • Kids Medicine. (look for Dye free)
  • Play Dough  (we use eco-dough)
  • Toothpaste
  • Yogurts (most organic options use natural coloring, like from beet juice)
  • Husband’s Sports Drinks and Maraschino Cherries

In April 2008, Britain’s Food Standards Agency (FSA) advised the food industry to voluntarily ban the use of six common synthetic food dyes by 2009 (UK food dyes on which the Food Standards Agency has called for a voluntary ban include: Tartrazine, Quinoline Yellow, Sunset Yellow, Carmoisine, Ponceau 4R, and Allura Red). Source  Mars has removed synthetic dyes from M&M;’s in the UK, but not yet in the US. Why?  It’s a half penny more expensive to switch to natural plant dyes in some cases.  I would be willing to pay a half penny more to avoid potential cancer causing ingredients.  I would even pay two pennies more to help cover the costs of the families that don’t have the additional money to make a healthier choice.  Education is key and if we can use our consumer dollars to choose products made with natural plant dyes instead of synthetic junk, maybe the big manufacturers will make the change for the better.
Here’s a quote that is rather scary, but true…
“In Europe manufacturers need to prove an ingredient is SAFE beyond a shadow of a doubt for it to be approved for use.
In the US, researchers need to prove an ingredient is DANGEROUS beyond a shadow of a doubt for it to be banned.”
– Fooducate.com
To learn more about synthetic food dyes, see 

Sortacrunchy.net 10 things everyone should know about artificial food coloring


What do you think?  What products do you have a hard time finding a good alternative? (Mine was Green Monster Mint Hood Ice Cream…sad to see synthetic food dyes here.)

Image and video hosting by TinyPic
I love to hear your feedback and comments. Stop by and visit the Facebook page or Twitter for updates!  Or get posts delivered via Email or RSS Feed. Thanks!   

This is being shared at Frugally Sustainable ; SortaCrunchy.

Happy long holiday weekend!

Missing from the list is Sunday’s great Beef Stew made in the Pressure Cooker tonight for my Mom’s birthday.  Have I mentioned how much I’m loving my new pressure cooker? 😉  Thanks Mom!

While my wonderful husband is traveling, I’m going to try a meatless Monday recipe I saw in Whole Living, the Mushroom and White Bean soup.  It just looks so cozy.

The chicken broth came out so good in the pressure cooker last time so I’m planning to do the same again this week.  I may throw in some sweet potatoes and cinnamon this time for some variety.

Mushroom and White Bean Soup

What are you making this week?  Winter has finally arrived and I would love to hear what you are making to keep yourselves warm and cozy!
Image and video hosting by TinyPic

For more menu planning ideas, stop by OrgJunkie for Menu Plan Mondays.

I love to hear your feedback and comments. Stop by and visit the Facebook page or Twitter for updates!  Or get posts delivered via Email or RSS Feed. Thanks!   

I have always loved museums, even as a little kid.  There is something so grand about the exhibit halls and the amount of information you can absorb seems endless.  Now I enjoy it when museums have family friendly activities that keep everyone entertained.  The Museum of Science Boston offers a nice blend of grown-up information and hands-on activities for the little ones.

My trip to the Museum of Science coincided with the A Day in Pompeii exhibit, running now through Feb 12, 2012.  First, I had an amazing lunch in their Skyline Function room with a spectacular view of the Charles River on a sunny January day. (After 5 years of being a wedding planner, trust me when I say their food is good!) Afterwards, I got to enjoy a mostly peaceful walk through the exhibit.   Peaceful because my kids were not with me, yet it was clearly a big field trip day for middle-school kids.  The Pompeii exhibit was educational and humbling.  The devastating volcanic eruption in AD 79 buried the Roman city of Pompeii.  The exhibit features amazing archaeological treasures found 1700 years later.  Some of the preserved items are the Statue of Venus (1) and a Water Urn (2) which was made from lead at the time.  There is a room of body casts from the victims of Mount Vesuvius’s eruption.  It was eerie to walk through and see some of the details that have been captured by the plaster molds of the victims (4).
At the end of the exhibit, there was a fun interactive learning area sharing stories of volcanic eruptions around the world, a chance to measure your own earthquake, and a mosaic building area for all ages (2).

While I have fond memories of going to the Museum of Science as a kid to see the giant wave and bring home some astronaut ice cream, I’m happy to say they have moved into the future with amazing exhibits.  I am a believer in giving kids the gift of experiences and some museum passes fit the bill.  To learn more about the museum, you can visit their website http://www.mos.org/.

Image and video hosting by TinyPic
I love to hear your feedback and comments. Stop by and visit the Facebook page or Twitter for updates!  Or get posts delivered via Email or RSS Feed. Thanks!  

Disclosure: I attended a luncheon at the Museum of Science in order to review their current exhibit.  This in no way influenced my opinions shared here.

I have been testing out my new Cuisanart Pressure Cooker and recently tried to make risotto.  I find it difficult to make risotto on the stove top since it requires so much attention, but I love it.  In our quest to avoid relying on packaged goods, I wanted to find a way to make risotto that works for us.  By using the pressure cooker,  I was able to make the risotto on a weeknight, while the kids played in the kitchen.

I do some of prep work for dinners while the kids take afternoon naps so the shallots and garlic were already chopped once I got started.  In the evening, I prepped the shrimp by cutting the tails off with kitchen scissors.  It was easier than expected and everyone ate it so this will be repeated in our menu plans to come.

Pressure Cooker Parmesan Shrimp Risotto

Ingredients

·                                 1 1/2 tablespoons butter
·                                 2/3 cup finely chopped shallots (about 2 large)
·                                 3 garlic cloves, minced
·                                 1 1/3 cups uncooked Aborio rice
·                                 1 cup white wine divided
·                                 3 cups fat-free, lower-sodium chicken broth (I used broth made in the pressure cooker)
·                                 2 ounces fresh Parmigiano-Reggiano cheese, divided
·                                 1 lb Cooked Large Shrimp, tails removed (I use scissors to cut off the tails)
·                                 1/2 teaspoon grated lemon rind
·                                 1/4 teaspoon freshly ground black pepper

Preparation

1.                               1. Heat a 6-quart pressure cooker over medium-high heat, or use the Saute function. Add butter to cooker; swirl until butter melts. Add shallots; sauté 2 minutes. Add garlic; sauté for 30 seconds, stirring constantly. Add rice; cook 1 minute, stirring constantly. Add 1/2 cup wine; cook 1 minute or until liquid is absorbed, stirring constantly. Stir in remaining 1/2 cup wine and broth. Close lid securely; bring to high pressure over high heat. Adjust heat to medium or level needed to maintain high pressure; cook 8 minutes. Remove from heat; release pressure through steam vent, or place cooker under cold running water to release pressure. Remove lid. Grate 1 3/4 ounces cheese; stir in grated cheese and remaining ingredients, including shrimp. Let stand 4 minutes to thicken. Shave remaining 1/4 ounce cheese, and top with shavings.
Adapted from, 

Image and video hosting by TinyPic
This post is being shared via the Green Resource, hosted by A Delightful Home, and also TidyMom.


Chicken chili is from the Not Your Mother’s Slow Cooker Cookbook

Risotto will be a test in the pressure cooker. I’ll add in some shrimp at the end.
Fish sandwiches will be made with Flounder. I fry them in coconut oil.

Burgers and potatoes are on deck for Thursday as Daddy is in charge of dinner.
Friday is homemade pizza night. I may be adventurous and make my own dough.
Pats game is on Sat night which calls for some chili!
For more recipe ideas, visit OrgJunkie.com.

Just an amazing deal to share over at Amazon for the Nutiva Organic Extra Virgin Coconut Oil
.
I did the math and it comes out to only $.40/ounce, vs the Tropical Traditions Buy One Get on Free deal which is $.60/ounce.

You need to sign up for Subscribe & Save to get an extra 15% off, which I did with a 4 month delivery set-up.  (I am familiar with the program since I use to use it for diapers.)  You get an email before your next order is shipped so you can always cancel later if you don’t need it.  Once you start cooking with coconut oil, I bet you will need it.

Also, use the discount code NUTIVJAN to get the additional 10% off your order.

My total order: $12.15 for 30 ounces of coconut oil. Just in time for chapped hands and faces from the late-arriving cold weather. And for making more homemade Granola.

Are you using Coconut Oil?
Image and video hosting by TinyPic
I love to hear your feedback and comments. Stop by and visit the Facebook page or Twitter for updates!  Or get posts delivered via Email or RSS Feed. Thanks!  


Disclosure: Amazon links are affiliate links and if you make a purchase, I get a small commission. This helps support further development of the website. Thanks!

You may have heard me mention I was eating my frogs this week.  You may have thought I was a little crazy after the holiday hoop-la.  You are probably a little right.  At the start of the new year, I love the fresh start it provides.  With an over abundance of organizing articles in magazines, the clutter free tabletops after the Christmas decorations are put away, and a need to settle in for winter, I love having a new challenge to tackle.

One Bite at a Time is providing this challenge in a way that is simple and understandable.  It’s written by Tsh Oxenreider, the founder of Simple Mom. (my favorite site!) In it is a collection of bite size tasks to help get your life in order, from starting the day off right to getting more quality time with your spouse. And no, grocery shopping together is not quality time. You have the flexibility to follow along weekly, as there are 52 ideas to put into action.  Or, if you are super motivated, you can tackle more when your schedule allows for it.

I’m following along with Katie and her fans at Kitchen Stewardship.  She is chronically her tasks on Facebook, where you can also join in the conversation.  I have already gotten some additional goods ideas on how to get started.

Now back to the frogs…Eat Your Frog is a concept where you tackle the hardest thing on your list once you start the day.  The goal is for this task on your to-do list, at work or at home, to be checked off and everything after that seems a little easier to manage.  On Day 1, my frog was to clear off our dining room table.  It’s the first thing everyone sees when they come into the house and it bothers me when it gets messy and cluttered.  With a high chair and booster seat also at the table, you can imagine how messy under the table it is too.

Here is what I realized by tackling this project.
1. It’s easier to clean it up right away.
2. The clear space gave me a place to fold laundry, which is usually Frog #2.
3. It was much more relaxing to bring out the next meal to a clear table.

It you want to follow along, you can download the One Bite at a Time ebook here.  It’s only $5 and offers the potential to save you loads of time and money in the long run.  A couple of topics coming up that I’m excited to read are about menu planning and creating a morning routine.  After the lovely holiday break, I realized that I function better with a routine.

Order your copy today for Kindle, Nook or PDF.

What do you think? Want to join in?  One last organizing note…if you love new calendars and free organizing lists, check out The Nest Effect. I’m enjoying reading through her organizing posts for fun storage ideas.

Image and video hosting by TinyPic
Click here to visit Simple Mom.
I love to hear your feedback and comments. Stop by and visit the Facebook page or Twitter for updates!  Or get posts delivered via Email or RSS Feed. Thanks! 


Disclosure: I am an affiliate of this book, which means I get a little commission for the sale of the book. Thanks!


I’m sharing this post at Frugally Sustainable, where you can lots of other green living tips & tricks.

I love collecting glass jars, in all shapes and sizes.  I even keep extras on hand of spaghetti sauce or coconut oil jars.  There are so many uses for them, both in and out of the kitchen.  One way I found to help organize them is to create chalkboard labels.  This works great for items you put in the freezer and want a quick label that can be reused over and over again, just like the jars.

Step One: Wash your jar and dry thoroughly.

Step Two: Use paint to create the shape you want on the jar.  (masking tape or blue painter’s tape both work fine.)

Step Three: Apply two coats of chalkboard paint to the jar. Allow to let dry in between coats.  Remove tape once it’s dry.

I use these jars in the kitchen and also in my craft storage area.  I have one for buttons and another for ribbons so far.  Chalkboard paint can be found at your local craft store, paint store, or on Amazon.  My advice, a little goes a long way so buy a small amount.  (Or paint a whole cabinet, like I did.)

What would you put in your jars?

Image and video hosting by TinyPic

For more green living ideas, visit Frugally Sustainable and SortaCrunchy.

Happy New Year!
Here is this week’s dinner menu.  One of my resolutions for 2012 is to spend more time menu planning.  I find such relief when I open my chalkboard closet and find tonight’s dinner decision ready and waiting for me.  I also want to be better prepared for lunches, so I may start planning those out too.  My goal is to make sure we use up all of our leftovers as it bothers me when we have to throw out food that has been sitting too long in our fridge.  I love to cook, but there is always a way to make it more efficient and enjoyable.

Monday Meatloaf is a beef version of this recipe from Cooking Light.  (I find turkey meatloaf just doesn’t cut it.) We left out the sriracha sauce so everyone could eat it.  Our little guy ate it all up! If it’s just me and my husband eating it, the spicy version is amazing. Roasted Green Beans in the oven and Sweet Potatoes in the Pressure cooker (10 mins total time!) rounded out the meal.

Tuesday will be my first attempt at cooking a Whole Chicken in the pressure cooker.  I have found recipes including beer cans, lots of liquid, minimal liquid, etc.  I haven’t quite decided what I’ll do, but most recipes say it should be done in about 25 minutes.   I’ll also be saving the bones to make a fresh batch of chicken broth. (Still trying to get it to gel…maybe in the pressure cooker it will work!)  The leftover chicken will be used for Waldorf chicken salad sandwiches, which will help me meet my healthy lunch goal and to use up leftovers.

Wednesday~ Sweet & Sour Pork Tenderloin in the Crock pot.  New recipe…will update later with results.

Thursday~ Homemade Chicken Nuggets and Sweet Potato fries.

Friday~ Homemade Pepperoni Pizza night. I should do a salad…but probably won’t.

Saturday~ Salmon and Broccoli. Last time we did salmon the little guy wasn’t for it.  I’m going to try it poached and see if he will eat it this time.

What menu planning resources do you use?  To get more ideas, check out Menu Plan Monday.

Image and video hosting by TinyPic
I love to hear your feedback and comments. Stop by and visit the Facebook page or Twitter for updates!  Or get posts delivered via Email or RSS Feed. Thanks!