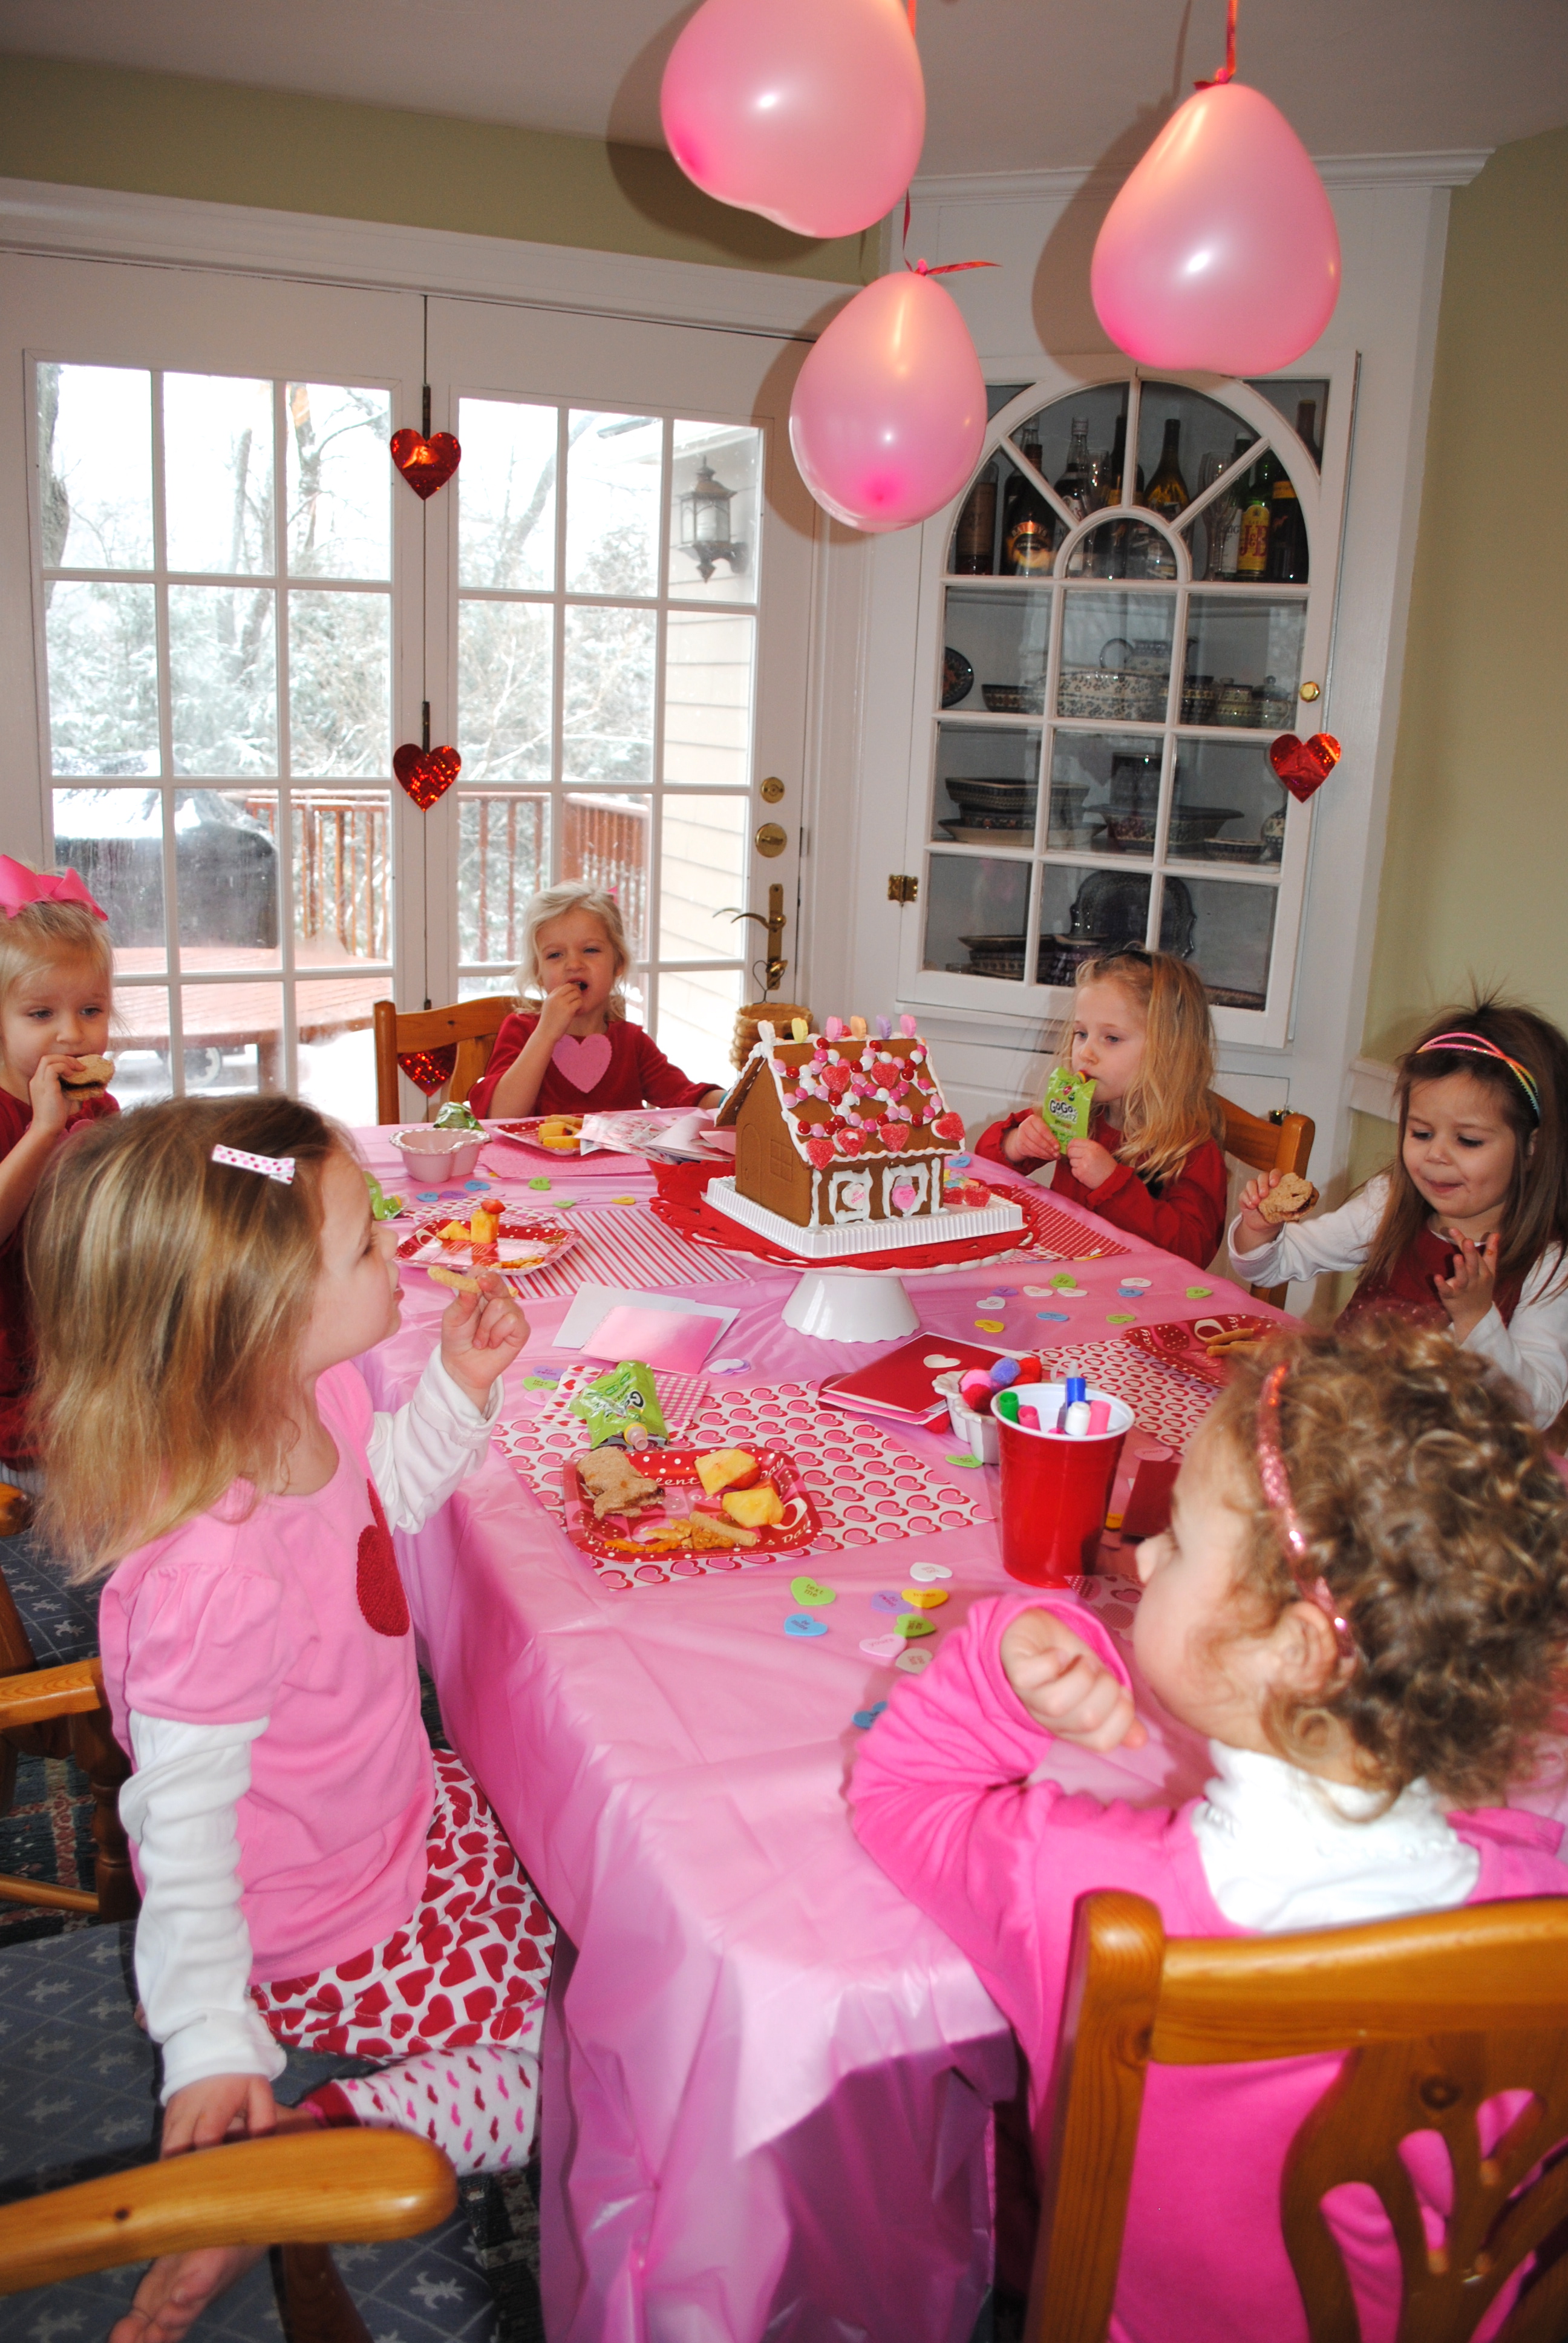
Prior to the arrival of Blizzard Nemo, our friend Susan hosted a wonderful Valentine’s Day party for some little preschoolers. It was a cute morning filled with craft projects, cupcakes, glitter glue and coloring.
All he remembers from the party is this cupcake.
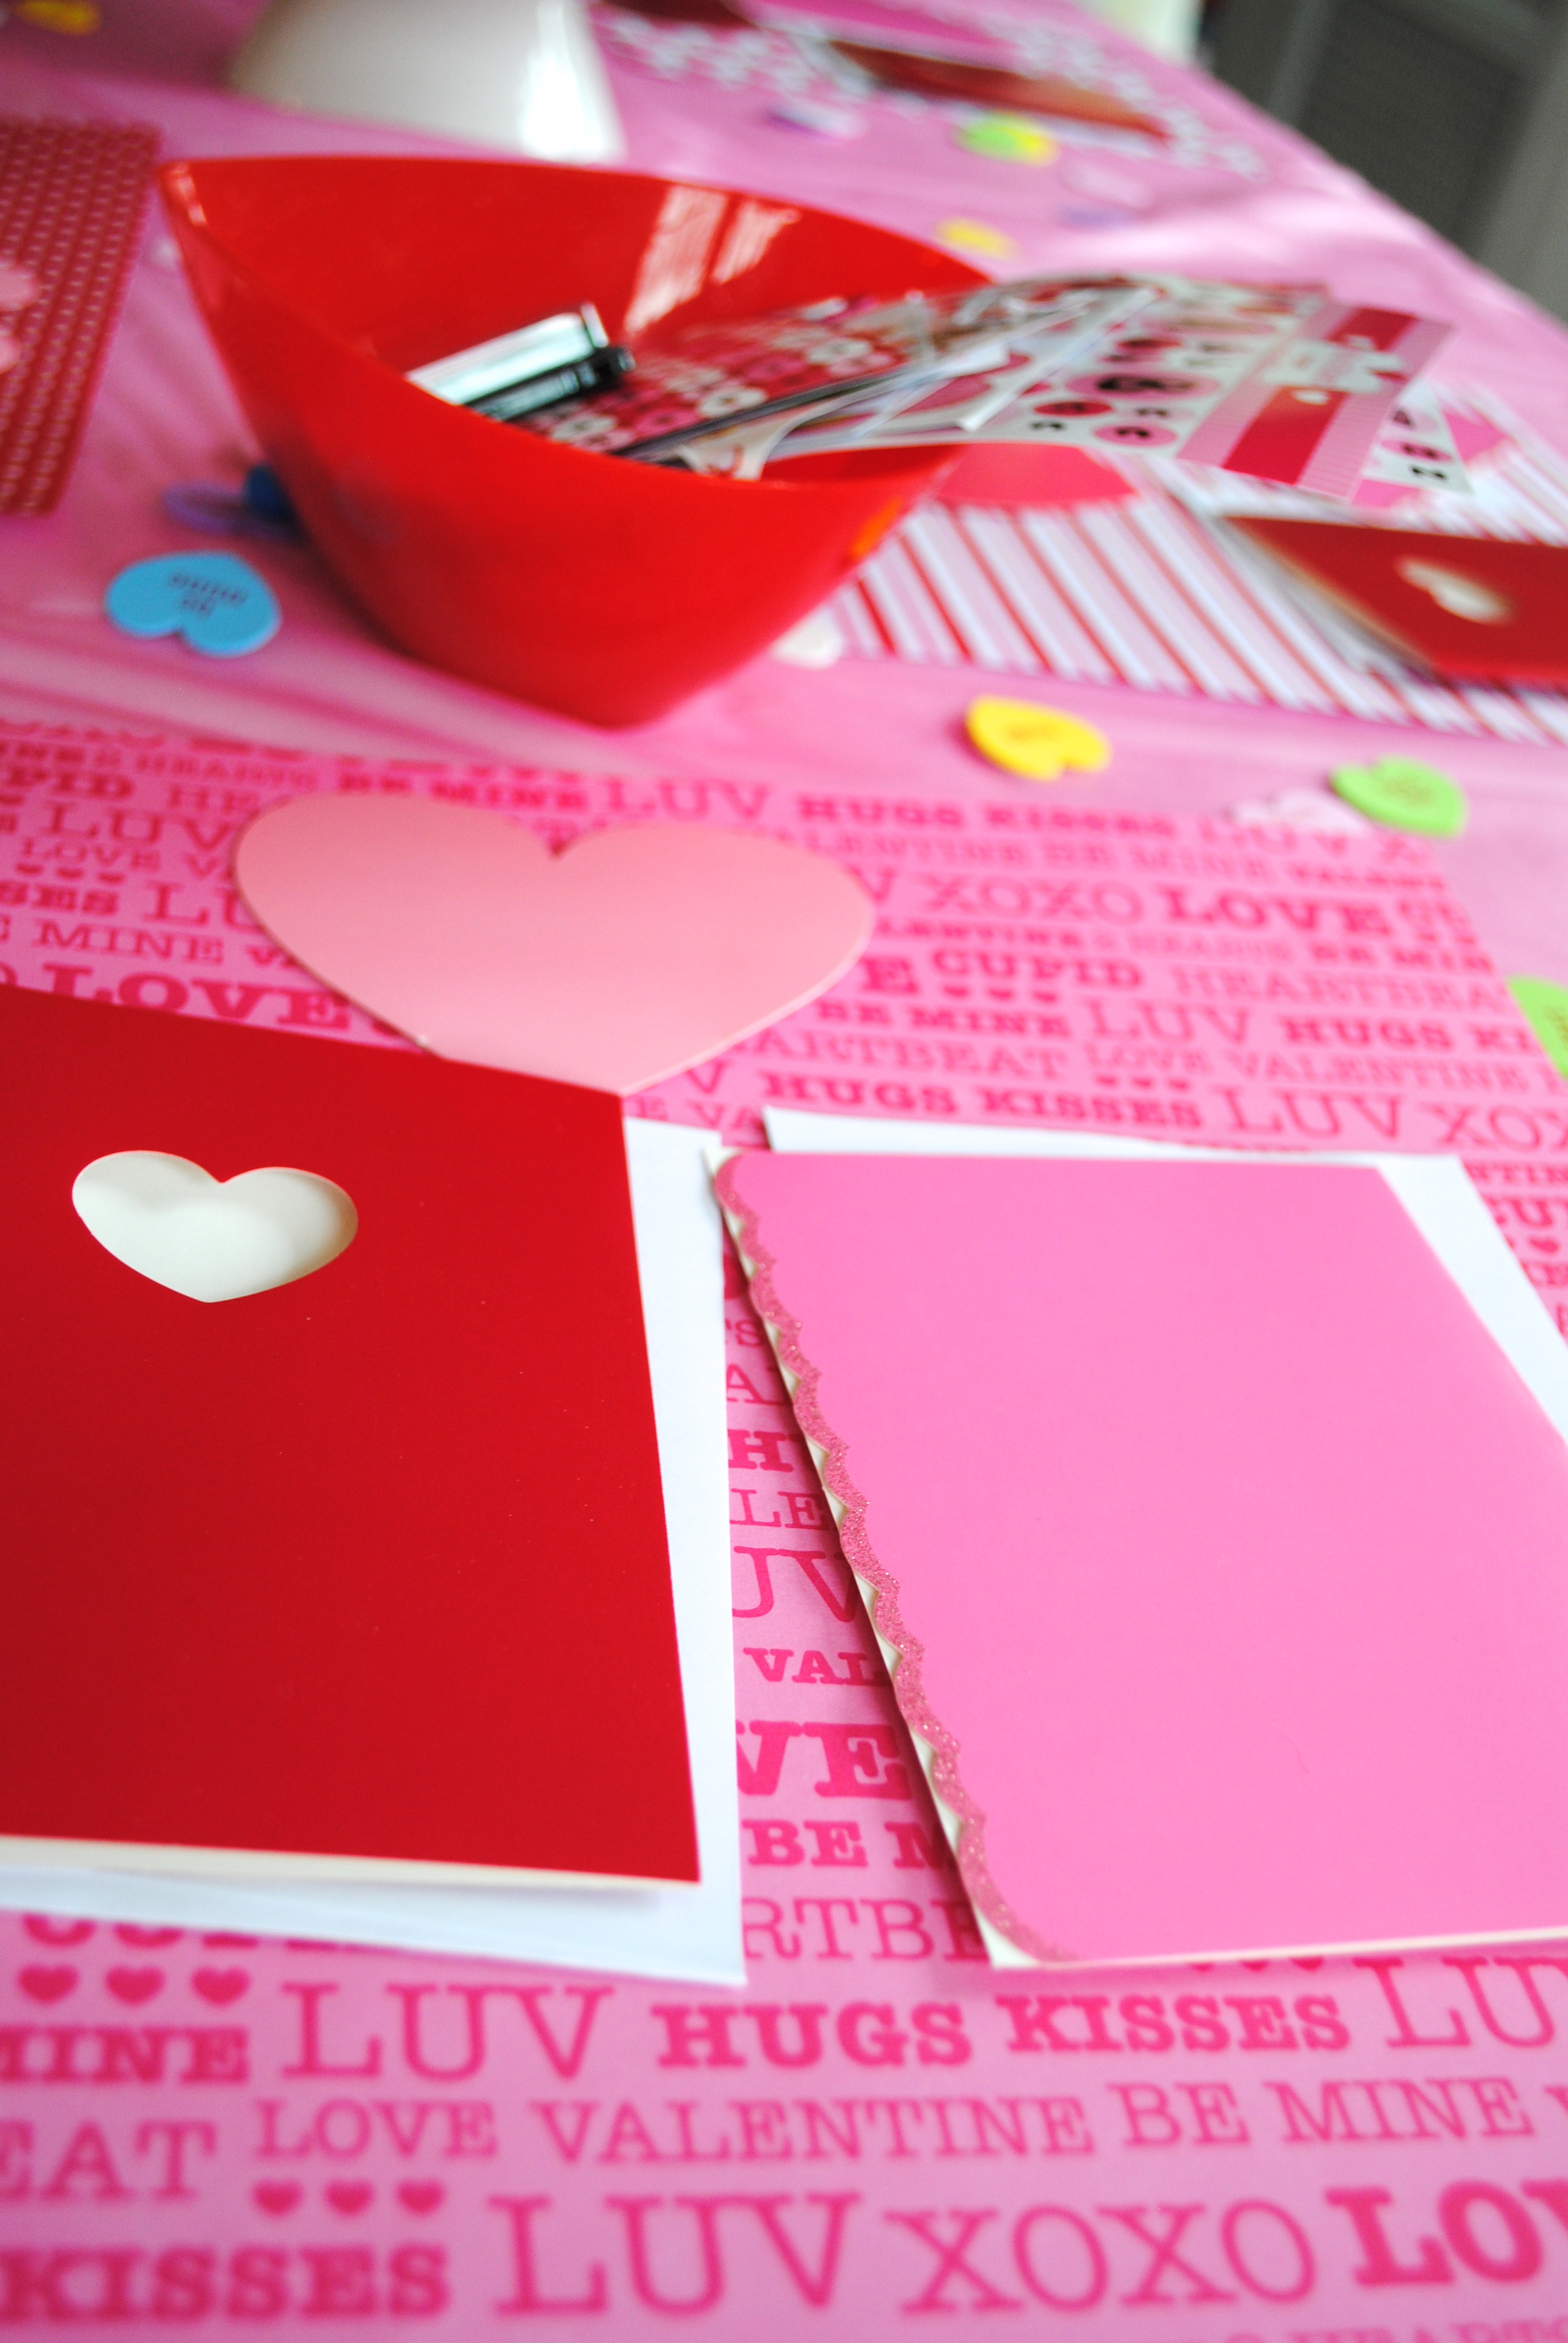
Card making craft time for the kids. Stamps, glitter glue and stickers for their special Valentine.
Who says gingerbread houses are just for Christmas time?
Lunch time with heart-shaped peanut butter and jelly sammies.
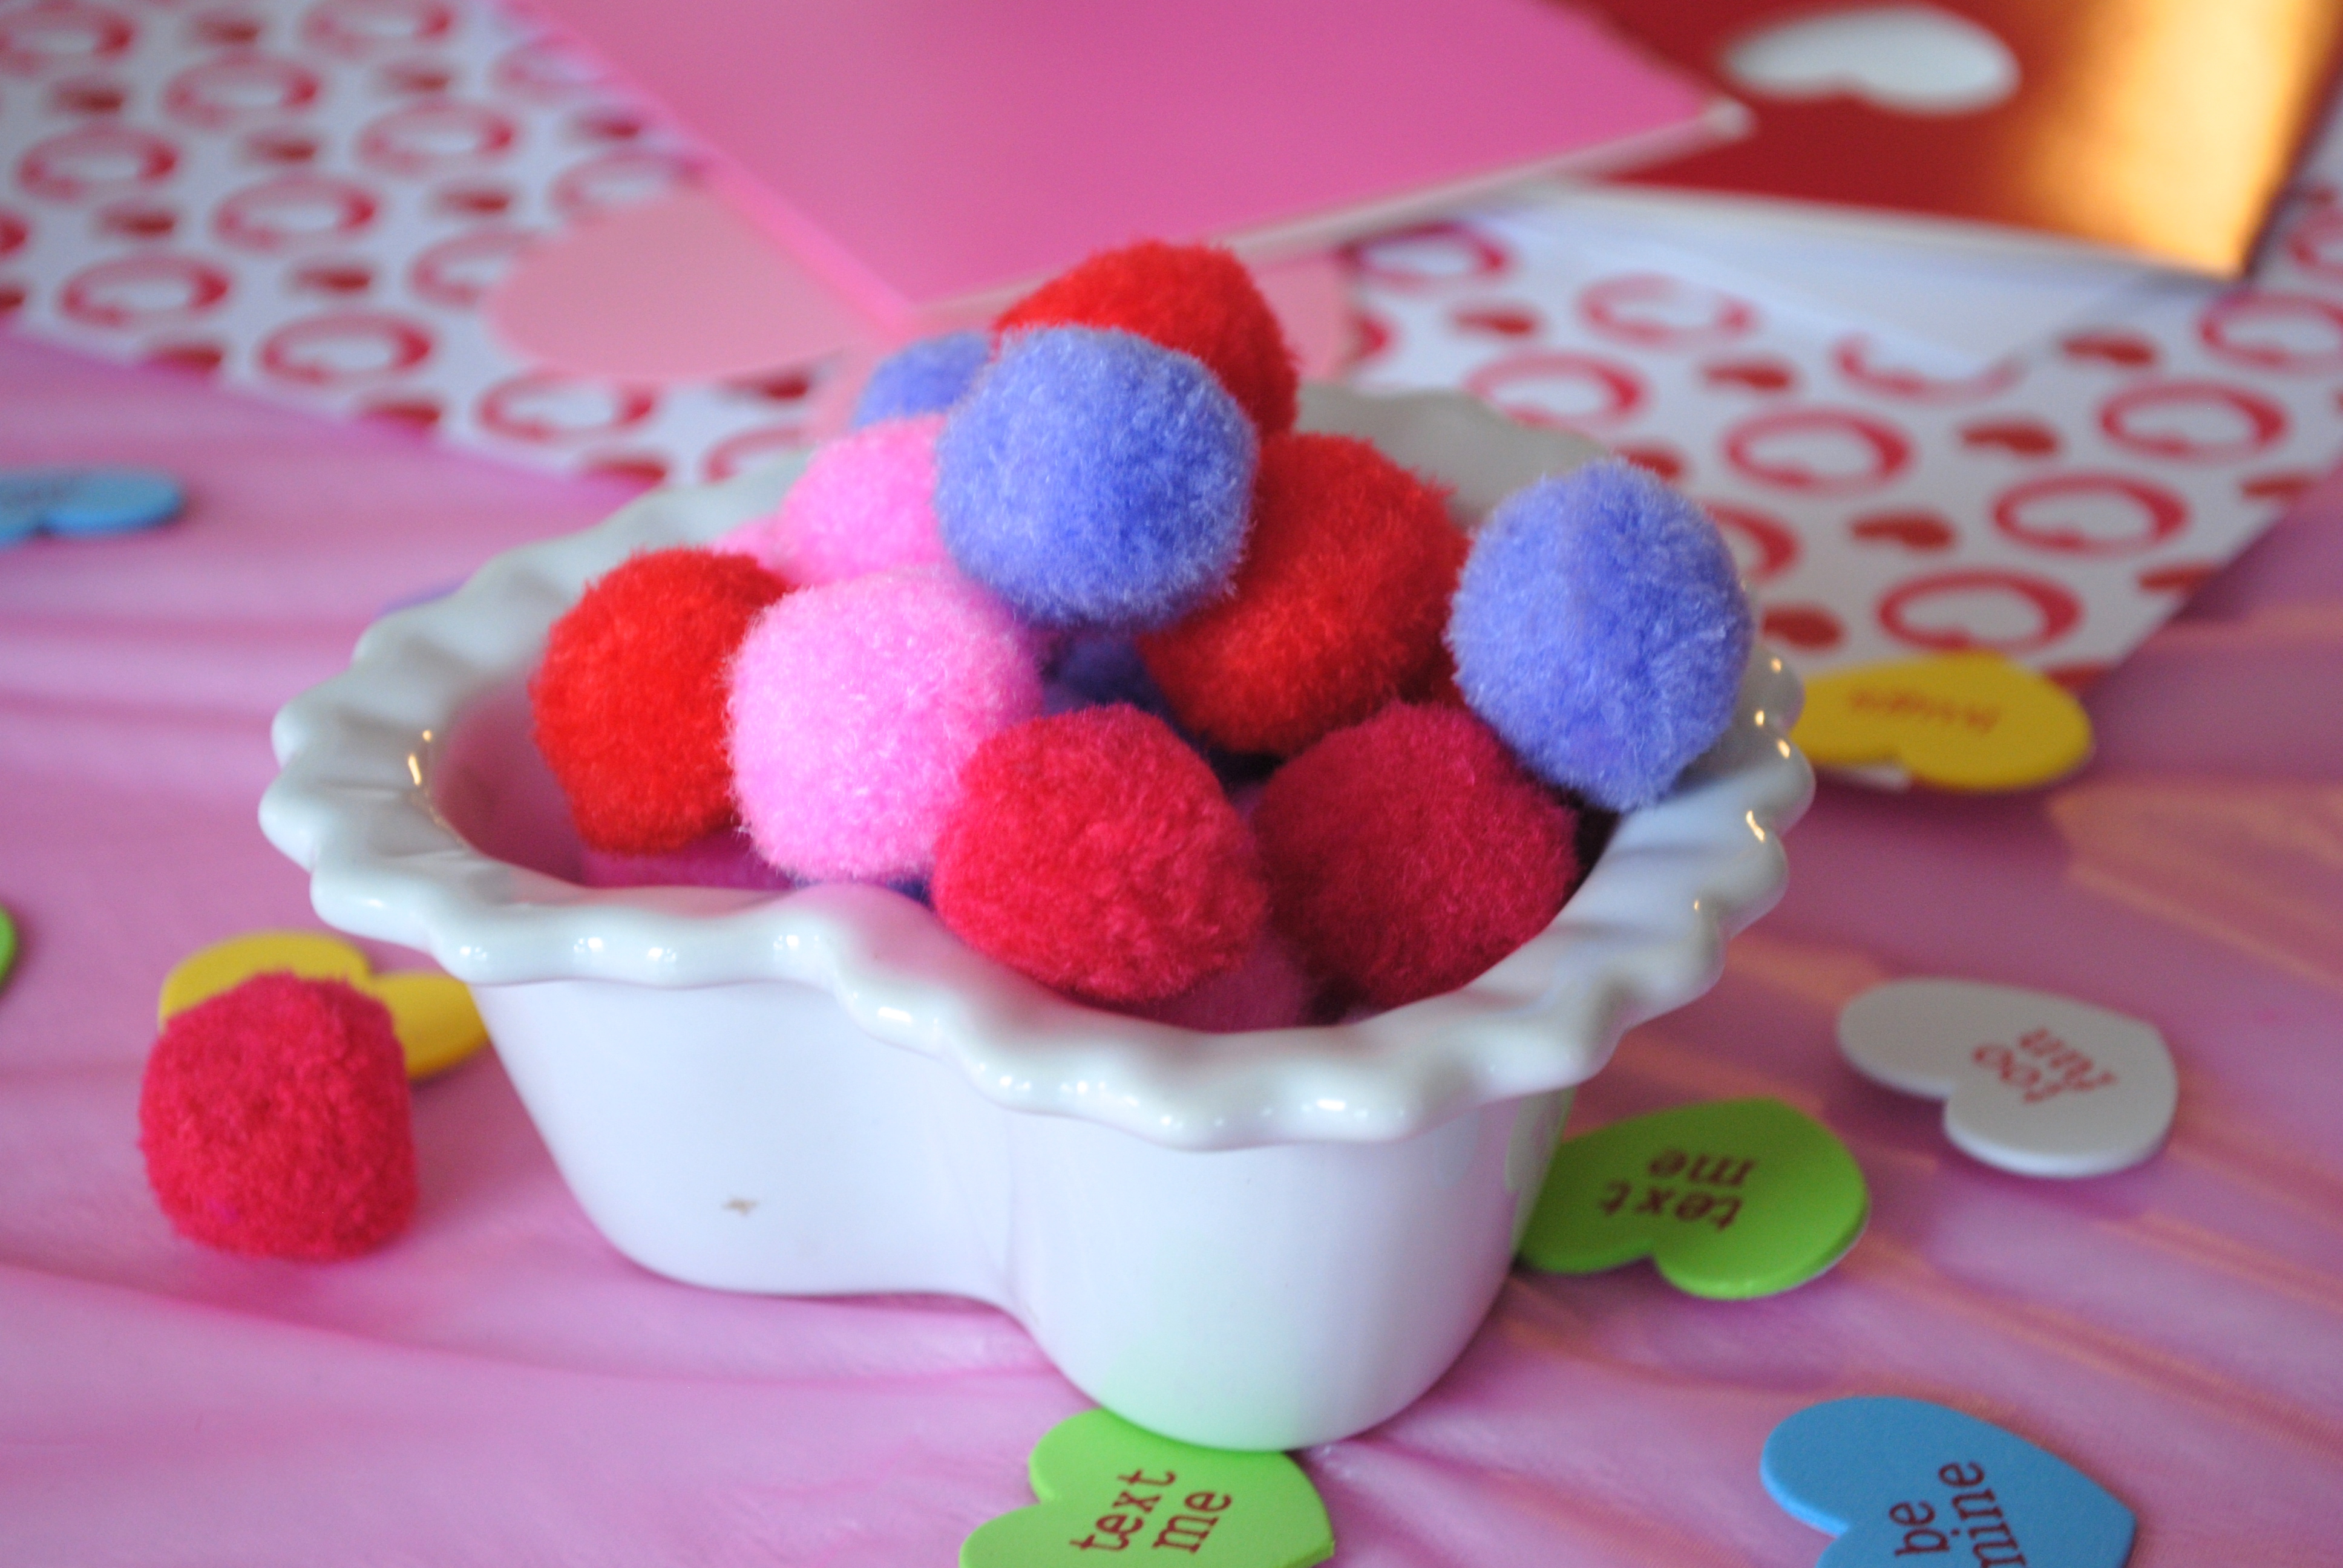
Who can resist using some fun pom poms.
Use paper to cover the table for toddlers, they can decorate it themselves!
They are trying to make hearts with their hands.
How cute are all those tights!
One very happy girl!
Adorable goodie bags!
The perfect parting gift~ a personalized coloring page from Frecklebox.
Thank you Susan for hosting a wonderful party! It was great to watch the girls make some masterpieces, both with their Valentine’s day cards and their cupcakes. Hope everyone has a Happy Valentine’s Day this week! If you still need some inspiration, stop by and see what’s new on my Valentine’s Day Pinterest board.
https://emilyroachwellness.com/wp-content/uploads/2013/02/DSC_0296.jpg25923872eroachwellnesshttps://emilyroachwellness.com/wp-content/uploads/2018/11/Emily-Logo-header-1.pngeroachwellness2013-02-09 21:49:432013-02-09 21:49:43Valentine's Day Craft Party For The Littles
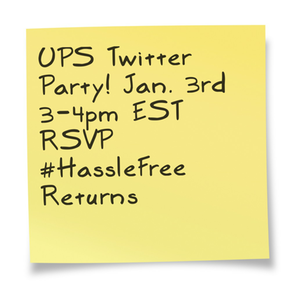
I did a large amount of holiday shopping this year online. It’s an easy way to get great prices, but also order from some unique shops on Etsy. As we sort through all the lovely gifts we received, we have a couple that need to be returned or exchanged. January 3rd is National Returns Day. It’s kind of like a back-to-reality moment when you want to clean up your house and check those returns off your to-do list. On January 3rd, UPS will ship more than 520,000 from consumers back to retailers. As companies like Amazon report their biggest year yet, many people will line up to do their returns in the easiest way possible.
Here are a couple ways to ship your packages in an eco-friendly way:
Skip the overnight shipping option. It increases the carbon footprint of that package’s return trip.
Repack in a used box. I save a few during the month in case I have any returns I need to do.
Use grocery paper shopping bags to wrap a return. The paper is strong and free!
Pack breakables in newspaper instead of bubble wrap or packaging peanuts. If you have a shredder, you can use the shredded paper.
UPS offers carbon offset options
Skip the drive to the store and have your local UPS driver pick up your returns.
While you are at UPS, see if your location will accept any packaging peanuts you received. Select locations will recycle them.
On January 3rd, I’ll be at our local Needham UPS location at 946 Great Plain Ave spreading the word about UPS’s Hassle Free Return options. They make it easy. I’ll be bringing my box to return to Amazon so I’ll give it a test run. You can follow me on Twitter @RandomRecycling and the #HassleFreeReturns. Our local sponsor is Wayfair, rsvp for the twitter party below to win a gift card for some personal shopping on their site.
There are also other events happening in Atlanta and Denver.
The UPS Store, 10800 Alpharetta Highway, Suite 208, Roswell, GA 30076 with Megan Cooper, @jamonkey
The UPS Store, 8200 S Quebec St Ste A3, Centennial, CO 80112 with Jen Goode, @jgoode
RULES: You must be a US resident 18 and older to be eligible to win. Please see attached document for official rules.
Disclosure:
The UPS National Returns Day public relations team partnered with bloggers such as myself to help educate consumers about UPS National Returns Day. As part of this program, I received compensation for my time. They did not tell me what to say or influence opinions in my blog posts. UPS believes that consumers and bloggers are free to form their own opinions and share them in their own words. UPS’s policies align with WOMMA Ethics Code, FTC guidelines and social media engagement recommendations.
https://emilyroachwellness.com/wp-content/uploads/2018/11/Emily-Logo-header-1.png00eroachwellnesshttps://emilyroachwellness.com/wp-content/uploads/2018/11/Emily-Logo-header-1.pngeroachwellness2012-12-27 15:41:512012-12-27 15:41:51Did You Know Jan 3rd is National Returns Day? #HassleFreeReturns
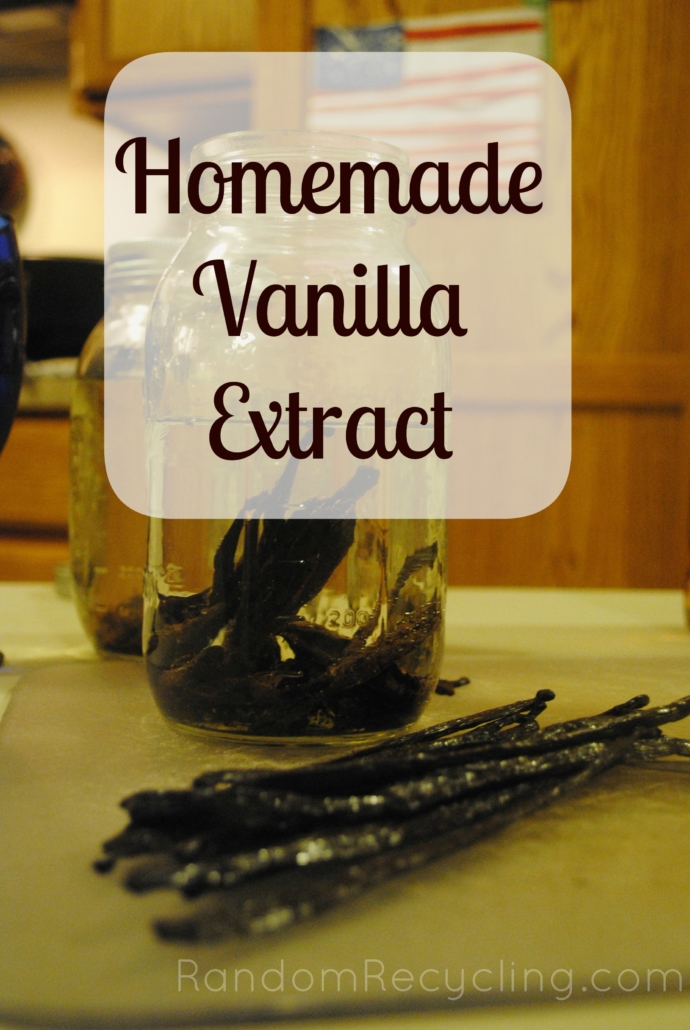
You are going to learn how to make your own homemade vanilla extract in the steps ahead. I’m going to guess a few of you do a fair amount of baking. Did you have to buy vanilla extract at the store? It’s expensive and it’s not always that healthy for you. Many of the vanilla extracts sold are “imitation” and are really just filled with ethyl alcohol and chemicals. That doesn’t sound like a great way to make your desserts taste extra special now does it. Here is an easy recipe to make your own vanilla extract. I give bottles of it away as hostess gifts, and have one more mason jar saved for myself. Time to make a few more batches.
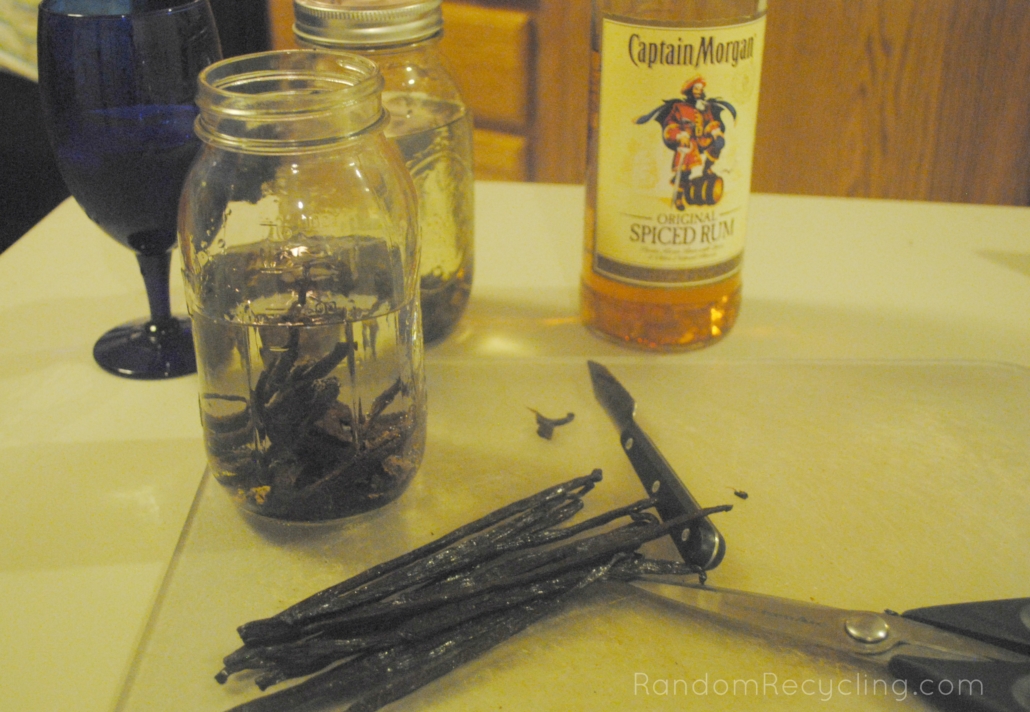
I cut the vanilla beans in half with scissors, then scraped the vanilla beans out into an sterile quart size glass mason jar. The vanilla beans are also added to the mason jar. Then cover the beans with your alcohol of choice. I used all three alcohols (separately) so I could decide which one is better. The bourbon smelled the best by far, but it is a more expensive choice. The better the alcohol you use, the better the end result. If you choose vodka, skip the plastic bottle bottom shelf vodka and get a mid-level priced option instead. It will create a better end result.
Next, store the jars in a cool, dark place. It has to be handy so it may be easier to just make some room in a kitchen cabinet. Over the next week, give the jars a gentle shake. After a week is up, transfer the jars to a storage area and let them sit for a minimum of six weeks. The longer they sit, the better. For the Christmas gifts I made, I did this in August and let them sit for months. Some say you can do it right away, others agree that longer steeping time is better.
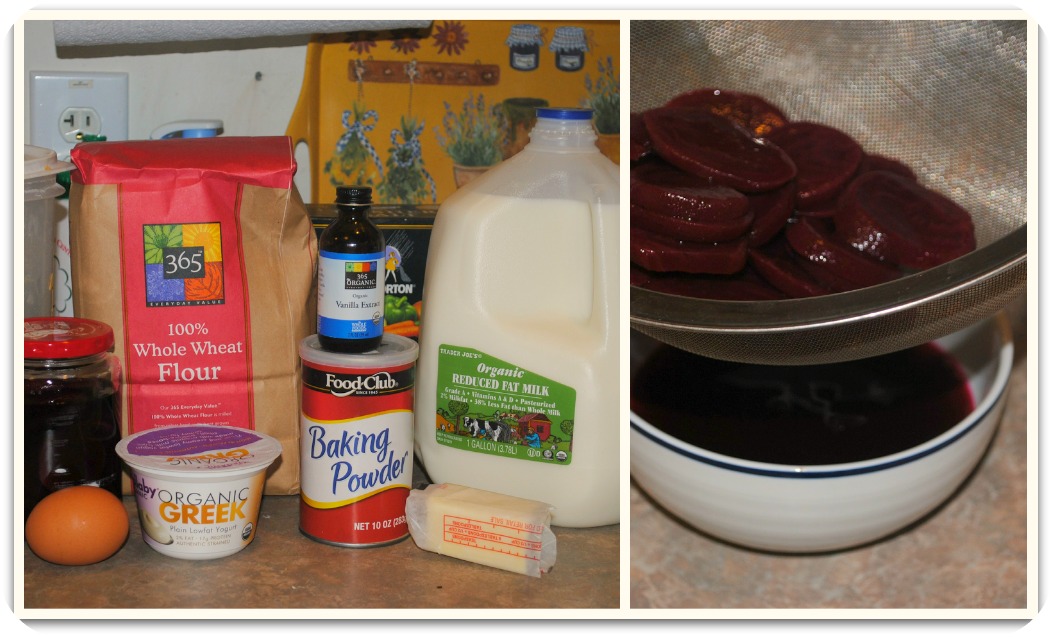
Once your vanilla is ready, I strained the mixture using a double layer of cheesecloth. I bought adorable swing top bottles from a local store. I used these labels and printed them on sticker paper. I had to create my own sheet of just the vanilla labels, cut and paste into a new document to print just vanilla labels. Once the jars were full, I added in some of the vanilla beans for decoration.
There are tons of different ways to make your own vanilla extract. This article here has links to many other crafters which helped develop my own recipe.
Let me know if you have any questions. Enjoy your homemade vanilla extract!
https://emilyroachwellness.com/wp-content/uploads/2012/12/154750_464795590223725_72733396_n.jpg612612eroachwellnesshttps://emilyroachwellness.com/wp-content/uploads/2018/11/Emily-Logo-header-1.pngeroachwellness2012-12-26 20:56:302019-02-18 20:39:24Make Your Own Homemade Vanilla Extract
Let the countdown begin! The kids are excited that it’s nearly Christmas Eve and the big day is almost here. They are exhausted from staying up too late at a holiday party but it was so much fun seeing them party like a rock star till well past their bedtime.
The meal plan for the week is focused on the next two days. One more party to attend and then we are hosting 11 adults and 6 kids on Christmas Day. I’m sharing our Christmas menu today if you need a little last minute inspiration. We have never hosted Christmas Day so the menu is a mix of family favorites. The rest of our week will be filled with leftovers, using up pantry staples and a night out for mom and dad.
Christmas Day Menu
Appetizers: Cheese and Crackers, Shrimp Cocktail
Main Course: Glazed Ham, Green Bean Casserole, Corn Pudding, Cranberry Sauce
Dessert: Buckeye Balls, Congo Bars, French Meringues, Gingerbread Cookies and Chewy Molasses Cookies.
What are you making for Christmas Day? Is it a tradition or do you mix it up every year?
For more menu planning ideas, visit the Monday Meal Plan at Org Junkie every week!
https://emilyroachwellness.com/wp-content/uploads/2018/11/Emily-Logo-header-1.png00eroachwellnesshttps://emilyroachwellness.com/wp-content/uploads/2018/11/Emily-Logo-header-1.pngeroachwellness2012-12-23 21:08:032012-12-23 21:08:03Monday Meal Plan Dec 24
I had the opportunity to check out the Royal Sonesta Boston hotel last weekend for a Boston Social Media holiday party. The hotel welcomed a group of local bloggers and their families for an afternoon of fun and great company. From the moment we entered the hotel, the staff was super nice and had the event well organized. I always love seeing hotels decorated for Christmas and took the opportunity to click a quick one of the kids in front of one the many decorated trees at the hotel.
Here are a few fun facts I learned about the Royal Sonesta Boston.
The hotel is great for kids. The indoor pool alone is a winner.
Even the kids straws are special.
They have a composting program!
Lots of new green initiatives are in work for each hotel room.
They buy local when possible. The bar tools were purchased from a local shop in Somerville.
They make their own sodas. We had the Pomegranate Lime Black Pepper soda and it was amazing.
They give kids homemade play dough at their restaurants instead of paper and crayons.
The restaurants partner with local farmers to create farm to table inspired menus.
The event was a blast for both the kids and adults. The kids were entertained with crafts, play dough making, and cookie decorating. The adults enjoyed a civilized lunch while the babysitters from UrbanSitter watched our little ones. Ice cream sandwiches with homemade cookies finished off the lovely afternoon.
Homemade play dough made in house.
Thank you to the Royal Sonesta Hotel for hosting us, and Niri and Isra for coordinating it all. Go team #BSMHoliday! To hear more about our Boston Social Media parties, here is my friend Lori from Groovy Green Livin’s recap. She shares more about what this group means to all of us.
I also want to mention our group has partnered with three charities for the holidays. Toys for Tots (we packed the bins at Burton’s Grill on Tuesday night!), Pediatric Cancer research and we adopted two families who were devastated by Superstorm Sandy. If you are a tweeter, if you send out a tweet with the hashtag #Aflackids, Aflac will donate $2 towards pediatric cancer research for every tweet this holiday season.
Disclosure: We attended a complimentary event at the hotel. All opinions shared here are my own.
https://emilyroachwellness.com/wp-content/uploads/2012/12/IMG_0802.jpg27071981eroachwellnesshttps://emilyroachwellness.com/wp-content/uploads/2018/11/Emily-Logo-header-1.pngeroachwellness2012-12-07 14:36:162012-12-07 14:36:16A Blogger's Holiday at the Royal Sonesta Boston
As December begins, it’s easy to get caught up in the frenzy of the holiday season. Presents to buy, packages to ship, parties to attend…it takes a real effort to slow down and enjoy the littles details that come along with this wonderful holiday of ours. I took a few minutes today to write down the activities that are really important for me to share with my kids. When I think back to my own Christmas as a child, it wasn’t the presents I remember best, (although there was that really awesome My Little Pony Castle one year) but the small moments of togetherness that warms my heart. Favorite stories like the Santa Mouse, and making buckeye balls with my mom and sister, are the moments I cherish. In no particular order, here are the things I want to accomplish this holiday season with my family. In the comments, I would love to hear what you have on your list.
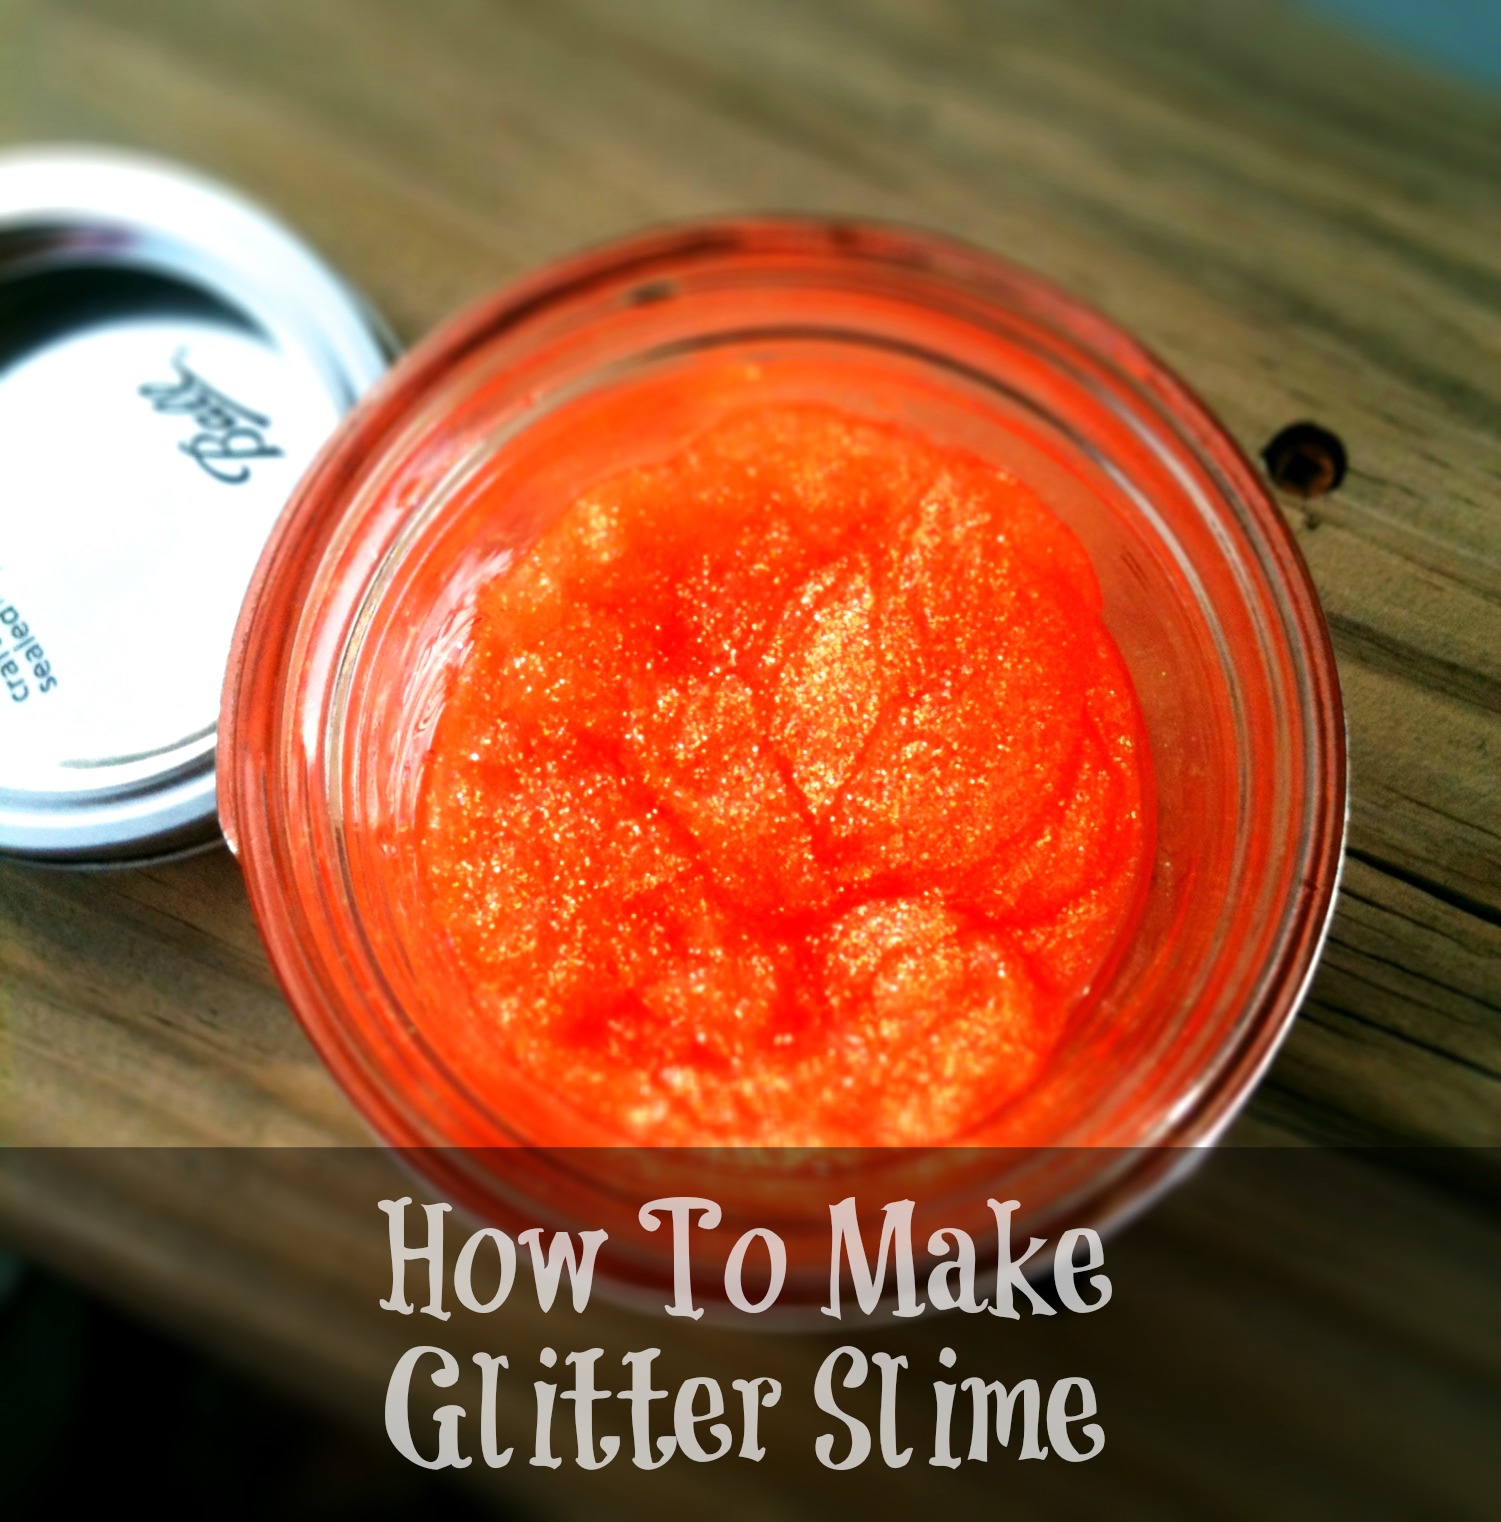
When I first spied glitter slime on Pinterest I was hooked. Such a fun project for the kids with a lasting toy to play with. This only requires three ingredients: glitter glue, Borax, and water. It’s not too messy and it was easy to make with both a three year old and a one year old.
Ingredients
1 large glitter glue bottle (glitter glue pens are too small)
1 teaspoon Borax
1 cup of water plus 1 tablespoon
Instructions
1. Empty glitter glue bottle into a large bowl. Add 1 tablespoon of water and swirl around to thin out the glue.
2. Mix 1 cup of water with 1 teaspoon of Borax. Add to glue mixture.
3. Let the kids swirl it all together and it instantly becomes slime!
Madison was really excited to find pink glue to make for her and a friend. It was a great sensory experience for both children.
We are storing our slime in reused glass jars. Large baby food jars are a good size too.
Easy peasy. Here is a cute Google + album sharing pictures of our experience making this project a reality. Happy Halloween everyone!!
https://emilyroachwellness.com/wp-content/uploads/2018/11/Emily-Logo-header-1.png00eroachwellnesshttps://emilyroachwellness.com/wp-content/uploads/2018/11/Emily-Logo-header-1.pngeroachwellness2012-10-31 14:13:002012-10-31 14:13:00How To Make Glitter Slime
I love this idea for Memorial Day. So did a lot of other people when I noticed my pin was repined almost 500 times in one day. There are so many fun holiday decorating ideas I want to do, but I hesitate sometimes because of my goal to reduce our intake of synthetic food dyes. Check out my earlier post on why it may be important for your family to make the switch.
If you are looking to make the switch to natural food dyes, I found a few options online that look good.
The India Tree All Natural Nature’s Colors Decorating Sugars Variety Setis an investment. The price we pay for natural ingredients I guess. The blue should work for making these patriotic strawberries. Maybe lighten it up with a little white sugar. You can make them for both Memorial Day and 4th of July parties!
Check out more Summer Holiday inspiration on my Pinterest Board! What are you making this weekend?
https://emilyroachwellness.com/wp-content/uploads/2018/11/Emily-Logo-header-1.png00eroachwellnesshttps://emilyroachwellness.com/wp-content/uploads/2018/11/Emily-Logo-header-1.pngeroachwellness2012-05-22 10:35:002012-05-22 10:35:00Switch to Natural Food Coloring for Holiday Baking
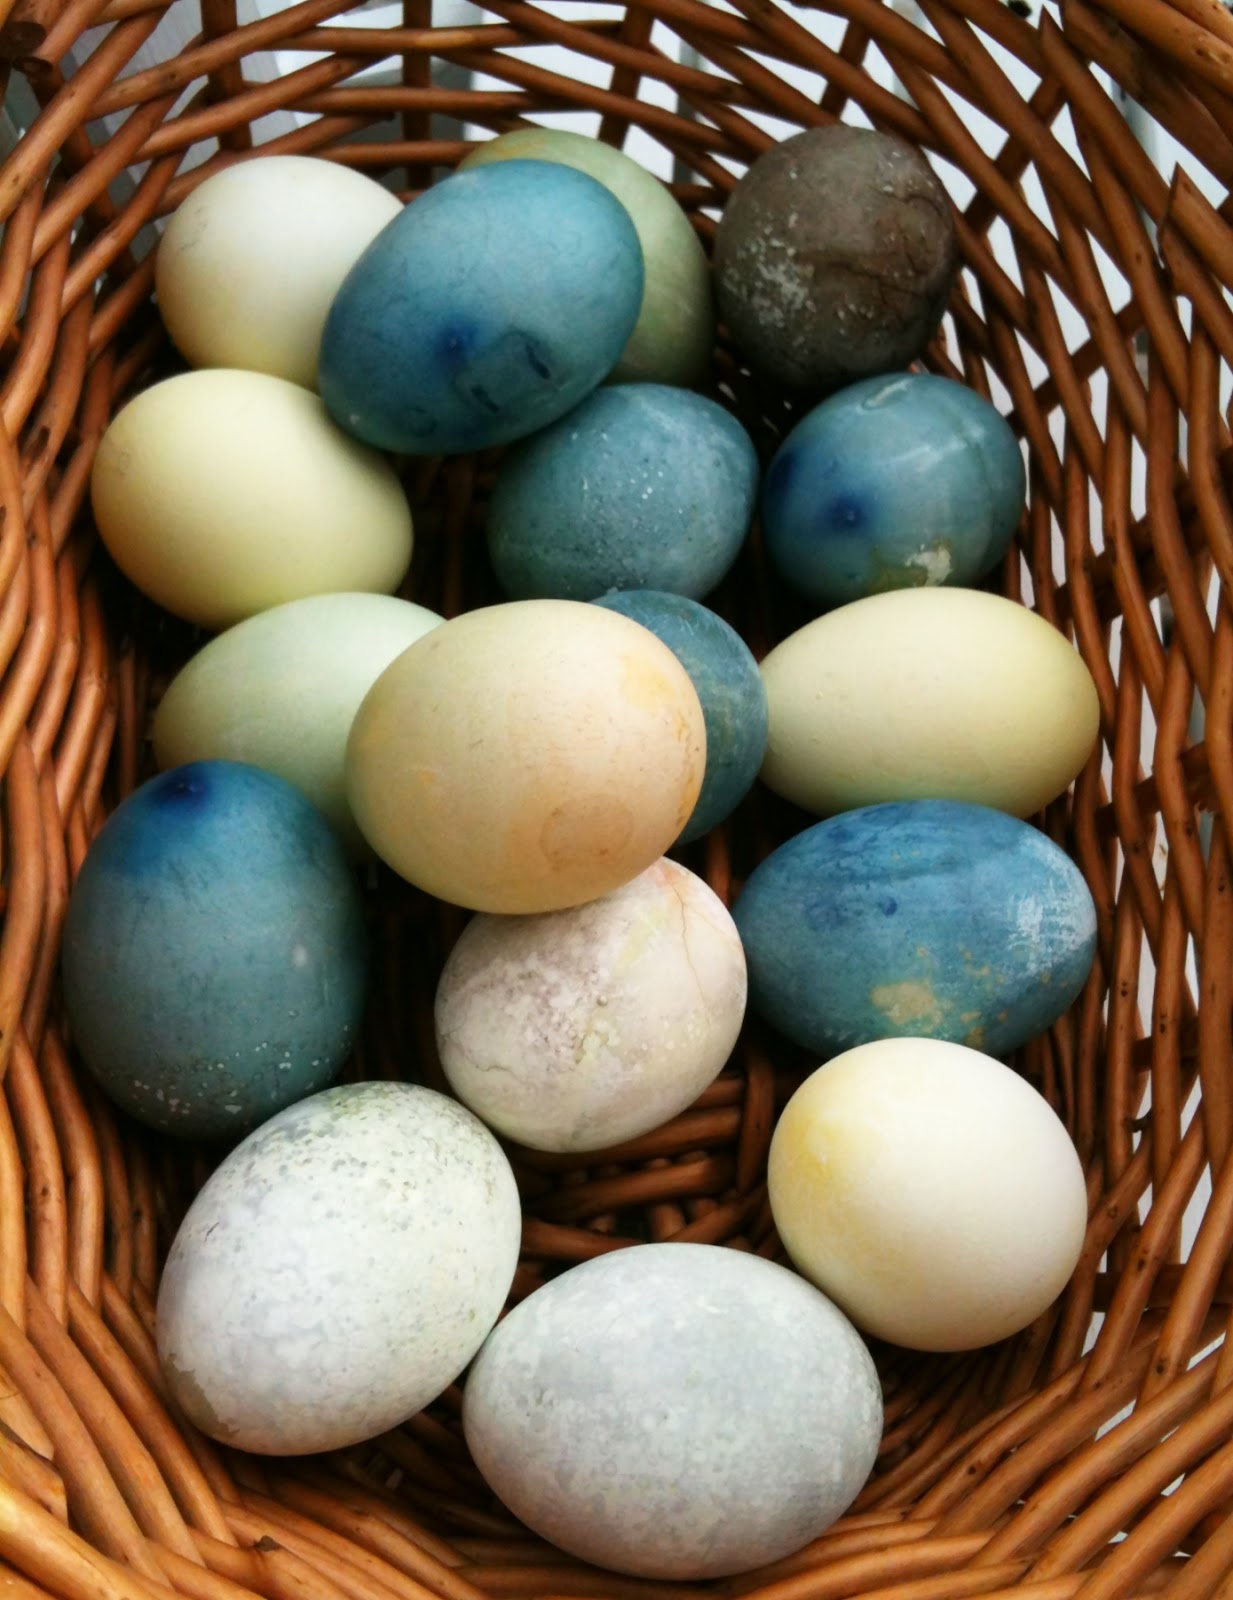
I am in love with holiday decorating. Easter included. Time to decorate those eggs! This year I finally took some time to do some egg dying with natural ingredients. Everything came from what I already had in the house.
I bought generic white eggs. I went with hard boiled instead of blowing them out because I was wasn’t sure if my kids could handle something so delicate. Cook for at least 15 mins on a simmer to avoid cracks.
I did some clean out of the fridge/freezer and cabinet to test out a few options. The blueberries soaked in water for about an hour. Others were boiled for about 20 minutes to draw out the colors.
Once the liquid was ready, I divided it up into smaller containers and added about one teaspoon of vinegar per one cup of liquid.
Cover the area with a large cloth or newspaper as this got messy when the eggs were dropped in!
We got used the following and let the eggs sit in the mixture overnight.
Spinach~ light green
Cranberries~ light pink…I would strain in a cheese cloth before doing this again. I got funny bubbles on the eggs
Pomegranate tea~ turned green over night! Originally was pink
Carrots~ light yellow
Red wine~ brown, almost prehistoric looking.
Beet juice~ (very) light pink BLUEBERRIES~ dark blue. Favorite of all the eggs by far.
We drained them on a cookie cooling rack. I didn’t care about little marks as it just adds to their character. This was an easy kids activity when adult can make the natural dyes at the stove ahead of time. The eggs are safe to eat as long as they are refrigerated. Find more egg dying ideas on my Pinterest Board. Next up for me are some chalkboard eggs!
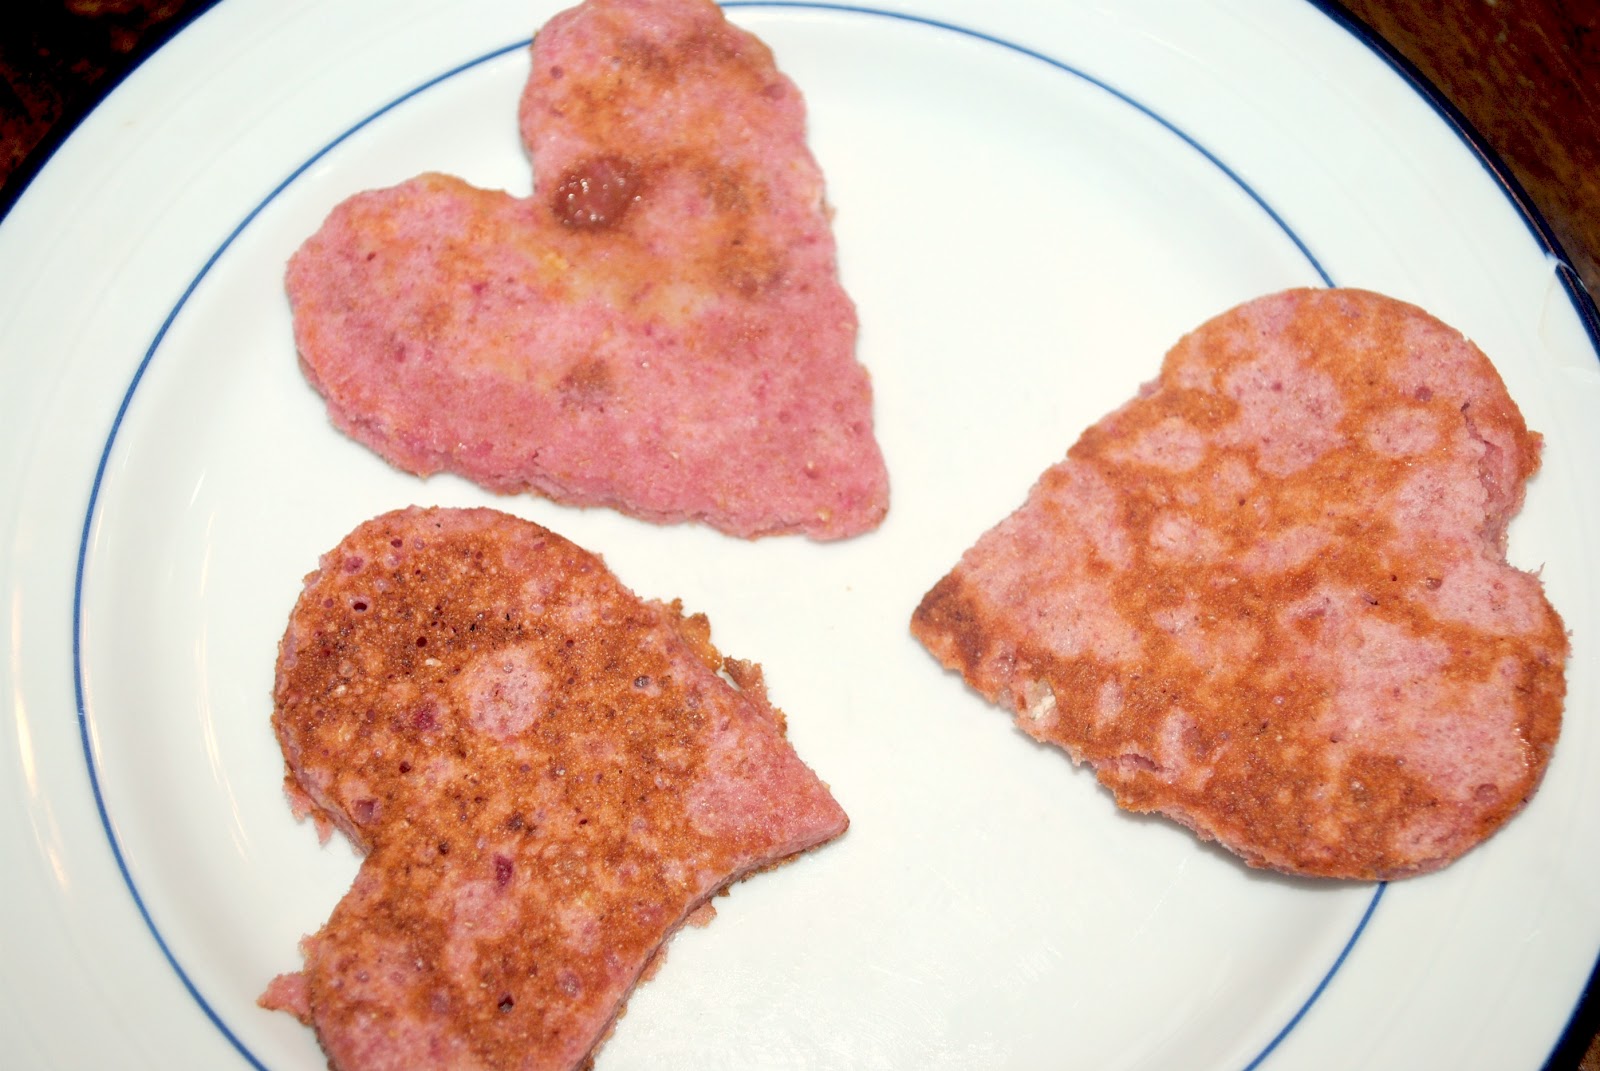
A little red pancakes anyone? I had some leftover beets and needed to use them up since the kids were not into them plain. I found the Red Beet Pancake recipe from Weelicious and tested it out this weekend. Madison ate 3 hearts before we even got to sit down together. This recipe was a winner!
Here is the recipe, with a few of my tweaks. I altered the flour ratio so there is a higher amount of whole wheat instead of white flour. I have found that most baked goods have a better end result when I keep some of the white flour in the recipe. It adds a little more gluten to the mix and helps with the leavening.
Ingredients
1 1/4 cup whole wheat flour
1/2 cup white all-purpose flour
3 Tbl brown sugar
1 Tbl baking powder
1/2 Tsp kosher salt
1 can of beets (original recipe calls for roasted beets…canned was fine.)
1 1/4 cup milk
1/3 cup Greek yogurt
1 egg
3 Tbl melted butter
1 Tsp vanilla
Instructions
-Mix all dry ingredients in a large bowl.
-Drain beets. (I saved the beet juice to use as food coloring for Valentine’s Day cookies this week.)
-Puree the beets and measure out 3/4 of a cup.
-Mix all wet ingredients together. Combine with dry until well blended.
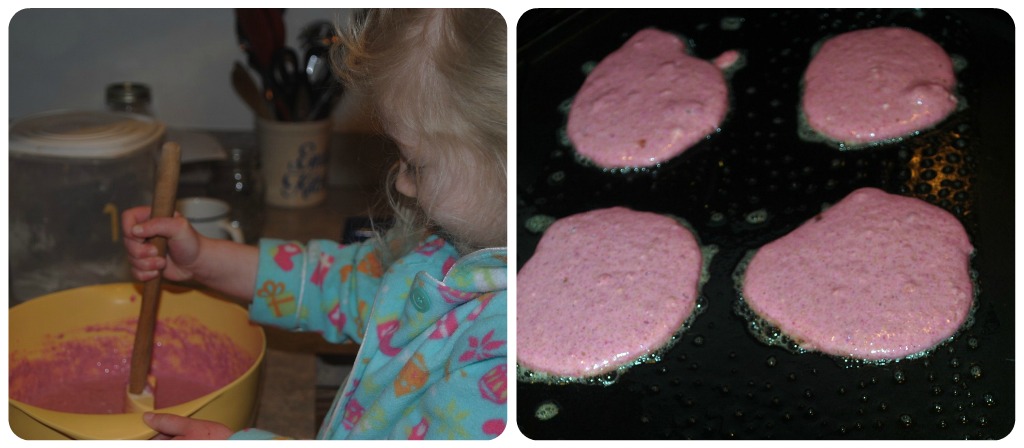
Someone woke up in time to help stir the batter
-Drop a 1/4 cup of batter onto a buttered griddle plan. Cook for about 3 minutes per side.
We used heart cookie cutters to celebrate Valentine’s Day once the pancakes were cool enough to handle.
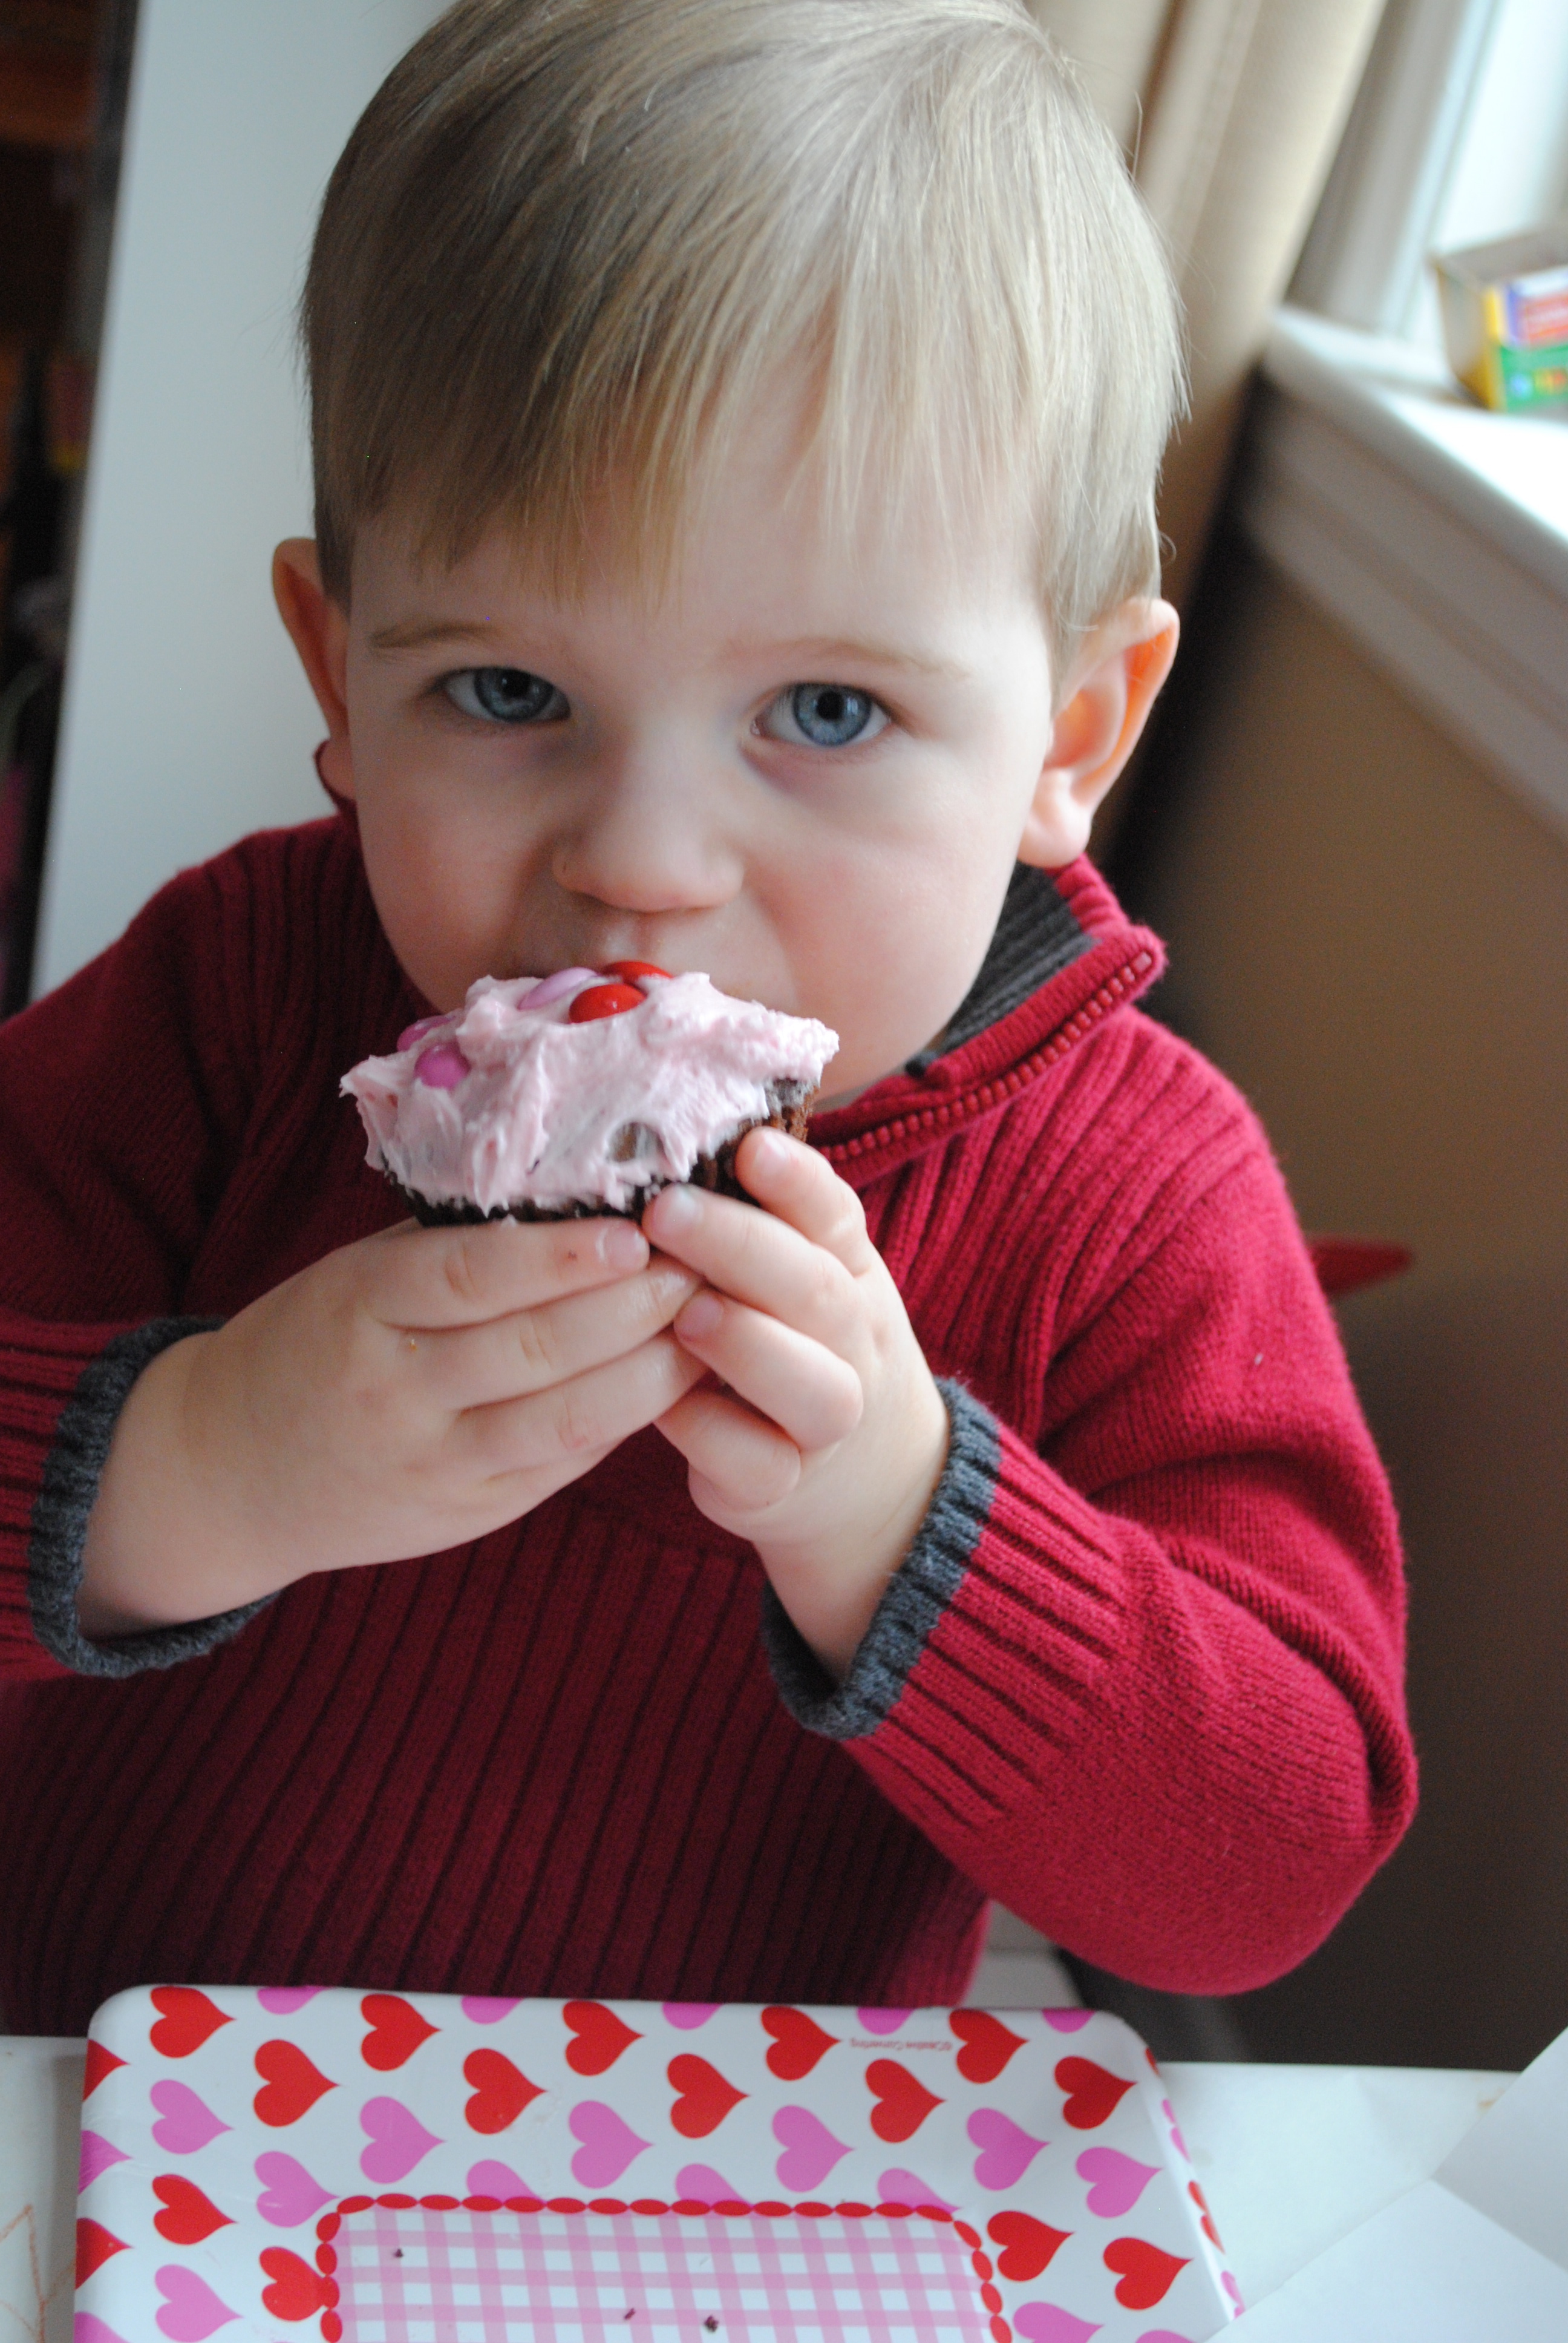
I served it with some of the leftover Wallababy Greek Yogurt for the little guy. The Greek yogurt is great for spreading as it’s thick enough to adhere to pancakes, rice cakes or bread.
He was awfully happy about his breakfast.
If he eats more than what’s on the floor by the end of the meal, it’s worth repeating. Plus he like playing with the yogurt.
How are you celebrating Valentine’s Day? Disclosure: I was provided samples of the new Wallababy Organic Greek yogurt. The opinions shared here are my own. This post is shared with Seasonal Celebrations, Tasty Tuesday Tidbits and Your Green Resource.

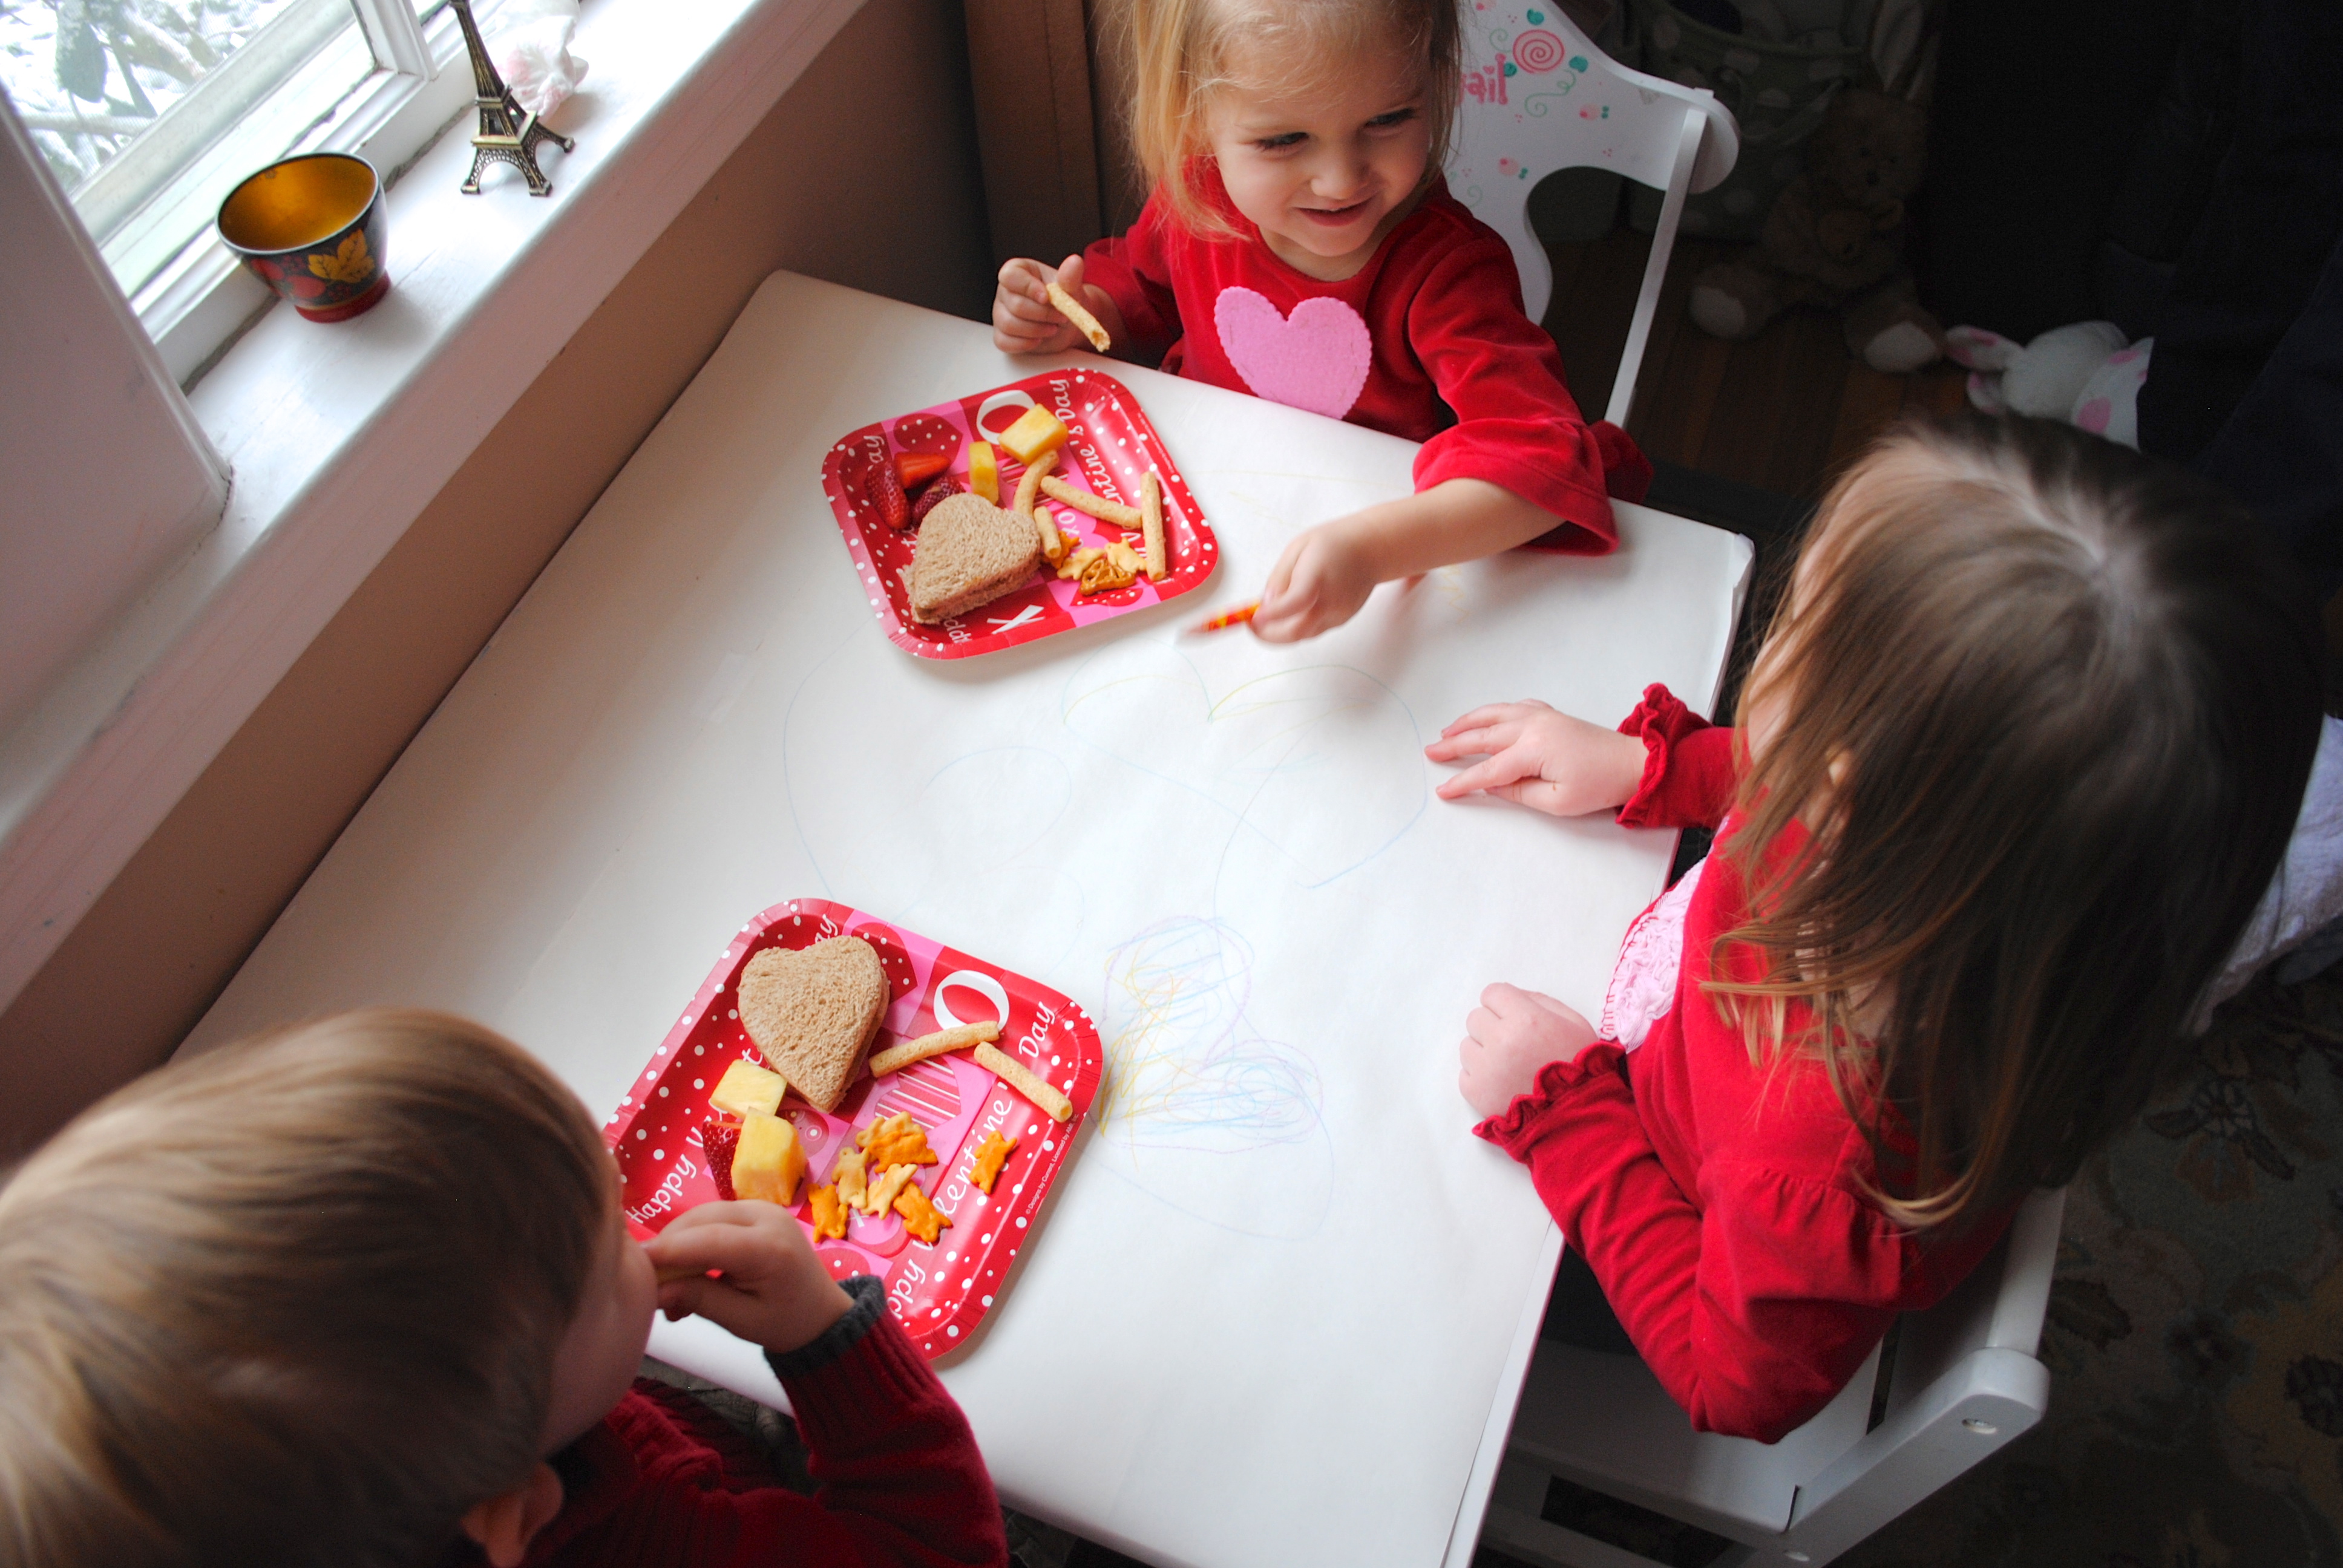 Use paper to cover the table for toddlers, they can decorate it themselves!
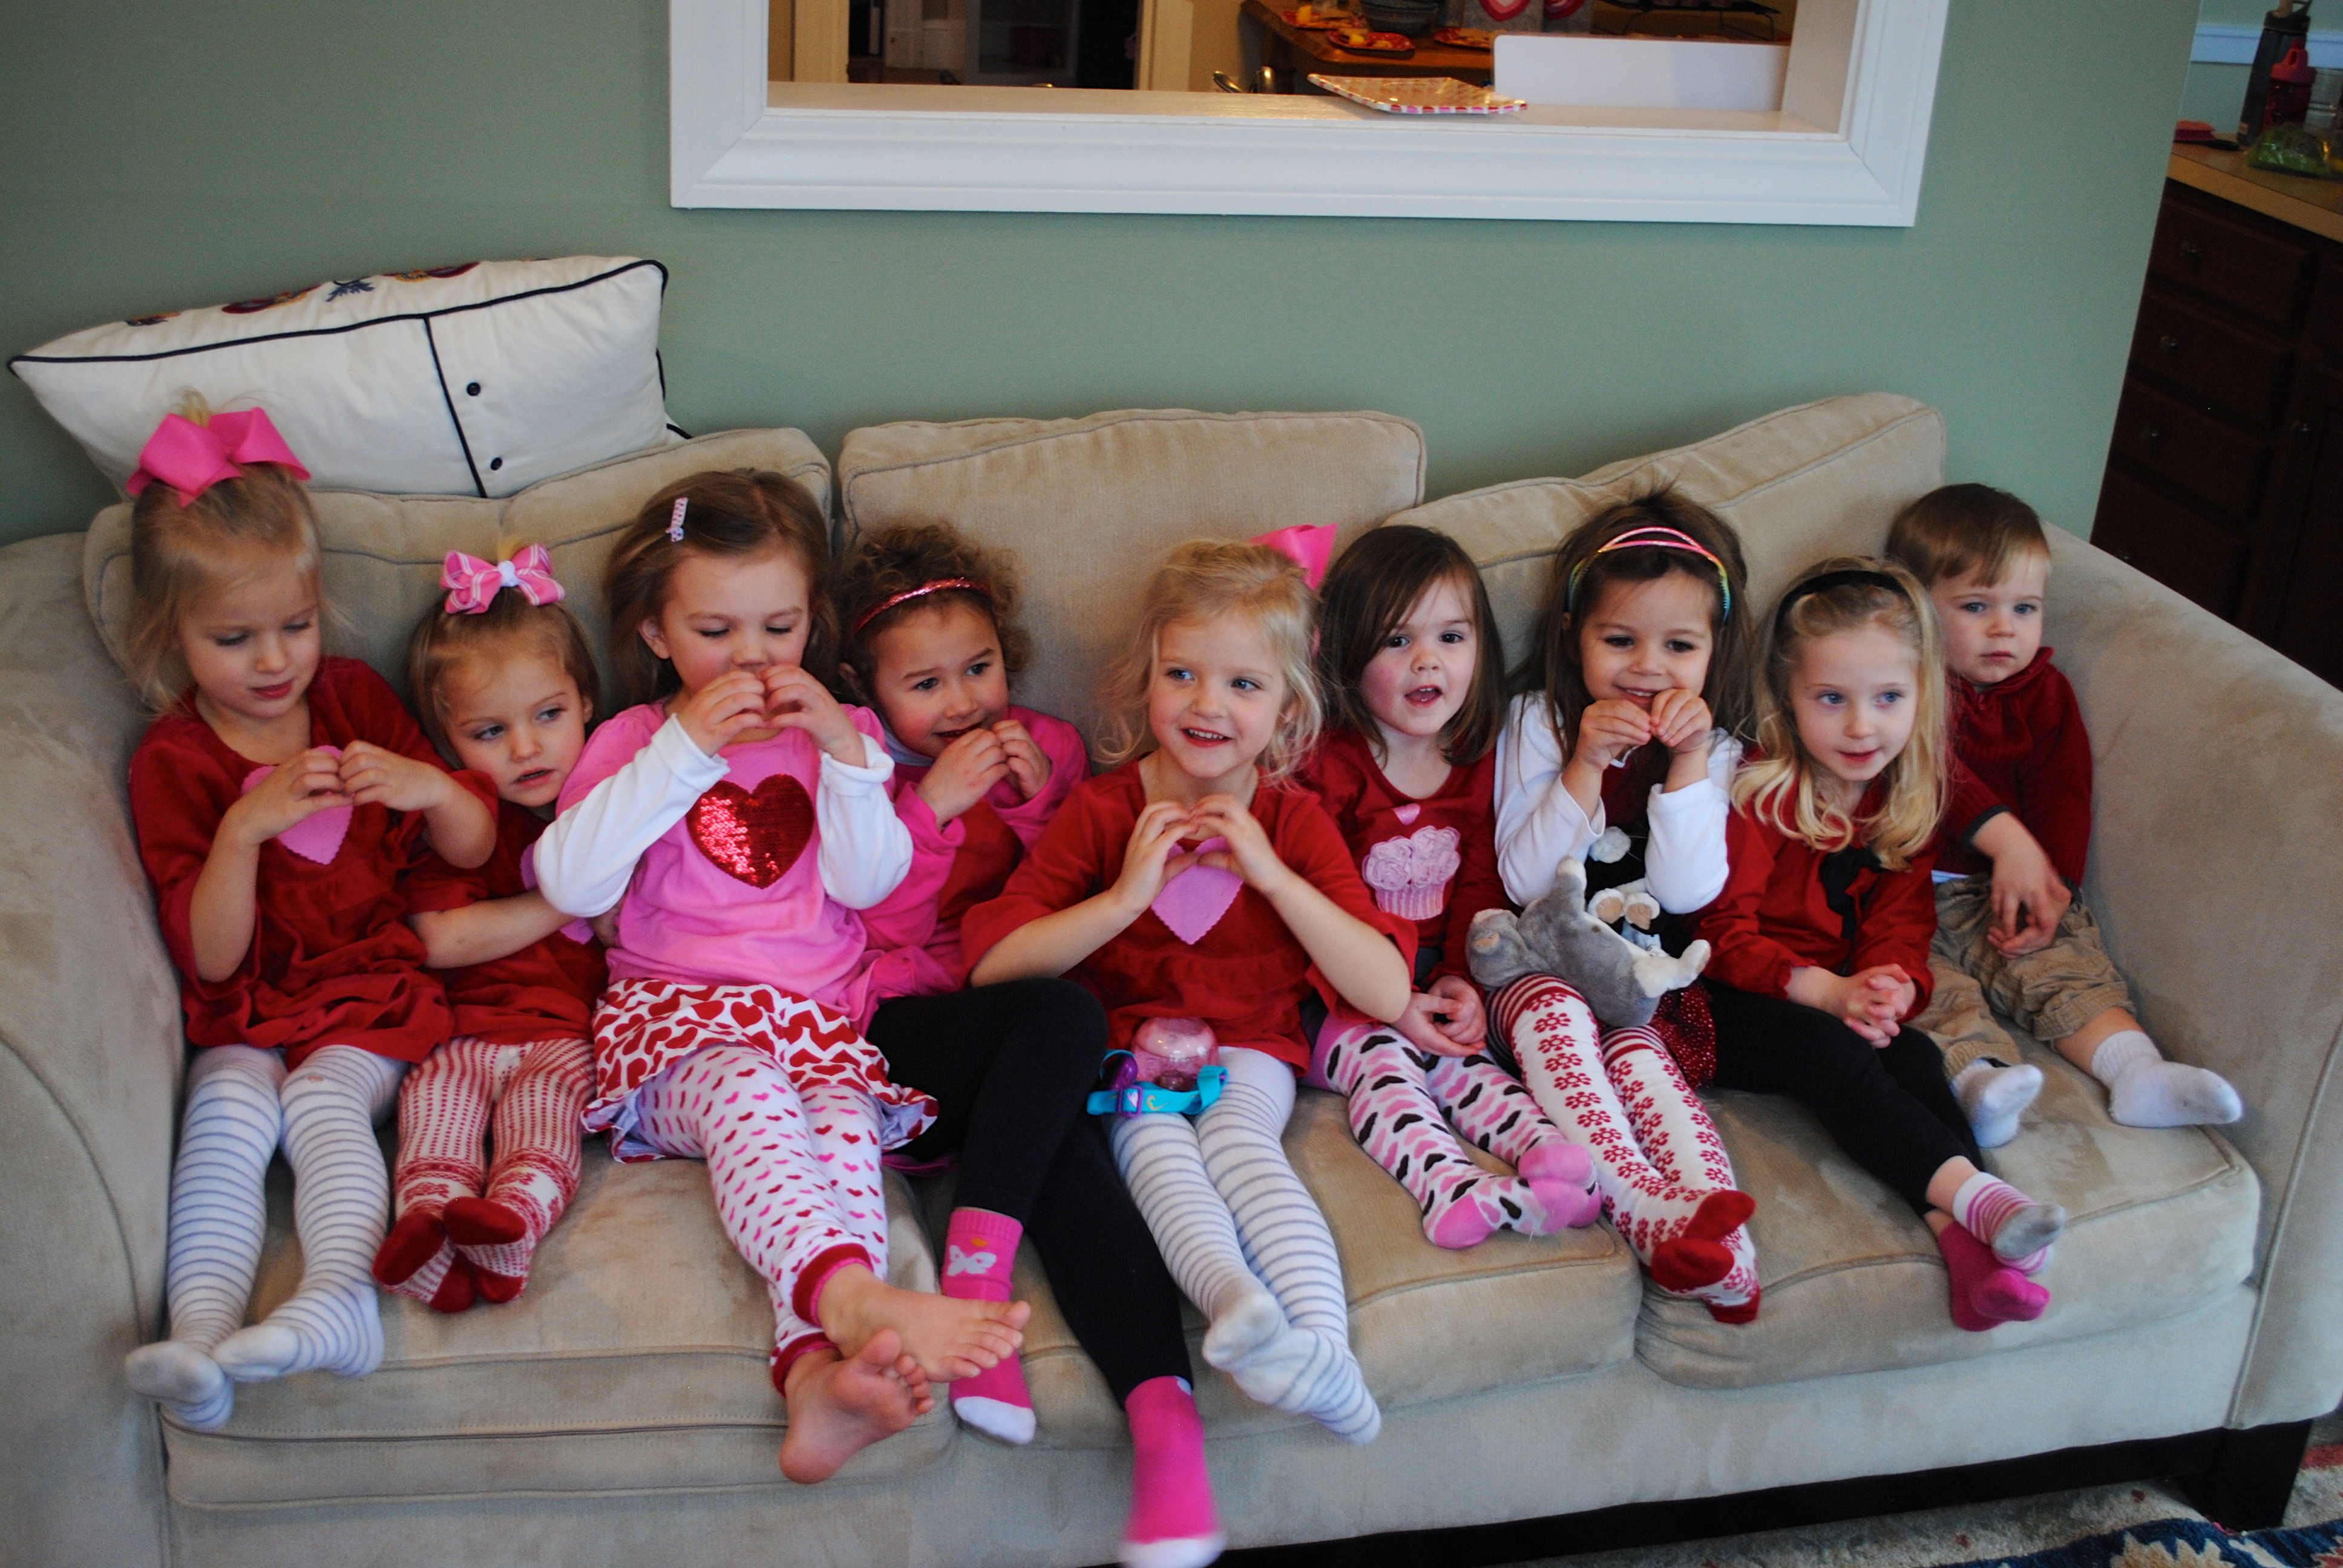


 Adorable goodie bags!