Posts

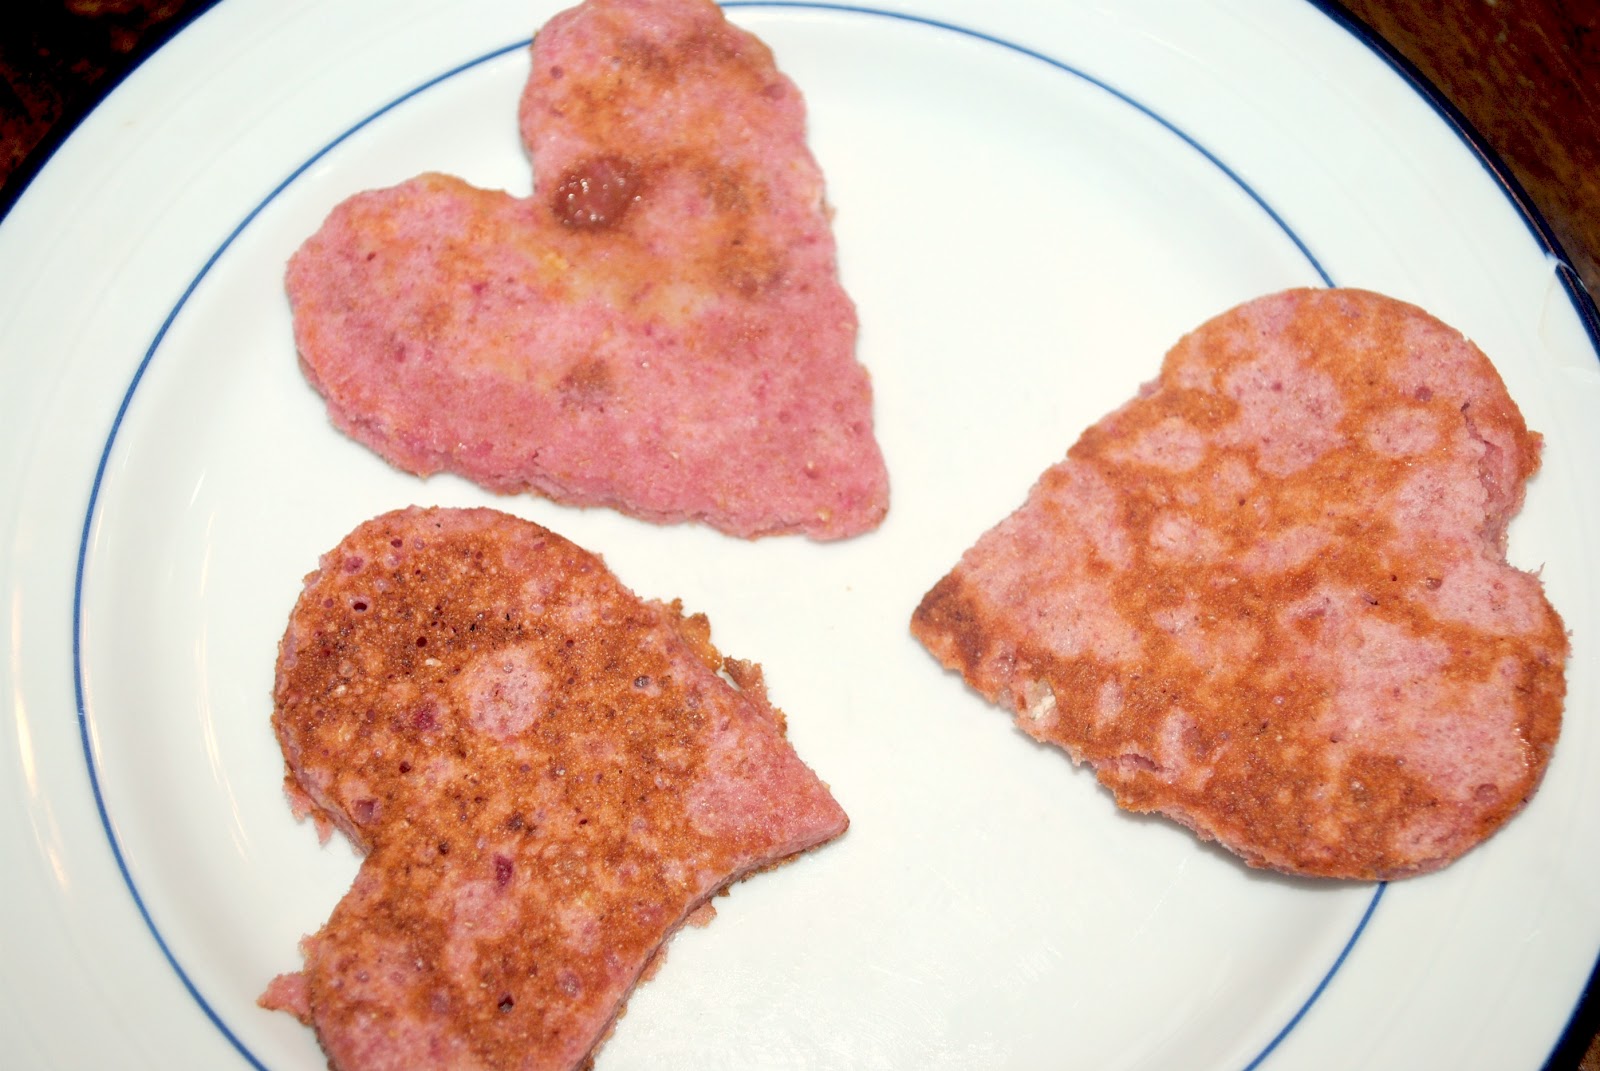
A little red pancakes anyone?  I had some leftover beets and needed to use them up since the kids were not into them plain.  I found the Red Beet Pancake recipe from Weelicious and tested it out this weekend.  Madison ate 3 hearts before we even got to sit down together. This recipe was a winner!

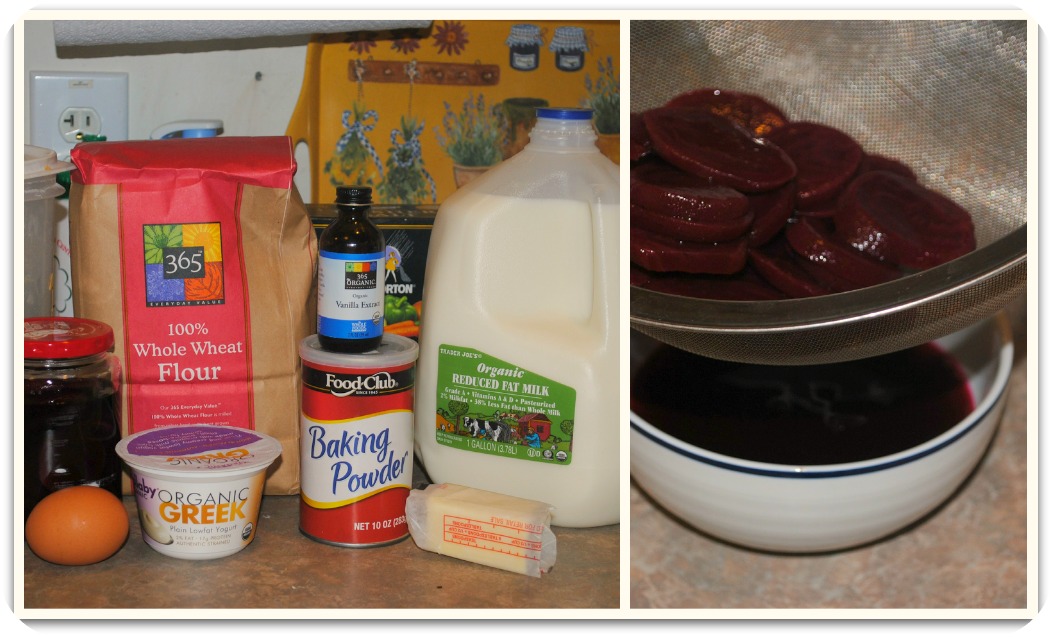
Here is the recipe, with a few of my tweaks.  I altered the flour ratio so there is a higher amount of whole wheat instead of white flour.  I have found that most baked goods have a better end result when I keep some of the white flour in the recipe.  It adds a little more gluten to the mix and helps with the leavening.

Ingredients
1 1/4 cup whole wheat flour
1/2 cup white all-purpose flour
3 Tbl brown sugar
1 Tbl baking powder
1/2 Tsp kosher salt
1 can of beets (original recipe calls for roasted beets…canned was fine.)
1 1/4 cup milk
1/3 cup Greek yogurt
1 egg
3 Tbl melted butter
1 Tsp vanilla

Instructions
-Mix all dry ingredients in a large bowl.
-Drain beets. (I saved the beet juice to use as food coloring for Valentine’s Day cookies this week.)
-Puree the beets and measure out 3/4 of a cup.
-Mix all wet ingredients together. Combine with dry until well blended.

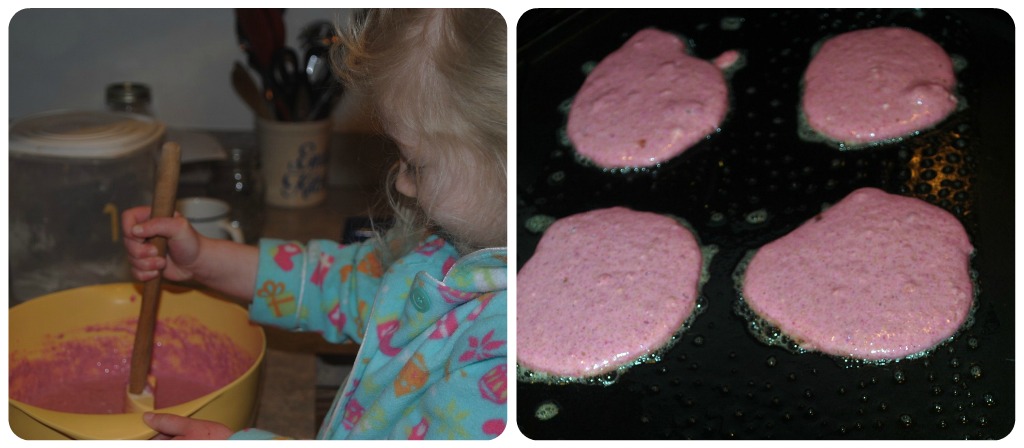
Someone woke up in time to help stir the batter

-Drop a 1/4 cup of batter onto a buttered griddle plan. Cook for about 3 minutes per side.

We used heart cookie cutters to celebrate Valentine’s Day once the pancakes were cool enough to handle.

I served it with some of the leftover Wallababy Greek Yogurt for the little guy. The Greek yogurt is great for spreading as it’s thick enough to adhere to pancakes, rice cakes or bread.

He was awfully happy about his breakfast.

If he eats more than what’s on the floor by the end of the meal, it’s worth repeating.  Plus he like playing with the yogurt.

How are you celebrating Valentine’s Day?
Image and video hosting by TinyPic
Disclosure: I was provided samples of the new Wallababy Organic Greek yogurt.  The opinions shared here are my own.  This post is shared with Seasonal Celebrations, Tasty Tuesday Tidbits and Your Green Resource.  

A wonderful way to save money is to make your own stock.  Stock is made using the bones of the chicken (or marrow bones for beef). Broth is made from making an actual dish with the meat.  In my humble opinion, the two words are essentially interchangeable.  I got the gelatinous stock when making “broth” so I think as long as you are making something that helps you avoid having to buy the high sodium laden chicken broth/stock boxes from the store, go for it.

In Part One of How to Cook a Whole Chicken, you will have a lot of excess liquid leftover at the end of the cooking process.  I transfer the whole chicken to a cutting board, or as much as I can without it totally falling apart.  Then I strain the liquid with a mesh strainer into a large bowl.  This is batch one of the chicken broth.

Gel is a good thing when it comes to stock

Now time for batch two.
Remove all chicken meat from the bones to serve with dinner, and the rest for salads, leftovers, etc.
Save chicken skin, bones, and necks to use in making the stock.

Combine the following into your slow cooker/crock pot or pressure cooker.

  • Chicken parts
  • Two onions quartered
  • Two carrots chopped into 2″ pieces
  • Two celery chopped into 2″ pieces
  • 1 Tablespoon of peppercorns
  • 2 bay leaf
  • 2 Tablespoons of apple cider vinegar (acidity helps draw healthy minerals out of the bones)
  • 10 Cups of filtered water

Cook on low heat for at least 12 hours in the Slow Cooker/Crock Pot.  Great overnight project.  Some people just leave their stock running all the time on the counter to always have it for cooking rice, beans, etc.  I don’t happened to have an extra slow cooker for this, or the counter space.

In the Pressure Cookeryou can make it in 45 minutes, plus about 10 minutes for the Natural Pressure Release.  The stock made in the pressure cooker tends to have more clarity, if that makes a difference to you.

The chicken stock will keep in the refrigerator for 4 days, or frozen for up to 6 months.  I freeze in 2 cup and 4 intervals.  Or I just fill whatever glass jars I have handy and pop them in the freezer.   Just remember to leave room at the top, at least 1 1/2″ of space to allow for expansion. If I’m making soup, I take out the frozen stock the night before and let it defrost in the refrigerator.

The middle jar bit the dust in the freezer.

This batch probably cost about $1.00 to make when you count in the veggies I used and spices.  If I got organic low-sodium chicken broth at the store, it would be upwards of $10.  Not a bad savings.  More money to spend on organic strawberries, since they are costing a small fortune these days.

Any success or failure stories of making your own chicken stock or broth?  Do you prefer to make it all on the stove?

Image and video hosting by TinyPic

I love to hear your feedback and comments. Stop by and visit the Facebook page or Twitter for updates!  Or get posts delivered via Email or RSS Feed. Thanks!     

Linky love: Sunday Night Soup


If you never cooked a Whole Chicken before, now is a great time to test it out.  Throughout the winter months, the pricing on whole chickens is always really low.  I find it at least $3/lb less expensive than buying boneless chicken breast, plus you get the benefit of also making your own broth.

This recipe is hearty, easy and makes the best batch of chicken stock without even trying. If you still have a little energy leftover, you can use the chicken scraps (skin, bones and neck) to make a second stock.

I have made this recipe in both the slow cooker and my pressure cooker.  The pressure cooker is clearly faster, but sometimes it’s easier to just let the chicken cook all day.  I did this a lot when I was working full time.  I have found that the meat doesn’t fall apart quite as much when cooking in the pressure cooker so I tend to prefer this cooking method as of late.  See my review of the electric Cuisinart Pressure Cooker here.

Ingredients
1 Whole Chicken~ (3 1/2- 4 pounds is best,  I’ve done 5 lb. fine in the slow cooker, it’s a little large for the pressure cooker.)
2 Tbl Olive Oil
2 cans of chicken broth~ or 14 /12 ounces
2 large onions diced
4 medium carrots peeled and diced
1 (28 oz) can of Whole Tomatoes (do not drain)
1 Tbl Worcestershire sauce
1/2 Cup White Wine
1/2 Tsp Kosher Salt
1/2 Tsp Ground Black Pepper
1/2 Tsp Dried Rosemary or Thyme
2 Sweet Potatoes~ peeled and chopped into one inch pieces (optional)

Instructions
1. Brown Chicken in Olive Oil on a stove-top pan, or on the Browning setting on your pressure cooker or slow cooker.  Set chicken in separate cooker, or on a plate while making step 2.
2. Saute carrots and onion in remaining olive oil.
3. Deglaze pan with 1/2 cup white wine.  Use wooden spoon to scrap up any bits left on the pan.  Add 1 can of chicken broth to pan.
4.  Add all ingredients to cooker.  Add water to cover the chicken.  Make sure you do not go over the fill line.  (ask me about the yucky white spray I ended up with on my cabinets!)
5. Cook on Low for 8 hours in slow cooker, cook on High Pressure for 25 minutes for Pressure Cooker. Use natural pressure release if using pressure cooker.
6. Optional~add the sweet potatoes to the slow cooker at the beginning of the cooking cycle.  If you are using a pressure cooker and want to include the potatoes, set the timer for 20 minutes. Use the Quick Release method and add the potatoes in.  Then reset to High Pressure for 5 minutes. Use natural pressure release.

Serve with a little pasta and Parmesan cheese on top.

I strained the excess liquid and use it as cooking liquid for rice and beans during the week.  Even boil in a bag rice gets some extra nutrients when you cook it in chicken stock.  The stock made with the whole chicken gives you the best results, I even got it to gel for the first time.  I think the acidity of the tomatoes helped draw more of the healthy minerals out of the chicken.

Read Part 2~ How to make your own Chicken Stock in the Slow Cooker or Pressure Cooker.

Image and video hosting by TinyPic

I love to hear your feedback and comments. Stop by and visit the Facebook page or Twitter for updates!  Or get posts delivered via Email or RSS Feed. Thanks!     


Don’t forget to enter to win a set of Wool Dryer Balls! Contest ends 2/15.


Does your meatloaf need a little wake-up call?  I recently saw a few photos for cooking meatloaf in a muffin tin and gave it a try.  If you remember from my Menu Plan Monday post this week, I mentioned being part of a recipe exchange with my playgroup peeps.  Thanks to Aimee G., I got inspired to test out my own spin of Mini Meatloaf.

Mini Meatloaf
Makes 12 muffins

Ingredients
1 lb Ground Beef (or Turkey)
3 cups (1 bag) Broccoli Slaw
7 Tbls Ketchup
1 Tbl Worcestershire Sauce
1/2 Cup Chopped Onion
1 Egg
1 Cup Whole Wheat Panko Bread Crumbs
2 Garlic Cloves minced
1 Tsp Kosher Salt

Instructions
1. Preheat oven to 350 degrees.  Spray muffin tray with non-stick spray.
2. Chop Broccoli Slaw in food processor.
3. Combine all ingredients except 3 Tbl Ketchup in a bowl.  Distribute evenly in muffin tray.

4. Brush remaining ketchup over the tops.

5. Bake for 30 mins until firm and lightly browned.

This is a great way to sneak in a little more veggies into dinner.  Next time we are going to make it and mix half the recipe with Sriracha Sauce. We can label our spicy ones with muffin liners.  I made this batch with 85% lean ground beef, which I feel cooks better (and tastes better) than the leaner versions.  I happily found that there was no excess drippings at the bottoms of the muffins which I was worried about.  They baked evenly and the veggies kept them moist.  I am a huge meatloaf fan and this is a great way to make it quick, instead of in a loaf pan that takes an hour to cook.  I may try to make this as mini muffins next time and serve as an appetizer.

How else do you sneak veggies into dinner?

Image and video hosting by TinyPic
I love to hear your feedback and comments. Stop by and visit the Facebook page or Twitter for updates!  Or get posts delivered via Email or RSS Feed. Thanks!    


Don’t forget to enter to win a set of Wool Dryer Balls! Contest ends 2/15.


This post is shared with the Green Resource at The Greenbacks Gal.

Ok, so these may be a little bit more on the cupcake side than the muffin side.  I make them as mini muffins so they are just a quick treat any time of day.  This is also one of those recipes I find helpful when I have too many carrots leftover in the fridge.  Even when they start getting a little bendy, this will still work.  I have also shredded the carrots and then put it in the freezer for a rainy day cooking project.

Carrot Cake Muffins 

Ingredients
1/2 Cup Whole Wheat Flour
1/2 Cup All-Purpose Flour (also works with all whole wheat flour, it’s just slightly more dense)
1/2 Tsp Cinnamon
1/2 Tsp Nutmeg
1 Tsp Baking Soda
1/8 Tsp (or Pinch) of Salt
2 Eggs
3/4 Cup Sugar
1/4 Cup Brown Sugar
1/2 Cup Coconut Oil (or Vegetable or Canola oil)
1/2 Pound Carrots, shredded (box grater or food processor shredder)
Instructions
1. Preheat oven to 350 degrees. Place liners in muffin tin or just grease with coconut oil to make 12 cupcakes, or 24 mini muffins.
2. Measure all dry ingredients into a bowl and mix with a whisk.
3. In a separate bowl, combine the eggs, sugars and melted coconut oil. I find it helpful to work with room temperature eggs when dealing with coconut oil so it maintains a liquid form.
4. Combine wet and dry ingredients in the largest bowl. Fold in shredded carrots.
5. Fill muffin liners until full and even across the tray.
6. Bake 15-20 minutes for muffins, and 13-18 minutes for mini muffins. My mini muffins took about 15 minutes, just watch depending on your oven temperature.
7. Let cool in the tray for 5 minutes, then transfer to cooling racks.
Instructions
Enjoy!

Image and video hosting by TinyPic
I love to hear your feedback and comments. Stop by and visit the Facebook page or Twitter for updates!  Or get posts delivered via Email or RSS Feed. Thanks!      


This recipe is being shared at Frugally Sustainable, Permanent Posies, Real Food Forager and Melt in your Mouth Mondays.

Slow Cooker Tomato Soup at RandomRecycling.com

Ever try to make your own Tomato Soup?  After reading the label on my favorite tomato soup, I decided to test out other organic options.  Nothing ever hit the mark.  I’ve cooked it before on the stove and never really been happy with the results.  Finally tried it in the crock pot and it came out fabulous!  I served it alongside grilled cheese sandwiches for a simple dinner one night, then added barley to it to make it into a lunch.

Slow Cooker Tomato Soup at RandomRecycling.com

CROCK POT TOMATO SOUP

Course: Soup

Ingredients

  • 1 large Onion chopped.
  • 1 stick of butter
  • 28 oz Can of Whole Tomatoes
  • 1/2 Cup White Wine I used Sauvingnon Blanc
  • 1 Tbl Sugar
  • 1 Tsp Dried Tarragon
  • Sea Salt
  • Sour Cream for serving

Instructions

  • In a large skillet, melt the butter on medium heat. Add onion and cook for about 15 minutes until softened. Stir often. (Or, set slow cooker to saute and complete this task in the main cooker.)
  • Add tomatoes (do not drain), wine, sugar and tarragon into the crock pot. Add onion and butter. Cover and cook on Low for 5 hours.
  • Puree using an Immersion Blender
  • or in a blender in batches. Season with salt. Serve with cold sour cream.
Tried this recipe?Mention @emilyroachwellness or tag #erwellness!

Enjoy!


Healthy Homemade Chicken Nuggets

Skip the drive thru and the frozen food aisle.  Here is an easy chicken nugget recipe that is both kid, and husband, friendly.  I grew up eating these and I have hardly tweaked the original recipe from the Eater’s Choice cookbook.  Now I make sure to cook enough so there is leftovers for the kids lunches.

A note about breadcrumbs.  I use the heels of my bread and pulse them in the food processor.  I have also used panko breadcrumbs as well and they come out just as crunchy.

Healthy Homemade Chicken Nugget Recipe

Kid-approved healthy chicken nuggets are a winner at the dinner table.
Prep Time: 8 minutes
Cook Time: 15 minutes
Total Time: 23 minutes
Cuisine: American, dinner
Servings: 4 servings
Author: Emily

Ingredients

  • 3-4 Boneless Chicken Breasts
  • 2 Tbl Olive Oil
  • 2 Garlic Cloves
  • 1/4 tsp ground black pepper
  • 1 Cup Breadcrumbs 2-3 pieces of bread
  • 1/4 tsp cayenne pepper
  • Dipping Sauce~ 2 1/2 Tsp Honey and 2 Tbl Dijon Mustard

Instructions

  • Preheat oven to 425 degrees.
  • Cut chicken into bite size pieces, about 8 pieces per breast.
  • Mix oil, garlic, pepper and chicken in a zip top bag and marinate about 30 minutes. (You can do it in the morning and let it sit till evening, or just marinate for a few minutes, it doesn't make a huge difference in taste.)
  • Mix breadcrumbs with cayenne pepper. Roll chicken pieces in bread crumbs and place on a large cookie sheet. I line my cookie sheet with parchment paper to make clean up easy.
  • Bake 15-17 minutes until lightly browned and cooked through.
  • Use honey mustard sauce or ketchup for dipping.

Notes

Updated: Instead of a breadcrumb topping, you can coarsely chop 3/4 cups of nuts. Pecans, walnuts or almonds are all healthy choices. If you choose a nut topping, omit the garlic from the recipe.
Tried this recipe?Mention @emilyroachwellness or tag #erwellness!


Healthy Homemade Chicken Nugget Recipe


Chicken Nuggets Honey Mustard Sauce

Enjoy this healthy homemade chicken nugget recipe. I’ve been eating this version since I was a kid!

After a few rounds of making my own yogurt, I feel confident enough to share my steps for how to make yogurt in a slow cooker.  I’ve tried to make it in the past using a stove top method with thermometers involved, but never found it that easy.  The slow cooker method is easier, you just need to plan your time accordingly.

How to  Make Yogurt with a Slow Cooker

How to make yogurt with slow cooker
Ingredients
1/2 Gallon of Milk ~ cannot be Ultra-Pasteurized, which many Organic milk products are.  I have found Organic Pasteurized milk at Trader Joe’s that worked fine. Local, farm fresh milk is what’s I’m using.
1/2 Cup Plain Yogurt, called the “starter”.  Once you make up your first batch, you can save a 1/2 cup and use for a future batch.
Instructions
Pour all of the milk into a slow-cooker and turn to Low. Leave it on for 2 1/2 hours. Check that the temperature is around 180 degrees as you learn how hot your slow cooker runs. They are not all created the same.
Unplug the cooker and let it sit for 3 hours.
At the end of 3 hours, mix in the 1/2 cup yogurt starter to the warm milk.  I slowly whisk in the yogurt.
Cover the slow cooker with a thick bath towel to retain heat.  Let the slow cooker sit overnight, or at least 8 hours.  Refrigerate in the morning.
That’s it!  In the morning, you have yogurt.  While I like it cool, I have eaten it right away in the morning, and so have the kids.  I’ve tried my starter using both Plain and Vanilla and each worked fine, just choose according to your taste.  I use my yogurt for baking and also to serve with my Homemade Granola. I usually mix fresh fruit in my yogurt and granola breakfast so I don’t care for fruity yogurt.  If that’s how you roll, you can make a puree in the blender of fresh or frozen fruit and then blend it into the yogurt.

What do you think? Will this take some of the burden off your yogurt expense each week? Let me know if you have any questions about how to make yogurt with the slow cooker.

I have been testing out my new Cuisanart Pressure Cooker and recently tried to make risotto.  I find it difficult to make risotto on the stove top since it requires so much attention, but I love it.  In our quest to avoid relying on packaged goods, I wanted to find a way to make risotto that works for us.  By using the pressure cooker,  I was able to make the risotto on a weeknight, while the kids played in the kitchen.

I do some of prep work for dinners while the kids take afternoon naps so the shallots and garlic were already chopped once I got started.  In the evening, I prepped the shrimp by cutting the tails off with kitchen scissors.  It was easier than expected and everyone ate it so this will be repeated in our menu plans to come.

Pressure Cooker Parmesan Shrimp Risotto

Ingredients

·                                 1 1/2 tablespoons butter
·                                 2/3 cup finely chopped shallots (about 2 large)
·                                 3 garlic cloves, minced
·                                 1 1/3 cups uncooked Aborio rice
·                                 1 cup white wine divided
·                                 3 cups fat-free, lower-sodium chicken broth (I used broth made in the pressure cooker)
·                                 2 ounces fresh Parmigiano-Reggiano cheese, divided
·                                 1 lb Cooked Large Shrimp, tails removed (I use scissors to cut off the tails)
·                                 1/2 teaspoon grated lemon rind
·                                 1/4 teaspoon freshly ground black pepper

Preparation

1.                               1. Heat a 6-quart pressure cooker over medium-high heat, or use the Saute function. Add butter to cooker; swirl until butter melts. Add shallots; sauté 2 minutes. Add garlic; sauté for 30 seconds, stirring constantly. Add rice; cook 1 minute, stirring constantly. Add 1/2 cup wine; cook 1 minute or until liquid is absorbed, stirring constantly. Stir in remaining 1/2 cup wine and broth. Close lid securely; bring to high pressure over high heat. Adjust heat to medium or level needed to maintain high pressure; cook 8 minutes. Remove from heat; release pressure through steam vent, or place cooker under cold running water to release pressure. Remove lid. Grate 1 3/4 ounces cheese; stir in grated cheese and remaining ingredients, including shrimp. Let stand 4 minutes to thicken. Shave remaining 1/4 ounce cheese, and top with shavings.
Adapted from, 

Image and video hosting by TinyPic
This post is being shared via the Green Resource, hosted by A Delightful Home, and also TidyMom.

Need a new recipe for a New Year’s Brunch?  Or maybe a cozy breakfast-for-dinner idea on New Year’s Eve?  I highly suggest the Baked Pumpkin French Toast I found over at Simple Bites.  We made it for Christmas morning brunch and it came out AWESOME!
I set it up the night before so everything soaks into the bread.  In the morning, just pop it into the oven for about 40 minutes and you are ready for a new favorite breakfast treat.

Ingredients
  • 1 loaf hearty whole wheat bread, sliced  (no floppy bread or it will come out too mushy)
  • 3 large eggs
  • 1 cup milk or cream
  • 3/4 cup pumpkin puree ( I used canned)
  • 1/4 cup salted butter, melted
  • 2 Tablespoons molasses
  • 2 teaspoons pumpkin spice blend
  • 1/4 cup brown sugar
Instructions
The night before…
  1. In a medium mixing bowl, whisk together eggs, milk, pumpkin puree, 2 Tablespoons melted butter, molasses and 1 teaspoon pumpkin spice blend.
  2. Dip each slice of bread into the mixture to coat well, then place, one layer thick, on a 13×17 baking sheet. Drizzle any remaining pumpkin mixture on top of the bread.
  3. Place plastic wrap over the soaking bread slices and refrigerate for 8 hours or overnight.
In the morning…
  1. Preheat the oven to 350°F. Generously butter an 8 x 11 baking dish. (I use coconut oil to “butter” my pans, and I used a smaller circle casserole dish instead to better fit the bread)
  2. Mix together brown sugar with remaining teaspoon of spice blend.
  3. Remove plastic wrap from the soaked bread and brush tops lightly with remaining 2 Tablespoons of melted butter. Sprinkle French toast tops all over with cinnamon sugar mixture.
  4. Starting with the smaller pieces, arrange the slices of bread in the buttered baking dish, propping them up on top of each other until the pan is full. Place on the middle shelf of the oven and bake for 35-40 minutes until the tops are crispy.
  5. Serve at once with Molasses-Cinnamon Syrup or pure maple syrup, and whipped cream.

Both kids ate the french toast for breakfast so that always makes the recipe a keeper in my book.

If you haven’t checked out Simple Bites yet, head on over as there are so many other delicious recipes waiting for you!
Image and video hosting by TinyPic